One of the easiest starter projects for a hopeful leathersmith, is a pair of leather vambraces. For the most basic vambraces you will need the following materials:
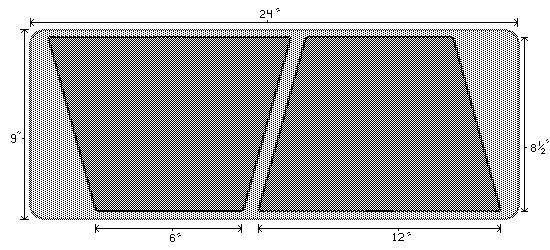
1.) One piece of leather (soft) 9"x24"
2.) Two (2) long leather laces.
3.) About 2-3 dozen medium eyelets (optional design 1)
4.) Eyelet tool (optional design 1)
5.) Leather sewing needle (optional design 2)
6.) Strong thread (optional design 2)
7.) Heavy duty scissors.
The most expensive material will be the leather. One of the most common sources of leather (here in the states) is Tandy Leather which you can find on the net. However, you may be able to find a dealer in leather good who will be willing to sell you small scraps of leather, but you will most likely not be able to get a single piece as large as 9" x 24". If that is the case, you may have to break up the pattern into two pieces.

Cut out the leather pieces as shown in the layout, but don't throw the scraps away! You may need them latter. Before you cut anything out, however, you should confirm that the dimensions I have shown actually fit comfortably around your arm. Make sure it doesn't overlap or leave to large of a gap. If it does you may have to alter the dimensions accordingly.
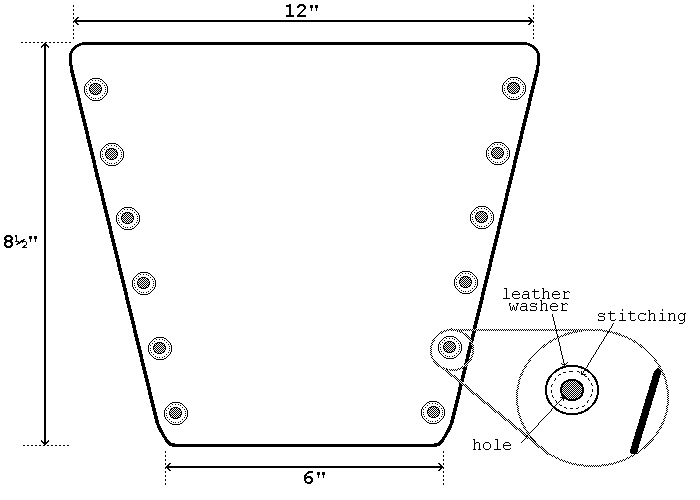
Once you have cut out the two pieces, you will have to make a few holes along each end of the vambraces. You will have to use a leather punch or a awl to make the holes. Be careful not to make the holes too close to the edge of the leather. 'Too Close" will depend on the size of the holes you are making. The size of the holes will depend upon the thickness of the leather laces you want to use.
There are a number of basic options that you have to reinforce the holes to aid in the lacing and strengthen the holes themselves. The first is to use metal eyelets which can be found at any fabric or craft stores. Just make the holes large enough to accept the eyelets and affix them to the leather using a standard eyelet tool.
A second, and more period, method of strengthening the holes is to use leather washers. Cut a few leather washers from the extra leather scraps. Make the inner diameter slightly smaller than the holes, and the outer diameter about 1/2" larger than that (so there is about 1/4" around the hole). Then use a heavy sewing needle to make stitches around the washer hole. The benefit to using the leather washer method, is that your completed piece is made entirely of leather and can be wax hardened using any number of methods.
