 JET-JOHNSON
 JET-JOHNSON
This Page contains detailed information on how I put a computer in my car, and use it for music, DVD video, GPS navigaion, XM radio, and Internet access.
Concept; Using current components and online resources, I wanted to build a custom sound system for any vehicle, and keep in "IN DASH".
WHY?; With so many sterio manufactures like Pioneer building In dash Navigation. Because I can! Also, with a "Computer" in my car, I can not only run music, DVD, Rear view camera ect... But I am capable of running application such as Internet Explorer for internet access, CD ripping software so all my CD's are stored on a hard drive. No more worries about scratching or loosing CD's.
I am NOT a software programmer (yet, Its on my list of sh*t to do while I work on my Engineering Degree). I have had a lot of experience with electronics (hardware) and sterio equipment, along with fiberglass experience and AutoCAD. IT WILL FIT!
General Specs;
| VIA EPIA MII 1200 Mini-ITX | Logic Supply |
| Automotive 90W DC-DC M1-ATX | Logic Supply |
| Panasonic slim CD-RW/DVD | Logic Supply |
| Notebook 2.5" HD 80GB | Logic Supply |
| Phylon 7" VGA TFT w/Touchscreen | Logic Supply |
| 512MB Ram | Logic Supply |
| iOne scorpius Wireless keybord | Logic Supply |
| 40mm auxillary Fan | Logic Supply |
| Morex 80w power kit (A/C power) | Logic Supply |
| iGuidance V2.1.3 GPS Navigation | USGlobalSat |
| Alpine MRV-F450 5Chan Amp | ebay |
| XM Direct Reciever | Walmart |
| XM Subscription | XM radio |
| Linksys Wireless PCMCIA network card | Walmart |
| VZ Access PC5740 Broadband Access Card | Verizon Wireless |
| Alpine ALP-1 Alpine Sirius Tuner (see below USB PC adapter) | J-Dub Audio |
| Sirius to USB Interface by Mitch | MJ's Gadgets |
| OS; Win XP Pro | |
| Front End: RoadRunner | GUINO-Free |
| SPENT SO FAR (6-08-2006) | $1,950 est. |
Date Started: 11-1-05, Parts ordered from Logic supply & PCConnection
Full Running System Finished: 11-20-05, Including 98% of the bugs worked out, running system with GPS, XM, DVD, Video, Applications, Skin, and "IN DASH" case built. Just waiting for the AMP to show up so I can install it in my car.
"100%" (running): 11-26-05, installed into car, MY Carputer v 1.0 with Alpine V-12 AMP, Rockford 12" Sub, fully operational. Still working on a cupple little bugs.
"100%" (running): 6-8-2006, installed into Truck, MY Carputer v 2.0 with Valor DVD 2 din DVD/TV/CD/AM/FM 6.5" monitor, 7" Monkey video Headrest monitors (installed by J-DUB AUDIO), Computer mounted under passenger seat with Mini VIA Case.
Ok, the first step was to sift through all the components when they showed up. Then I had to find a case or something I could use to do the setup (I didn't buy a case because I planed to build my own). I found a case for an old computer that I was able to use just fine. I installed the memory and hooked up the HDD and DVD drive. This requires adapters available from Logic Supply; to adapt from the Notebook style drives, to a standard IDE cable (which is supplied with the VIA mainboard). I bought an AC power supply so I could do the installation of software in the comfort and warmth of my house. This installs easily, hook up the power in cable, then hook up the power cable to the mainboard. The plugs can only go in one way so you can't mess it up. I also split off the 12V power supplying the power board to my monitor, which also runs off of 12V. I then found some LED lights to use to show power and HDD activity. I also found a power button to use to turn it on. (The LEDs and switch were ones I had stashed in my closet from previous computers that I junked, but kept the spare parts)
Quick note: I used a standard PS2 mouse and keyboard during initial setup of Windows, then installed the wireless keyboard later on.
Finally, lets turn it on! What the hell is going on? Oh, ok. I ran into a problem righ off the bat. Both my HDD and DVD drives were set to master; thus, a conflict which I had to solve by setting the HDD as the slave. (I did this because the DVD drive didn't give any clue as to how to set it to slave). Then, into the BIOS with the delete key to set my desired parameters. I set the CD_ROM drive as primary boot device (for inital setup only); I changed the time, and set other peramaters where I wanted them for my build.
Ok, onto the Windows XP PRO install. This is very straight forward, as you only have a few things you have to set. Once Windows was installed, I setup my keyboard, touchscreen monitor, PCMCIA wirless network card and installed the supplied drivers for the VIA mainboard. Once all the hardware was all set up and working, I went to Microsoft's Webpage and downloaded ALL the available updates. This is important (especialy were my Windows XP version didn't have SP2) because there are security updates and even driver updates for the VIA mainboard. Once all the updates were downloaded and installed I began the setup for putting it in my car.
First thing I did was go download RoadRunner by GUINO. I highly recomend running the update software, and download the most recent version of RoadRunner. This will prevent any problems later on. You will also need to download WinAmp. You can use the most recent version, but I am using Version 2.95 because it loads a cupple seconds faster. It is available from OldVersion.com
Once RoadRunner was installed I went through the RRconfig program and set my location for WinAmp, where my music was located on the hard drive, and selected the BMV2 skin located in my C:\Program Files\Road Runner\skins\ folder. I selected to use the internal DVD player, use an external GPS program, and select the 'Line In' for use with the XM radio. Also, I changed the audio control from "All Lines" to "Master" only. This was because I was having problems with the audio control.
On to the Fun stuff. XM First. There is a very good forum at MP3CAR.com on how to set up your XM. The only problem is that MP3Car.com only works about 1/3 of the time I need it so I downloaded it. So here is what it says: (Thanks Prindle19)
OK, as my first tutorial, I would like to share with everyone the way i beleive to be the simplest, cheapest,
and most desireable way to integrate XM radio into your car computer.
After weeks of work, I have come up with a simple process that I beleive to be the best, and here we go.
First of all, lets briefly discuss Hibernation. Since it is the method most of us use to shut down / start up our
computers when we turn the ignition key, an XM instalation should be aware of this unique power managment situation.
I would suggest STAYING AWAY from USB solutions, as they are notorious for having hibernation issues. That is why i
suggest a simple serial interface anyone here should be able to build, and an XM direct unit.
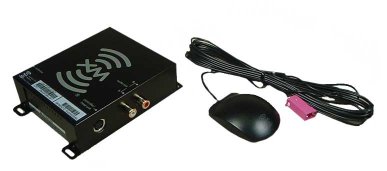
Well, you could go spend upwards of $50 to buy a pre made cable, but what if i told you you could make it yourself for only $15 in parts, and only needed to solder 5 lousey wires??
Lets borrow the advice from iHacked.com and I'll show you how to build your own serial interface cable.
Parts list:
* 8 pin mini-din plug. If you can get your hands on a older mac
	printer cable, it has the correct style of plug.
* female db9 connector & hood
* Wires to connect it all up.
* 12 volt tap. (get it form somewhere)
EDIT: I bought my cables from PCConnection.com
Cable Pinout
8 pin mini-diin to db9
pin 1 = pin 3 Data Receive
pin 2 = pin 2 Data Transmit
pin 3 = pin 5 Ground
pin 6 = 12v
pin 7 = 12v
pin 8 = gnd
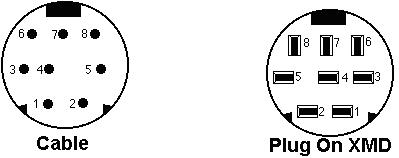
Now, the colors on the 8 pin mini diin cable may be different, and i assume they are, but using a voltage tester you can easily figure out which pin corresponds to which wire.
Here's how mine worked out.

1 Brown
2 Red
3 Orange
4 Yellow
5 Green
6 Blue
7 Purple
8 Black
Shroud Silver.
EDIT: My Belkin cables from PCConnection were like this:
8 PIN MINI-DIN
1 Black
2 Brown
3 Red
4 Orange
5 Yellow
6 Green
7 Blue
8 Purple
Shroud Silver

9 PIN DB9
1 Orange
2 Red
3 Brown
4 Black
5 Yellow
6 Orange
7 Blue
8 Green
9 Not Used
shroud silver

I also used a DB9 Cable instead of an end connector (backordered).
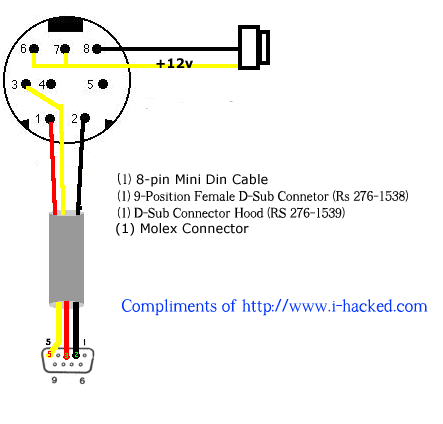
I soldered and heat shrinked the wires together like this:

8 PIN Mini-DIN		9 PIN DB9
1-Black  <------------> 3-Brown
2-Brown  <------------> 2-Red
3-Red    <------------> 5-Yellow
6-Green  <------------> 12v + (positive)
7-Blue   <------------> 12V + (positive)
8-Purple <------------> 12V - (negative)
So of those, these are the ones we care about

DIN | Serial DB9
6 Blue | 12v+
7 Purple | 12v+
8 Black | 12v ground
3 Orange | Pin 5
1 Brown | Pin 3
2 Red | Pin 2
So, just solder that up, and i suggest using a molex connector for the power; that way you just solder the other half of the molex connection into your clean 12v power source near your car computer and can easily connect and disconnect the cable if you need to.
Here's an example of the finished product.
Ok, so now we have an XM direct unit, and a cable to connect to a serial port. OH NO! we have our gps plugged into our one EPIA onboard serial port!!! Lets run out and get a usb to serial converter.....NO, LETS NOT!

EPIA boards do have an extra comport, but they consist of simply a header on the motherboard as shown above. Now this is really simple, all you need to get is either from a mom and pop computer store in town, or somewhere online, a riser serial extension cable, shouldnt cost more than $4.00 MAX.
BUT!!!!! Save your self some time, and listen closely, there are two styles of riser cables...and if you have the wrong one, you will pull your hair out like i did for 5 days.
So here we go.
There are 2 types, V1 (which we want) and V2(which we wish never existed)
V1 styles correspond to the pins on our motherboard correctly, and look like this:
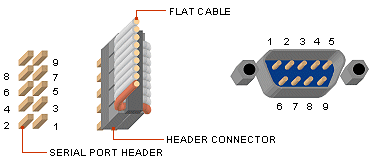
V2 styles DO NOT match our motherboard, and look like this
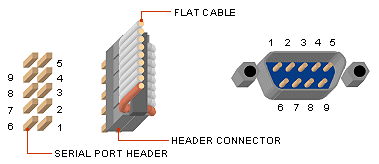
So how do we make sure we get a V1, and not a V2.
Well, you can bring a voltage tester to the store like a nerd....like i did, or you can save from being laughed at by the owner by going to the bin of serial header cables, and simply looking for ones that are wired streight at the head, or crossed. We want the crossed ones.
NOT CROSSED (THROW THIS BACK)
Crossed (KEEP IT AND GO HOME) Now, connecting to the motherboard is really easy, all you do is align the red striped end of the cable towards the PIN1 on the motherboard and press the connector on.
Ok, so connect the cable you built to the new serial port, and then connect an RCA to stereo mini cable into your line in port on your carputer. Hardware woes are now over.
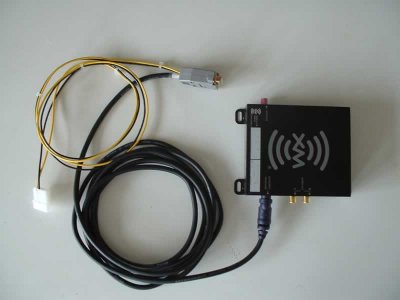
Now, as for software. Everything stinks for using in the car, mainly for hibernation issues, except for Frodo's XM application, which is still an Alpha, but is absolutely outstanding for an Alpha.
Following my guide, and using Frodo's application , you will have rich sounding XM radio in just a few hours, and hopefully no headache. Best of all, theres nothing to connect/disconnect every time you hibernate, Frodo does it all through his software. Hopefully this software will be updated soon to allow it to be embeded in programs such as Centrafuse, and to allow you to quickly and easily store your favorites.
Enjoy!
Prindle19
Thanks Prindle19 for the tutorial
Now where I decided to use RoadRunner I have had NO major problems with my XM unit. I have had a cupple times during a cold start (not coming out of Hibernation) where it has excesive noise, but by exiting from RR and restarting RR it starts working just fine. Xm is 100% incorporated into RoadRunner, no outside programs are needed.
My recomendations; Use RoadRunner or another well known program for XM. I HIGHLY sugest that you activate your XM Direct box on an existing platform. (EX: the head unit in your car) I have XM in my Jeep so I was able to disconnect my other XM Direct box and get the new box activated and working so I KNEW for 100% that it was working before I started testing with my computer cables. You can activate the XM Direct form XM Radio's website. XM service is about $100/year.
I am using a USB GPS so I didn't have to get the header cable for my install. You also will have to use a male RCA to 1/4" male (headphone style) jack. This is required to bring the actual audio into the computer. I used the "Line In" plug.
Wait! what about FREE FM radio? To HELL with FM, is what I say. I hate FM radio and it's bull. I hate comercials, and I live in a small town where we have 3 Country stations, and 1 sortof good, pop/rock station. My solution is XM and over 50 GIG worth of Ripped MP3's from my CD collection and my brother's collection. If you don't have this or if you do want FM radio; RoadRunner has support for some USB style FM recievers, but I have not read very many good things about any reciever. There are also PCI card radio/TV recievers out there but you will just have to check around with the MP3Car.com forums (if they are up) to see what other people are using.
OK, now to the GPS! This was VERY easy. I bought the iGuidance Navigation software and GPS reciever from USGlobalSat and installed the software using the included DVD and CD for the reciever, and about 30 minutes later I had GPS Navigation on my Computer. I installed the software on my Laptop first for testing, and it works great. It took me right to the nearest Olive Garden restaurant. The software has voice commands along with a easy to read map.
The only Setup in RR that I had to do for the GPS was to select the location of iGuidance in the RRConfig file.
Ok, this next section is going to go into detail of how "I" setup my carputer for my "Personal Likings". There are some things that I use in RR and some things that I don't. So I modified it to my needs.
First off, the skin. I liked the BMV2 skin that came with the installation program of RoadRunner, but it just seemed to lack the ease of accessing my CD drive to play music if I had a friend want to listen to one of their own CD. So what I found was the CFX skin. This skin has a good appearance and in the MUSIC screen it allows you to load a audio CD. It saves the playlist that you was listening to at the time the CD was loaded, loads the CD and lets you listen to it. Then when your done listening to the CD, you can Eject the CD, and restore your previous playlist easily with the touch of a cupple buttons on the screen. It doesnt't get any better than that!
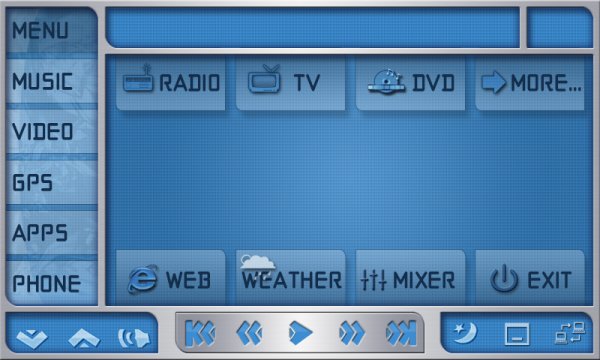
I'll download the installation tutorial for this skin as soon as I get a sec, and post the links to download the skin here also.
Even though the CFX skin is awesome, there still was a cupple ADDED features that I didn't use. Like the "Radio" link loads the FM radio which I don't have. Also, I have had nothing but grief with the built in CD Ripping software included with RoadRunner so I needed to do some changing. In comes the RoadRunner Skin Editor available through Guino's Website.
What I changed: First off, I changed the Menu button for RADIO to load the XM skin. I changed the COMMAND for the RADIO button from "RADIO" to "XM". This now loads my XM directly from the Main Menu.
Next, I changed the CDRIP button. In the Menu2.skin I changed the CDRIP button from "CDRIP" to "RUN;C:\Program Files\Windows Media Player\wmplayer.exe" which now will launch the external program Windows Media Player 10. I reccomend using WMP10 because it allows ripping of MP3's, WMP 9 or earlier only allow ripping to WMA format. Which won't work with my iPod thus, using Media Player 10. WMP10 is available for download form Microsofts Downloads for FREE when using genuine Windows Operating Systems.
Also, the original CFX comes in 800x480 screen size, I am using an 800x600 resolution, so I had to change the skins "General.ini" file. Open it in any text editor, I use Notepad for all my text editing. The file when opened shows this:
OriginalWidth=800
OriginalHeight=480
ShowWidth=800
ShowHeight=480
XPosition=0
YPosition=0
ApplyToVideo=False
ApplyToVisu=False
AutoSwitch=False
DayTime=8:00:00 AM
NightTime=6:00:00 PM
GammaDayRed=0
GammaDayGreen=0
GammaDayBlue=0
GammaNightRed=-40
GammaNightGreen=-40
GammaNightBlue=-40
What your going to want to change is "ShowHeight=480" to "ShowHeight=600".
Ok, so it works, I want to make it better. This is where we get technical. What we want to do is set it up so that I can actually use this computer as a "IN-DASH-Audio System". To do this I wanted it to boot quickly, load directly into RoadRunner, and hide all unneeded Windows crap. There is a good forum here; MP3car Forums (if its working). Or you can download a copy of this post from Here. Or HERE for a self extracting version of the entire forum posting.
The post helps out a lot, but this is what I did on my system. I had a problem with RoadRunner wanting to be the Shell. With Windows trying to load RR as the Shell it actually took longer for my system to load, then if I loaded Windows, then RR. I also would rather be able to access Window's quickly so this is what I did.
Load RR on startup:
Step 1: Click Start > Run > regedit
Step 2: Browse to HKEY_LOCAL_MACHINE \ SOFTWARE \ Microsoft \ Windows NT \ CurrentVersion \ Winlogon
Step 3: In the right pane, find and double-click Shell
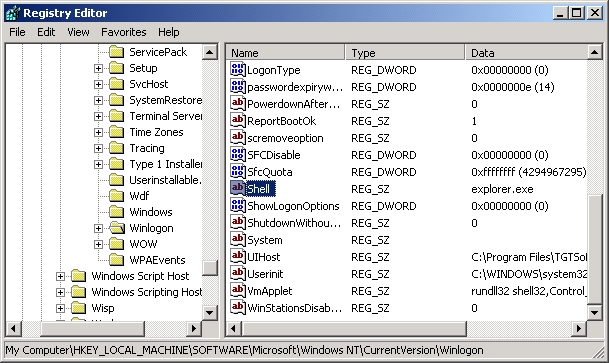
Step 4: After Explorer.exe add the complete path of your front end and hit OK.Note: For me it was Explorer.exe "C:\Program Files\Road Runner\rr.exe"
Also, note the quotation marks at the beginning and end of the path.
Then Disable Status Messages During Boot, Logon, Logoff, & Shutdown:
Step 1: Click Start > Run > regedit
Step 2: Browse to HKEY_LOCAL_MACHINE \ SOFTWARE \ Microsoft \ Windows \ CurrentVersion \ policies \ system \
Step 3: In the right pane, find and double click DisableStatusMessages
Step 3b: If you do not have it, click Edit > New > DWord Value. Name the new DWord as DisableStatusMessages
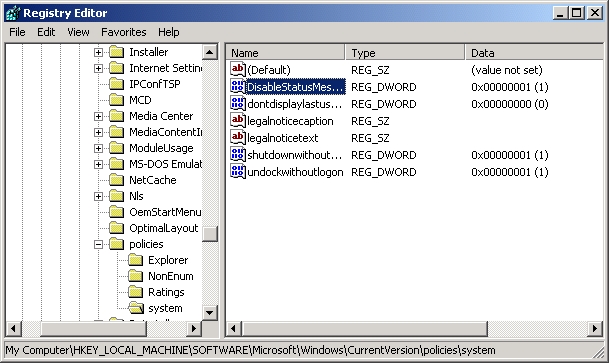
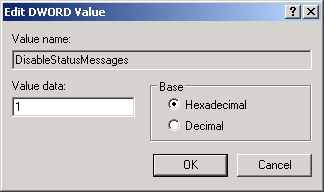
Step 4: Double click DisableStatusMessages and change the value to 1 and hit OK
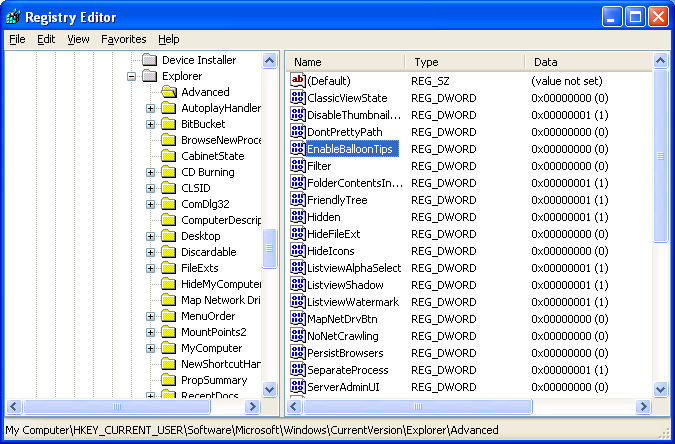
Get rid of pop-up baloons:
Use Regedit to navigate to:

HKEY_CURRENT_USER\Software\Microsoft\Windows\Curre ntVersion\Explorer\Advanced

1.) Create new DWORD value, name it EnableBalloonTips
2.) Set it to 0.

If EnableBalloonTips is already there and equal to 1, set it equal to 0.
Quit the registry editor, log off, and log back on. No more annoying balloon tips.
Power button, Go into hibernation. I want to start my computer faster. So in conjunction with my DC-DC power supply, I want my computer go go into hibernation.
In the Control Pannel \ Display \
-While here, I set the the desktop to "NNONE" and Screen Saver to "NONE"
under the Screen Saver Tab;
there is an option for POWER setting.  Click the Power... button.

In Power Schemes I selected the "Portable/Laptop" scheme
I set Turn off Monitor to "Never"
Turn off hard disks to "After 30 mins"
System standby to "Never"
and System Hybernates to "Never"

Then under the "Advanced" tab I selected
When I press the power button on my computer
"Hibernate"

Then under the "Hibernation" tab select
"Enable Hibernation"
What this does is gets rid of the desktop and screen saver. It also sets the computer so the monitor never turns off during the middle of playing your music. If your using XM only on a long trip, it shuts off the HDD to prevent any possible chance of damage. Also when my DC-DC power supply sends the "Power off" signal to the mainboard, it will go into hibernation instead of shutting down. This also plays into my greater plan. Later on I'll discuss how I use the power button on my monitor to be able to turn on and off my carputer without needing the key in the acc. position. I can also perform a hard shut off by holding the button for 4 seconds if the system locks up.
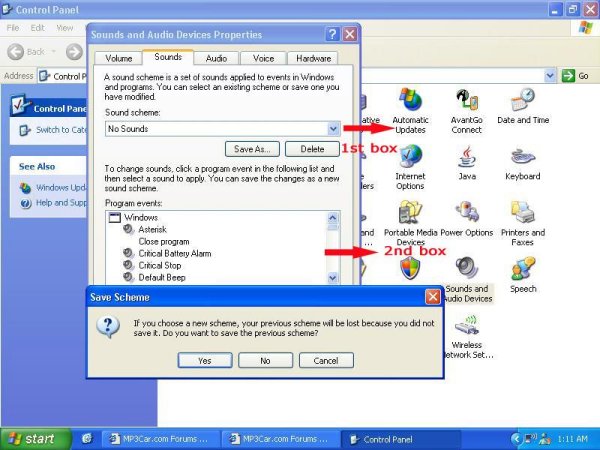
Get rid of Sound themes
Thanks; thanatos106So the way to do it is going to control panel\sound and audio devices\sounds and kill all the schemes (global ) by puting "no sounds" in the firts box or killing one by one in the second box.
Now I want to start the computer and monitor from 1 button. Why? Because I don't want to have to turn the monitor on and off, or just leave it on. This is capable using the Automotive 90W DC-DC M1-ATX power supply and some careful surgery on my monitor. This will only apply if your monitor has it's own on/off switch.
First some understanding of the M1-ATX power supply. It is a DC-DC power converter. What??? It's input source is 6V to 30V DC. It is designed to monitor and REGULATE the voltage to protect your PC from over power. At the same time it watches the input Voltage, if it drops below 11V for more than one minute it will shut off the computer and perform a hard shutoff of the power board its-self in order to prevent 'deep dischard' of your battery. Whats this?! It's smart enough to keep me from running my radio until my battery is dead...I can still start my car GOOD DEAL! It also has optional Off Delay/Hardoff settings. I have mine set for OFF at 5 seconds, and HARDOFF to NEVER. This basicaly says that after 5 second of no Ignition(ACC.) signal to the power board it sends the "Shutdown" signal to my computer. It will never go into a HARDOFF. So I can turn on my computer form an external ON/OFF switch whenever I want to, and I don't have to worry about needing a key on running other Accesories. But it will still shut off if my battery level drops below 11 volts.
Ok, on to the button. The power board has an "External Power Button" feature. What I did was tie it to my power button on my monitor. To do this you have to take your monitor apart to get into the power button.
DISCONNECT YOUR POWER! Don't mess with electronics, there is no point in risking buring up a $250+ item because your being stupid. Don't let the smoke out, it's impossible to put it back in if you burn it up.
Warning; This may void the warranty on your monitor, so do it at your own risk. I did.
Remove the screws holding the monitor together. Carefully separate the two halves, don't disconnect cables unless you have to. The plastic front of my monitor was able to completely come off the screen and all other electronic boards. The only cable I disconnected was the connector that connects to the printed circuit board which contains the buttons.
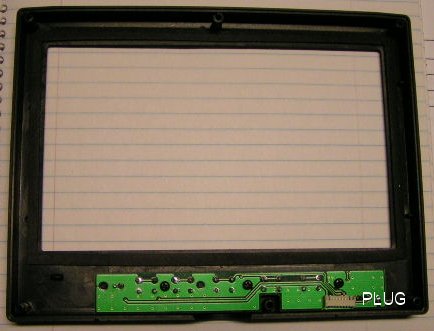
To find out which wire I had to splice into I took the above circuit board off. On the other side the pins were labeled. GOOD DEAL! I didn't have to do any work tracing out which pin tied to the power button. I needed pin 5. Easy enough, pin 1 was labeled. So I just counted over to the 5th wire from the 1 side. Then, about 1" from the connector I used an razor knife and stripped off the insulation for about 1/4" of the wire. I didn't want to cut the wire, just splice into it. If I did cut the wire it would have been too short to solder back together. At this point I decided the only way to get a piece of heat shrink onto the wire was to remove the pin form the connector end. Using the blade of my razor knife I was able to lift the little plastic tab holding the pin in place, and remove the pin from the plug end.
At this point I slid on a piece of heat shrink, and soldered the end of a similar guage wire onto wire 5. Covered it with the heat shrink, and put the pin back into the plug end.
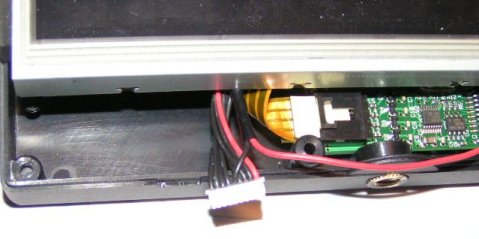
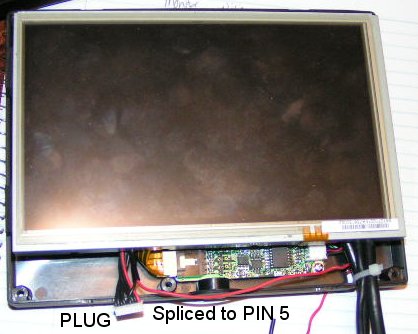
The other end will plug into the 2 pin plug (J8), the pin closest to J6, on the Power supply board.
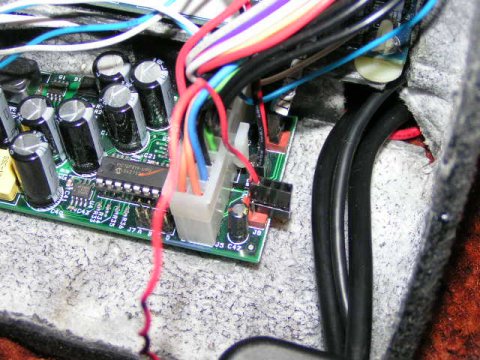
Voilla! I now can turn on the entire system from the power button on the monitor, and when I turn the key in my car to ON it will turn on everything without any input from me.
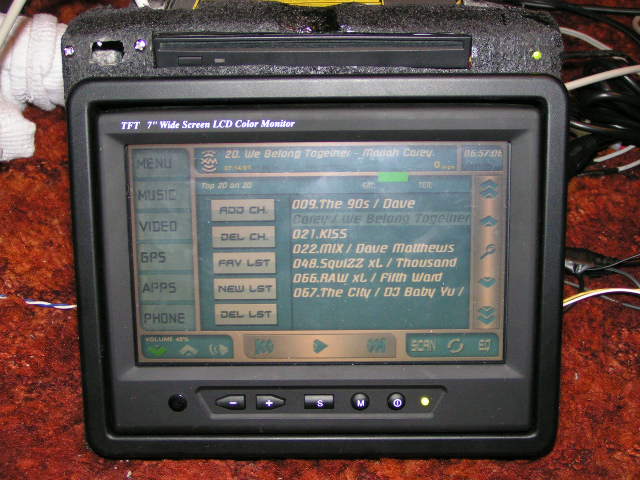
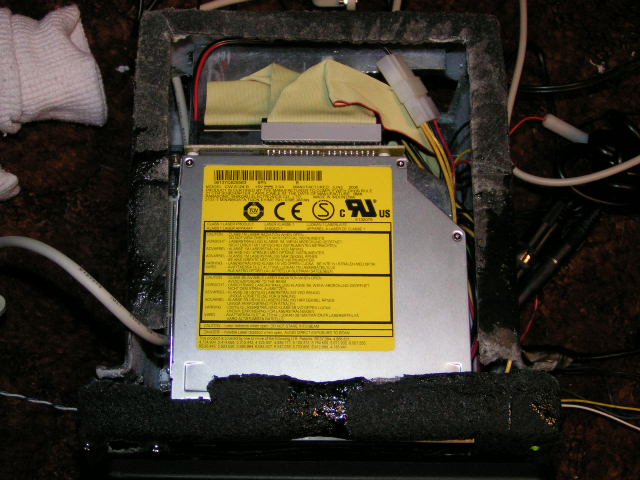
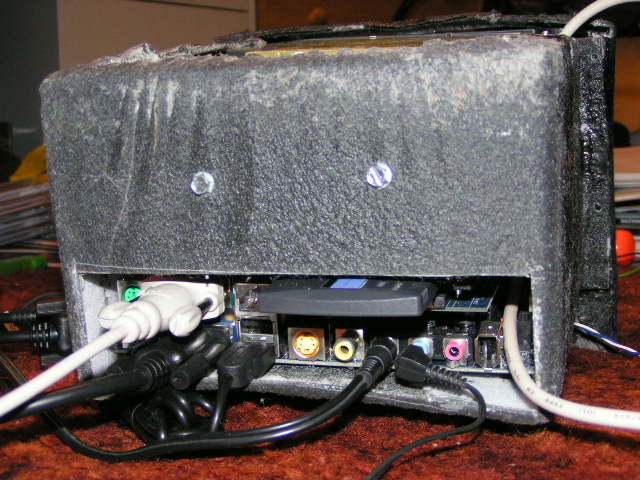
I guess I better give a quick overview of my case. I built the first one for my Mustang. It was made from sheet metal, and would work just fine. But the problem is that the heater in the Mustang is broke, and it's winter in Utah. BRRR!!! Ok, so on to plan B. Put it in the Subaru. This was a little diferent task. I didn't have the depth that was available in the Mustang, but I gained some height with the 1.5 din.
Ok, so what I did once it was all plotted out on AutoCAD, build the case using Fibeglassing techniques. But I hate working with fabergalss on such a small scale. So the solution was to build it out of polyester cloth. WHAT! Polyester cloth works great. It stretches good, and has great strengh. I built a wooden buck and covered it with wax paper. The wax paper prevents the fiberglass resin from sticking to the wood.
Once I had the polyester stretched over the buck, I saturated it with the resin, then allowed it to harden. Easy enough. No fiberglass to deal with, and I get a final product that is more than strong enough to do its job. I then cut out an opening in the back for the cables, cut out for the screen, and cut out for the DVD drive and USB port up front. I also built a sheet metal tray to mount the HDD and DVD drive to.
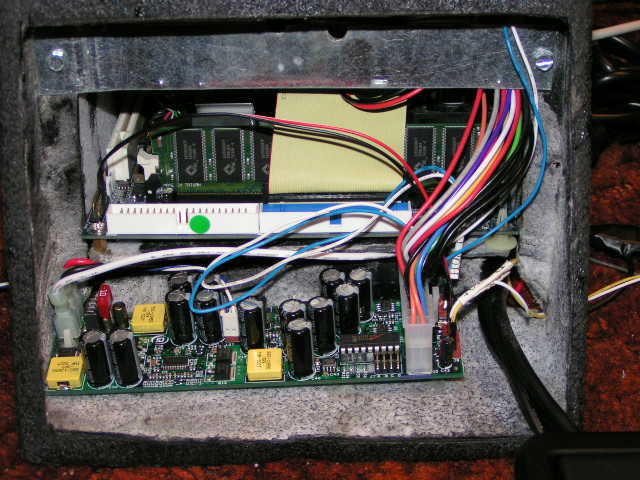
For an added bonus, I drilled a hole and installed a LED light to indicate when the power is on. I also plan on putting one next to it
for a HDD light.
Onto the Amp. Ok, here is where the magic happens. With running a computer in a car comes a slight problem. The computer does not output enough power on the Line Out port to run un-amplifed speakers. So this is where the Alpine V-12 5 channel amp comes in. This awesome amp allows 5 channel output, 50wx4 RMS for the 4 speakers, and 200wx1 RMS for the Sub. This has prooved perfect for my situation.
So what I did was buy an adapter from Radio Shack that converts from STERIO 1/8" (headphone Style) output on the computer, to female RCA style jacks. This then runs to the Amp in the trunk via the supplied cables which came with the 4ga Amp installation kit. Once at the amp, I split each channel using Adapters from Radio Shack. I supplied channels 1 and 3 from the Left channel, and channels 2 and 4 from the Right channel. To control front to rear fading, I adjusted the gain for these channels. The output gain control dials are as follows: 1 and 2 are one output and channels 3 and 4 are controlled from another dial. The 5th channel is contolled from 2 other dials, one for Gain, the other for bass output. So with some fine tuning I have front to rear fading set, left to right fade is adjustable through windows. BINGO! Full fade control and all 5 speakers controlled without needing an external EQ.
For the Installation of the Sub and Amp; First, I bought a inexpensive "Build your Own Box" from Walmart for the Sub. In my case, I have a Rockford Fosgate Punch Z 12" 2ohm. I mounted the amp directly to the back of the box, this keeps things easy and clean. The box fits perfectly in the trunk of the Subaru. My only complaint: the trunk is near sound proof, so I have had to set the gain to a very high level to actually hear the amount of bass I like (a lot).
Conclusion: So what I've decided about this installaion is this, the computer stored music on the hard drive, access to GPS navigation and XM radio, plus having a computer in my car is overall, COOL. But, there is a down side to all of this. First off, its all in my damned Subaru Legacy, which is not really one of the coolest cars in the world. The boot time seems like forever when your waiting for music. I also had a cupple bugs with my power sources. I was running the XM and touchscreen off of ignition switched power, which caused for some funny interfearance during bootup and shutdown. Also because of the computer, I have a slight whinning noise during XM use; but its only noticable at no music times. This I am hopping to fix this by grouding the computer to a seperate grounding location instead of using the stock sterio ground wire. Also, I don't have any EQ control over the XM. Winamp doesn't control the "Line In" channel with the EQ. My solution to this is going to be to find a different EQ program for windows to take control of the current windows volume control. The reason for this is because the stock software and sound card don't allow me to use the advanced option of the volume control to even adjust bass and trebble.
So my overall satisfaction of this install is about 80%. Mostly likes, but a few dislikes and a cupple bugs. Once everything is worked out I hope to be even more satisfied with it. But as an overall system, I would probably build other units for my other cars. For the general public, its still not 100% satisfactory. For the techno-geeks and those like me that do it just because "I CAN", this is a very unique system that is a truely "custom" addition in an ever growing aftermarket marketplace.
| Pioneer in JEEP, to XM | 8 seconds |
| Pionner in JEEP, to CD | 6 seconds |
| Carputer to XM, From cold start | 46 seconds |
| Carputer to XM, From Hibernation | 24 Seconds |