PhotoShop Classroom Exercise, Part 1


Using Layers to Enhance Photos
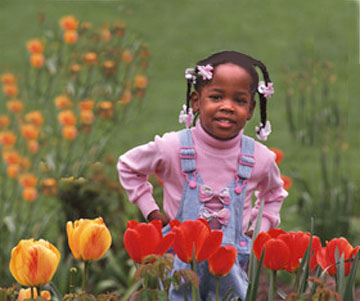
Open an image from the files included on your textbook's CD. It almost
doesn't matter which image you use. Discovering ways to enhance them is
part of the fun. For this exercise, we used PhotoShop Bible 5 CD, Stock
Photos > Photo Disk > Signature Series > Children, Ss03086.
The first step is to take a good look at the image you will be using,
and to analyze any problems it may have.
-
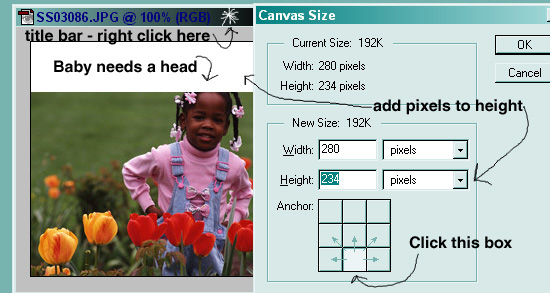
The little girl needs a complete head, and some more garden at the top
of the image.
-
The image needs cropping, and needs canvas added at the top.
-
The image is a bit too dark. The little girl's face is in shadow, and the
rest of the garden could also stand a little brightening.
Crop the Image
-
Choose the Crop tool (C). (Note: if you prefer clicking the toolbox icon,
it's up to you to know by this time where the tools are located in the
toolbox.)
-
Drag the cropping marquee around the image. (Note: The crop marquee is
not the same as the selection marquee. It has handles, and it can be sized
and rotated.)
-
Use the handles to place the border exactly where you want it.
-
When the marquee surrounds the part of the image that you want to keep,
press Enter, or double-click inside the marquee.
-
If you miss, press Undo (ctrl-Z) and try again.

Sizing the Canvas
-
To resize the canvas, right-click the title bar of the image.
-
Click Canvas Size.
-
Place the white square at the center, bottom
-
Add 50 pixels to the height.
Adjust the lightness
The little girl's face is in shadow, but the rest of the garden is almost
light enough. We need to select the little girl's face, with the lasso
tool, and then feather (soften) the selection. Then we can adjust the color
levels of her face and of the rest of the garden.
-
Choose the lasso tool (L).
-
Draw a circle fairly close to the outline of the little girl's face. Don't
include the flower in her hair. Select as little of her hair or of the
white above her head as possible.
-
Feather the selection (Select > Feather > 2 pixels.)
-
Choose the Levels dialog box (Ctrl-L, or Image > Adjust > Levels)
-
Move the white slider to 167, and the center slider to 1.37. You have lightened
the little girl's face without lightening the rest of the sunlit garden.(Note:
Classroom lecture covered this feature. Review the Levels dialog box features
in your text.)
-
Invert the selection. (Select > Invert, or Ctrl-Shift-I)
-
Display the Levels dialog box again.
-
Move the center slider to 1.30. You have now lightened the garden, independently
of the child's face. The softened, or feathered, selection prevented the
changes from clashing with each other.
If you wonder whether you have made a positive difference in the appearance
of the image, use the History palette to look back.
Fill the white area at the top
We will clone grass and garden into the top of the image. To avoid spoiling
the image, we will make our changes on a new layer.
-
Display the Layers palette (F7)
-
Create a new layer (click the New Layer Icon at the bottom of the Layers
palette.)
-
Be sure the new layer is active.
-
Choose the Stamp tool (S).
-
On the Stamp too Options palette (press Enter if the palette is not displayed)
check Aligned and Use All Layers.
-
Alt-Click on some portion of the flowers.
-
Move the tool to the white area and paint (clone) in the flowers.
-
Choose a new area to clone from by holding the alt key and clicking on
a new area of flowers or grass. Or un-check the Aligned box and alt click
on some flowers. Then paint the same flowers into the white area over and
over again. (Tool was demonstrated in class. If you need to review, read
the appropriate pages in your text book.)
Give the child a head
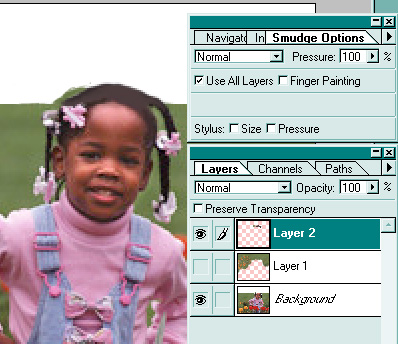
To create a head for the little girl, we will create a new layer and then
use the Smudge tool at 100% opacity. You may need to erase some of the
grass from your other layer, if you stamped it over the girl's face.
-
Create a new layer above the grass layer.
-
Choose the Smudge tool (R). Note: Check the Options palette. Press Enter
if the Options palette is not displayed. Be sure the tool chosen is the
Smudge tool. If you see the Blur or Sharpen tools instead, press Shift-R,
or use the toolbox to select the Smudge tool. Set the options to 100%,
Use All Layers.
-
Turn off the visibility of the grass layer (click the eyeball beside the
thumbnail.)
-
Zoom in on the child's head. (Ctrl-+, or press ctrl-spacebar, and drag
a marquee around the head.)
-
Use the Smudge tool to create hair for the child. Be sure you have your
newest layer active, and the grass layer visibility is turned off (see
illustration below). Choose a small brush and drag color from the temple
area of the hair and the braid, to fill in the head.

Finishing:
-
Turn on the visibility of the grass layer (Layer 1). Make any necessary
adjustments.
-
Save the image in psd format.
-
Flatten the image. (Layer > Flatten Image, or ctrl-shift-E)
-
Save a copy (File > Save a Copy) in jpg format.
In the second part of this exercise, we will bring a little boy into
the garden to play with the little girl, so don't lose the file.
Christine C. Frey
cfrey@erols.com
art-dig@onelist.com

