On-Line Study Group
PhotoShop 6.x
Text: PhotoShop Bible, Chapter 2
Read about the Zoom tool (pg. 37) and the Magnification Box (pg. 38-39)
Creating a Reference Window (pg. 40)
Scrolling with Keystrokes (pg. 41)
Navigation Palette (pg. 41)
Preferences (through the end of Chapter 2)
Zoom Tool
To select:
-
Click the magnifying glass on the toolbox.
-
Press Z.
-
Use the ctrl-spacebar to toggle to the zoom tool. Release to toggle back
to your previous tool.
To use:
-
Click on the image to zoom into that spot.
-
Drag a marquee to zoom the window to the area you define.
-
Press Alt to change from zoom in to zoom out.
You can type a specific zoom amount into the magnification box (lower left
of status bar.)
Zooming Around
Ctrl-zero
1. Open an image. To do this best, it should be an image that is large
enough to about fill your working space when it is at 100% magnification.
2. Type Ctrl-zero.
Most people want to type Ctrl-O (that's the letter, "oh") instead
of Ctrl-0 (that's the numeral, zero). Ctrl-oh will display the Open dialog
box. Ctrl-zero will resize your image window.
3. Your image window will be resized to fill the work space, but not be
hidden behind any palettes.
4. Look at the image's title bar. What is the magnification?
The magnification will vary according to the size of the image and
your computer's resolution display settings.
5. Ctrl-zero is the quickest way to display the entire canvas.
Ctrl-plus and Ctrl-minus
1. Type Ctrl-+ (ctrl-plus). This will magnify the image, or zoom in for
a closer look.
2. Keep typing Ctrl-+ until you can get no closer.
3. Notice the magnification on the image's title bar. What is it?
4. Type Ctrl-- (ctrl-minus). This will zoom farther away from the image.
5. Continue to type ctrl-minus until you can go no farther.
6. Look at the image's title bar. What is the magnification?
Type ctrl-zero to put the image back into a perfectly sized window.
Toggling to the Zoom Tool
1. Select any tool other than the zoom tool. (Press B for Brush, for example.)
2. Paint a few strokes in the image, if you like.
3. Hold down the control key with your little finger, and with a different
finger (same hand) hold down the spacebar. You will toggle to the Zoom
tool.
4. Click in the image to zoom closer by one factor.
5. Press Ctrl-zero to put the image back in a perfect window.
6. Again, toggle to the Zoom tool with Ctrl-spcbar (as in step 3.)
7. This time, instead of just clicking in the image window, do a click-and-drag
around some part of the image.
8. You will zoom to that area of your image.
9. Make a few paint strokes on the image at the new magnification.
10. Use Ctrl-zero to see the entire canvas again.
Using the Alt key with Zoom
1. When you see the Zoom tool cursor, by passing your mouse over the canvas,
it will have a plus sign in the middle. This means you are going to zoom
closer when you click.
2. To zoom out instead, hold down the alt key.
3. If you are toggling to the Zoom tool, Ctrl-Space-Alt will zoom you
out.
Creating a Reference Window
What is a Reference Window?
A reference window is a second window with a view of the image
you are working on. You can set the window to show 100% zoom (or any other
zoom) while working on a close zoom in the other window.
-
Open an image.
-
Zoom to 100%, if you arent there already.
-
Click View > New View
-
Position the New View (reference window).
-
Switch to the original window.
-
Press Ctrl-+ three times, to zoom to 400%.
-
Press B, for paintbrush. D for default color, zero for 100% opacity.
-
Press Shift + [ (left bracket) to select the first brush on the brush palette.
(This is a new shortcut. Remember it.)
-
Paint on the image, and watch the reference window (which is 100%) to see
what your work looks like.
-
Press ] (the right bracket) to choose the next largest brush. Paint again.
-
Repeat the previous step.
-
Press ] four times and paint on the image. Then press [ (left bracket)
three times, and paint again. The brackets let you switch to the next and
previous brushes, while the reference window allows you to see the result
of your work.
Shortcut Keys for Displaying and Hiding Palettes:
F5 = Brushes (Version 5. In Version 6, the brush footprints are displayed
on the Options Bar.)
F6 = Color
F7 = Layers
F8 = Info
F9 = Actions
Exercise:
-
Display the toolbox and all the palettes.
-
Press Tab a few times to see what happens.
-
Press Shift-Tab a few times.
What is the difference between pressing Tab and pressing Shift-Tab?
Navigator Palette
Read the section about the Navigator Palette in whatever book you have.
I don't enjoy the Navigator, so if you want to use it, you are on your
own.
-
Use the Navigator Palette to zoom in on your image. How far in can you
go?
-
Use it to zoom out again to 400%.
-
Move the image by pressing the spacebar and dragging the image around.
-
Move it by dragging the red box in the Navigator Palette. Which is easiest
for you? When might you best use each?
-
Click the small mountains on the Navigator Palette to zoom out as far as
you can. I went out to .35%. How far can you go?
-
Now move the slider bar in the palette. What happens?
Preferences
Read the section Customizing the Interface in your text.
-
What are factory defaults?
-
According to the text, what are two places for changing default values?
-
What is the name of the preferences file? Where is it located? Find it
in your computer. (To find the preferences file, hold down the Windows
key on your keyboard and touch the F key. The Find Files dialog box appears.
In the Named box, type *.psp, and press Enter. After the search is performed,
note where the Preferences file is stored.)
-
Why might you want to delete the preferences file?
-
What must you do first, before you delete the preferences file?
-
How can you keep PhotoShop from writing to the Preferences file? Why would
you do this?
Setting Preferences
Preference Dialog Box 1: General
-
How do you access the Preferences dialog boxes? (Give two ways.)
-
What should your settings be for Color Picker? Why?
-
What is Interpolation? What should your setting be for Interpolation, and
why?
-
Anti-alias Postscript means vector objects imported into PhotoShop will
be anti-aliased to soften the edges. Explain this statement.
-
What happens if you turn off the Export Clipboard option?
-
Which button would you click if your palettes got stuck in an inaccessible
position?
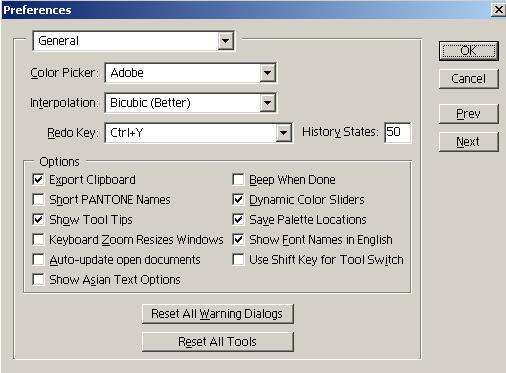
Version 6 General Preferences
These are my settings for the General preferences box.
Redo Key: Set the Redo to Y, and you can use Ctrl-Z to go back-back-back
in your history. Undo, Undo, Undo.
History States: I have the History States set to 50. This means
my History palette will display 50 steps before they start getting lost
off the top. You can use up 50 steps really fast, if you are painting or
making a mask, so remember to take Snapshots if you think you're going
to need to go back farther than that.
Use Shift Key for Tool Switch: Turn this setting OFF if you
want to use the tool's alphabet shortcut to toggle. For example, to toggle
between the rectangular Marquee and the Eliptical Marquee, you would type
shift-M, shift-M, etc. If you uncheck this option, you can toggle by typing
M, M, M.
Preference Dialog Box 2: Saving Files
-
When might you not want an image preview saved with your image?
-
What does Deke (the author of your textbook) call the Include Composited
Image With Layered Files option? Why was this option included? (Version
5)
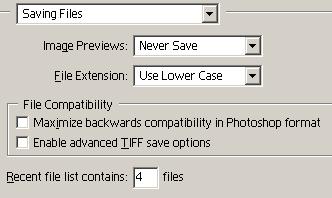
Version 6, Saving Files preferences
I've set this to Never Save because I already get previews with Windows,
and saving the preview makes the file size greater.
Preference Dialog Box 3: Display & Cursors
"Color Channels in Color" will be discussed when we talk about Channels.
-
Use Diffusion Dither. Turn this one ON. If you cant state why you should
do this, be sure to bring it up for discussion.
-
I hate Video LUT. So does Deke. We both say, Turn it off.
-
Brush Size: This, in my opinion, is the preference to be set before you
do anything else in PhotoShop, ever. You want to choose Painting Cursors:
Brush Size. (Others: leave set at standard.) What does this do to the appearance
of your cursor when the Paintbrush, Airbrush, Pencil or History brush is
selected? What does it do to the appearance of your cursor when the Bucket,
Wand, Lasso, etc. are selected? Why?
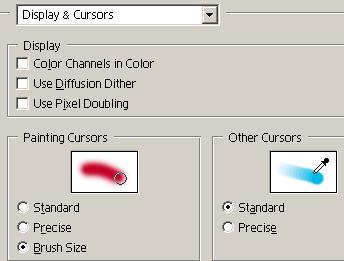
My Display and Cursor settings.
Preference Dialog Box 4: Transparency & Gamut
Heres where you find out (in case you didnt already know) what that funny
checkerboard is. You will also get a brief introduction to layers.
Remember when Walt Disney showed us how he drew cartoons on clear sheets
of plastic? A layer, in PhotoShop, is like one of those sheets of plastic.
When you create a new image with a white background, that just means the
plastic is painted over with white. If you create a new image and specify
Transparent background, you will see a checkerboard pattern when the new
canvas opens.
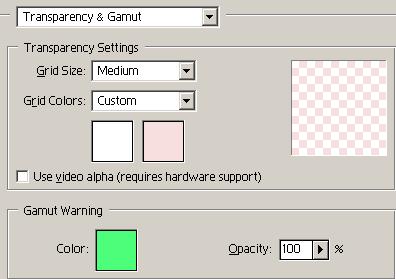
My Transparency and Gamut settings.
Do it now:
-
Ctrl-Double-click on the PhotoShop desktop, or type Ctrl-N, or click File
> New.
-
Create a canvas 5 x 5, 72 pixels/inch, RGB, Contents: Transparent.
-
Imagine that you are looking at a clear sheet of plastic.
-
Press B, D, 0 (zero). Paint a picture of a peapod on the background sheet
of clear plastic. (Yeah, a peapod. Well, why not?)
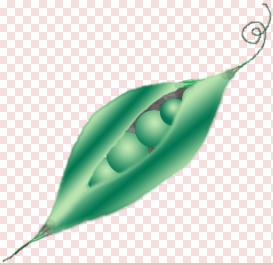
Peas on a Transparent Grid
This could be used as a transparent GIF
The checkerboard is PhotoShops way of telling you that you are looking
into a bottomless hole straight through a transparent layer with nothing
below it. Well talk about layers and transparency in a later lesson. For
now, all you need to know is, you can change the appearance of the checkerboard
(the space beneath the layers).
I happen to prefer a rosy grid, and pink contrasts with the green. If
I'd been painting roses, pink might not have been a good choice.
In addition to the color, the grid has a checkerboard pattern to distinguish
it from the pixels in the image. But what if you were painting a picture
of your mothers breakfast table, which was decked with a pink and white
checkered tablecloth? Youd have trouble telling the picture from the transparency.
So youd need to change the appearance of the squares in the checkerboard.
Heres how:
-
Open the Transparency & Gamut Preference box.
-
Click the drop-down arrow beside the Grid Size box.
-
Select the size checks you want.
-
Click the drop down arrow beside Grid Colors.
-
Choose DARK
-
Click the first Color box, and set it to green. Set the second Color box
to red.
-
If you hate the effect, you can reset the option without closing the dialog
box: Hold down the Alt key and click the Reset button. (When you hold down
the Alt key in a PhotoShop dialog box, the Cancel button changes to Reset.
This lets you continue to set options without closing the dialog. Try this
in other PhotoShop dialog boxes.)
-
Choose a grid size, lightness and color scheme you think you can live with,
and click OK.
Gamut warning:
Read the explanation in the book. Be prepared to discuss this. Mostly I
don't worry with gamut. It looks the way it looks, and that's enough for
me. This is an extreme right-brain approach, and I'm aware that it drives
some people crazy.
Preference Dialog Box 5: Units & Rulers
Change the unit of measurement as you wish. You can display this dialog
box by double-clicking the ruler. (If you cant see the ruler on your image,
press Ctrl-R. To turn it off, press Ctrl-R again.)
Preference Dialog Box 6: Guides & Grid
On the Menu bar, click View and look at the last seven options, from Show/Hide
Rulers to Snap to Grid. Notice their shortcut keys, while you are there.
You neednt memorize them.
If your rulers are not visible, press Ctrl-R. Then click in the top
ruler and drag down, into your image. A guideline will be pulled down from
the Ruler, kind of like pulling down a window shade. You can also pull
vertical guidelines from the side Ruler. The lines wont print. You can
move them with the Move tool. Drag them off the canvas to get rid of it.
Press Ctrl-; (ctrl-plus-semicolon) to make them disappear. This does not
delete them.
Note: Placing guidelines and turning on the Snap to option helps align
objects. OTOH, if you are drawing and find you cant place a line or an
object where you want, you probably have the Snap To feature turned on,
and you need to turn it off, or move the guideline.
The guidelines are bright blue, by default. If you were painting on
a blue sky, you wouldnt be able to see the lines, so you can change their
color to suit your needs. Open Preference Box 6: Guides & Grid, and
change the color of the guidelines, either by clicking the drop-down arrow
and selecting a color, or by clicking the color swatch, just as you did
for the checkerboard.
The Grid will appear if you click View > Show View. You cant
delete the grid; you can only hide it. You can also change the frequency
of the grid lines in the Preference Dialog box 6.
Preference Dialog Box 7: Plug-ins and Scratch Disk
In this dialog box, you tell PhotoShop where to look for the plug-ins (filters).
You can point the program to any folder, and even keep different sets of
filters in different folders. This is useful, because if you load too many
filters into the same folder (or sub-folder system) the program stops displaying
them in the menu.
Scratch files are a temporary record of the image you are working on.
The program remembers the image, first, by storing the definition in
its RAM. When the image size exceeds the RAM, the program writes the definition
on a hard disk. In this dialog box, you tell the program where to write
this record.
Its a good idea to assign a different hard disk as the scratch disk
not the start up disk (which is the C:\ drive.) If you have space enough,
you can partition a large drive and assign the partition as the scratch
disk. You should try to keep that disk clear of other files. You shouldnt
assign a removable disk (a zip disk, for example) as a scratch disk.
You can assign up to four different disks, in any order, as scratch
disks. If the program doesn't have enough free disk space to write the
virtual memory on, it will either refuse to perform the task you have set
it, or it will freeze.
Read the section in your text book, and be prepared to ask your questions
or discuss these features.
When will changes to this dialog box take effect?
Preference Dialog Box 8: Physical Memory Usage
Guide: Fifty percent is the default amount of memory allotted to PhotoShop.
If you like to run a number of programs at once, adjust the percentage
available to PhotoShop lower. If PhotoShop is the only program you will
run and you have less than 32MB of RAM, increase the value to 70-80%
Dont give PhotoShop more than 80%. If the program seems to run slow,
and the efficiency indicator on the status bar tells you the scratch disk
is often being used, buy more memory.
Note your questions, and bring them to the discussion group.
Annotating an Image
-
Open a new image.
-
Draw a picture of a dog. (No, the artwork does NOT count. Dont take more
than 5 minutes on your sketch.)
-
Click File > File Info
-
Note the Next button. Scroll through all the panels, and come back to the
Caption section. Click the drop-down arrow beside the Section window to
see the list of panels.
-
Create a caption for your image.
-
Print the image.
Questions about Zooming:
1. How can you size the canvas to display your entire image?
2. What is the greatest magnification you can get by zooming closer
on an image?
Answers:
1. Type ctrl-zero.
2. 1600%
Copyright Christine C. Frey, 1999