On-Line Study Group

PhotoShop 5.x, 6

Text: PhotoShop Bible
Chapter 4, Image Fundamentals
Read the Chapter in your textbook.
Complete the Study Guide activities.

Resolution

Images are made up of pixels.
A pixel is a picture element - the smallest unit of an image.

Do this:

  1. Open a new image. (Double-click the PS desktop. Double-click the image you want to open.)
  2. Right-click on the image's title bar. Click Image Size.
  3. Note the resolution. Close the dialog box (press escape.)
  1. Display the rulers. (Ctrl-R)
  2. Measure an inch on the screen.
  3. The resolution is the number of pixels across that inch.
  4. Duplicate the image: (Right-click the title bar. Click Duplicate.)
  5. On the Duplicate image, right-click the title bar.
  6. Click Image Size. Set the resolution to 10. (No, you would never really do this.)
  7. Switch to the Zoom tool (Z)
  8. Right-click the image and choose Print Size.
  9. Compare the image with a resolution of 72 ppi to the image with a res of 10 ppi.

Notice that the number of pixels per inch will not affect the print size. It only affects the size of the pixels.

Remember that your monitor displays 72 ppi. That's why the 10 ppi image seems to be smaller when displayed on the monitor.

Experiment with changing the resolution of images. Notice what happens to the clarity.

On the Image Size dialog box, uncheck the Constrain Proportions box. The chain linking height to width will disappear. Change the height or the width - then note the changes.
 

Resampling Images

If you allow PhotoShop to resample the image, the program will make its best guess about either adding or getting rid of pixels.

If you tell the program it may not resample, no image data will be added or deleted.
 

Saving in Various Formats

GIF: Drawings, created for the Web, are best saved as gif images, and interlaced. These display faster and give the viewer something to look at. Resolution: 72 ppi.

To save as a GIF image, you can click File > Save a Copy > Save As: Compuserve GIF.

JPG: This format was developed to make our large images portable - we can save them on floppy disks and take them along because they are compressed to a small, handy size. Photos and paintings intended for display on the Web (with lots of blended colors) are best saved as jpg images. JPG is a "lossy" format. That means the image data is compressed in such a way that some gets lost. The lost data is generally not visually important - you won't see a difference. But each timme you re-save the image, more data gets thrown out. Eventually the image will degrade. Moral: make the save to JPG format the last thing you do to an image. After that, you shouldn't open, edit and resave, because more image data will be lost.

To save as a JPG: you can click File > Save a Copy > Save As: JPEG.

PSD: This is PhotoShop's format, and saves all image data, including layers, channels and paths.
 

Cropping an Image

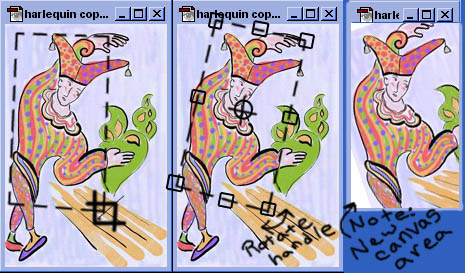
When you crop an image, you can cut part of it away, straighten or add area to the canvas.

Do this:

  1. Choose the Crop Tool (C).
  2. Drag the marquee around the area you want in the image.
  3. Use the handles to rotate the marquee, if you need to straighten.
  4. Press Enter or Double-Click inside the marquee to execute the crop.

Post your questions, comments and fabulous successes to the art-digital@yahoogroups.com.com mailing list.


Copyright Christine C. Frey, 1999
1