1. Open the images we will be using.
Woman
 Man 1
Man 1
Man 2
 Petal
Petal
2. Press V and hold down the shift key. Pull Man1 into
Woman.
This will cause the second image to be centered on top of the first.
3. Using the move tool, move the man to the leftof the image. You
want his head just inside the frame. At the top.
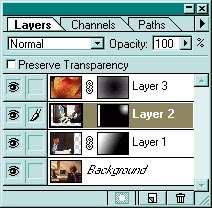
4. Display the layers palette, by pressing F7.
5. Click the layers mask icon on the bottom of the layers palette to create a layer mask on the layer. (Note: you should use Layer Mask, and not Quick Mask.)
6. We want the man to be on the left, and look like the woman is just thinking about him.
7. G for Gradient. D for default colors. 0 for 100%
Change to the gradient tool (G). Be sure you are set to Linear Gradient.
8. Make sure you have the mask active, not the image, and drag a
gradient across the man.
I dragged left to right, from the upper left corner diagonally to right lower corner.
9. Make Man2 active by clicking on it.
10. Click (on the menu bar) :
Image > Rotate Canvas > Flip Horizontal.
The man should be looking from left to right.
11. With the Move tool, (V) pull the man2 into the image.
Hold the shift key as you drag, to center.
12. Switch back to the Gradient, and select the radial gradient from the tool box.
13. This part may need some experimenting. We want to make a layer mask that will just display the man's face.
14. One of the problems is, the man really needs to be up a little higher in the window. I want you to know that you can break the link between the mask and the image.
15. Click the link that is between the mask and the thumbnail of Man2 to turn it OFF.
16. When the link is broken, you can move either one, independently of the other. Use Move (V) to move the man around.
17. Now we need to move Petal into the image.
Be sure to hold down the shift key when you move it into the image, so that it will be centered.
18. Turn Layer Mask on. Use the Radial gradient again, but this
time we want the center to be transparent and the outside to show.

20. You will probably also need to drag your gradient far outside of the image to make the transparency go far enough.
Gradients begin where you start dragging, and end where you stop dragging. This gives you a lot of flexibility, in determining how far the transparency will go.
