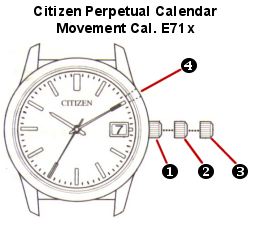
 All
Reset All
Reset
All reset is
used when first setting the watch or when there is
unusual or erratic operation.A - Unscrew the crown and
pull out to the second click (3). The second hand moves
to the Zero position it has memorized and stops.
B -Press
button 4 for 2 seconds or longer and
release. The hour and minute hand will move forward, then
reverse, then forward. The second hand makes one full
rotation clockwise.
C - The
All Reset is now complete.
Zeroing the hands
After all
reset the hands and calendar must be "Zeroed"
to provide a starting point for setting the watch.
A -
Unscrew the crown and pull it out to the second click
(3). The hands will move to their last memorized
"Zero" position.
B - Move
the crown to the right (clockwise) to make the hands move
in the forward direction, move the crown counterclockwise
to move the hands in the reverse direction.
Quickly moving the crown several clicks at a time in the
desired direction advances the hands rapidly.
C - Once
the hour and minute hands are "Zeroed" at the
12:00 position the second hand and date can be
"Zeroed".
D - Pull
out the crown to the first click position (2).
E - Turn
the crown to the right (clockwise) to move the second
hand around the dial until it is "Zeroed" at
the 12:00 position.
F - Turn
the crown left (counterclockwise) to adjust the date
until the date reads "1".
Note: turning the crown rapidly in the
counterclockwise direction advances the date rapidly.
Turn again in either direction to stop rapid date
advance.
G - When
all hands and the date are set push the crown in all the
way (you don't have to screw it down) to have the watch
"memorize" the zero positions.
Note: memory recording of the zero position takes
about 1 second. When it has been recorded the second hand
will begin a 2 second "hitch" movement. Do not
pull the crown out until after the 2 second
"hitch" movement has begun.
H - After
adjusting the zero positions proceed to adjusting time
and calendar.
 Setting the Time Setting the Time
A -
Unscrew the crown and pull it out to the second click
(3). The second hand will rapidly advance to it's last
memorized zero position at 12:00 and stop. If it is not
zeroed perform the "Zeroing the hands"
adjustment outlined above.
B - Set
the time by turning the crown clockwise to move the hour
and minute hands forward, counterclockwise to move in the
reverse direction.
Note: if you move the crown rapidly (two or more
clicks at a time) the hour and minutes hands will move
rapidly. Move the crown one click in either direction to
stop the rapid advance.
Note2: When the hour and minute hands reach 12:00 am,
the date changes. The hands will pause until the date
change is complete, then resume operation. Make sure that
the correct Am/Pm time setting is observed or the
calendar will be out of sync.
C - When
the hands are set to the correct time push the crown all
the way in and the watch will start.
Setting the
Calendar
This watch is
a perpetual calendar type that automatically changes
year/month/day, including leap years, once it is set
correctly.
 How
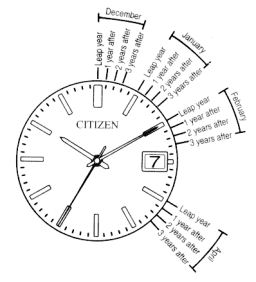
to read the month/year. How
to read the month/year.
The months are represented by the second hand pointing to
the hour markers on the dial. Dec = 12:00,Jan. = 1:00,
Feb. = 2:00, etc.
The 12 hour markers represent the 12 months of the year.
The years (or more correctly the number of years since
the last leap year) are represented by the amount that
the second hand moves past the hour marker.
Example:
| December of a leap year |
The
second hand should be right on 0. |
| December of a year one year past a
leap year |
The
second hand should be right on 1. |
| February of a year 3 years past a
leap year |
The
second hand should point to 13 |
A -
Unscrew the crown and pull it out to the first position
(2). The second hand will move to the year/month position
last memorized and stop.
B - Turn
the crown clockwise, a click at a time and the second
hand will move to indicate the year/month position (years
passed since the last leap year).
C - Once
the year/month is set turn the crown counterclockwise to
set the date in the window. When the crown is moved
quickly in this direction the date will advance
continuously and stop automatically after reaching 31
days. Turn the crown one turn in either direction to stop
rapid date advance.
D -
Complete date setting by pushing the crown in and
screwing down. The second hand will catch up to the
correct time as timekeeping resumes.
|

