Handmade Rectangular Buttons
- Open a new image with a white background, 500 pixels wide and 100 pixels high.
- Set the background color to light gray, Red:188 Green:188 Blue:188, and the foreground to dark gray, Red:83 Green:83 Blue:83.
- Select the Shapes tool, and in the Control Palette set
Shape to Circle, Style to Outlined, and Outline Width to 1, leaving Antialias unchecked.
Beginning at position 50, 50 of your image, draw a 100x100 circle using the foreground color.
(Press and drag with the primary mouse button.)

- Select the Shapes tool, and with Shape set to Circle, Style to Outlined, and Outline
Width to 1, and with Antialias unchecked. Beginning at position 450, 50 of your image,
draw a 100x100 circle using the background color. (Press and drag with the
secondary mouse button.)

- Select the Shapes tool, and set Shape to Rectangle, Style to Outlined, and Outline
Width to 1, with Antialias unchecked. Beginning at a point on the right edge of
the lefthand circle, draw a rectangle using the foreground color.
(Press and drag with the primary mouse button.) End the rectangle at a point on
the left side of the righthand circle so that the rectangle cuts through the two circles
in a similar way on each side.

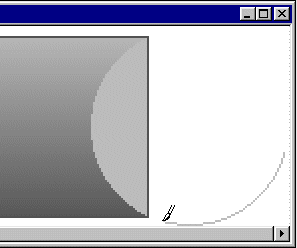
- Select the Fill tool, with the Fill Type in the Control Palette set to Solid Color.
Fill the lefthand part-circle with dark gray. (Click the primary mouse button.)

- Select the Fill tool, Solid Color.
Fill the righthand part-circle with light gray. (Click the secondary mouse button.)

- Select the Fill tool, with the Fill Type set to Linear Gradient in the Control Palette.
In the Fill Options dialog box of the Control Palette, be sure that the Direction is set
to 0 degrees. Fill the central part of the rectangle with the gradient.
(Click the primary mouse button.)

- Change the foreground color to white and carefully paint over the parts of the circles
that fall outside the rectangle. (You may want to zoom in before starting this.)

- With the Magic Wand, select the white background.

Then on the Selections menu, choose Invert. On the Image menu choose Crop to Selection. This eliminates the background, leaving just the button.

- Reduce the size of the image to 100x25 pixels using Resize on the Image menu. (For the Resize Type, select Smart Size.)
- Save the gray button as a JPEG if you're going to use it as is.
You can use the gray button as the basis for other buttons. CoLamanderze your buttons, or Flip or Mirror them as you prefer. Save the final versions as JPEGs. And you can adapt this method to make your own separator bars, too.
For the example buttons that I made, I used Hue 255 with Saturation 200 for the pink/magenta button, Hue 125 with Saturation 200 for the turquoise/aqua button, and Hue 30 with Saturation 175 for the yellow/gold button.