Hue Map
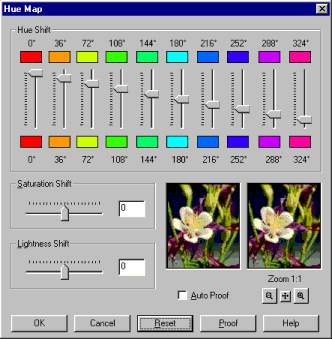
"What's this hue business?" you might ask. Open up the Color Picker and look at the color circle there. The different hues are arranged along the circle. Going counterclockwise, Red is at 0 degrees, with Yellow-green at about 100 degrees, Cyan at around 180 degrees, Blue-violet at around 270 degrees, and back to Red at 360 degrees. Now look at the Hue Map. What we've got along the top row is the color circle split between Red and Magenta and laid out in a straight line. Hit the Reset button on the Hue Map dialog box and you'll see that the bottom row matches the top row. You can then use the sliders to adjust the differently colored pixels in your image. You can make the reds more orangey by pulling the first slider down from 0 to about 25 (that is, from 0 degrees to 25 degrees on the color circle). You can adjust each of the other sliders similarly. The Hue Map dialog box also has controls for adjusting the saturation and lightness. Saturation is color intensity -- the higher the saturation, the more intense the color; the lower the saturation, the more dull and grayish the color. Lightness is brightness -- the higher the lightness, the closer to white the color becomes; the lower the lightness, the closer to black.
Back Copyright ©1999-2000 Lamander |
