Masks: Pop Art Cat
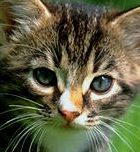
In this introduction to PSP5 masks, we'll make a pop art cat image, using
this photo of a kitten as our mask:

- Start by opening the image that you want to use as the basis of your mask.
Duplicate this image by hitting Shift+D. We'll build the pop art
version of the kitten in the duplicated image and use the original image
to create the mask.
- Set the foreground color to something suitably pop-ish (I chose purple).
Hit Del to delete the current contents of the image, and then fill the image with
the foreground color by clicking in the image with the Fill tool.
- Create a new layer in the duplicated image by clicking the New Layer
button in the Layers Palette. This layer will be named Layer1 by default.
- Next set the foreground color to some contrasting pop-ish color.
(I chose a bright green.) With Layer1 the active layer, click in the image with the
Fill tool to fill this layer with the new foreground color.
You now have a totally opaque purple layer with a totally opaque green layer above:
 |
 |
| Contents of Background |
Contents of Layer 1 |
- Now, with Layer1 still the active layer, choose Masks | New | From Image.
For 'Source window', choose the image that you want for the basis of your mask
(M-KITTEN1.JPG here). Be sure that 'Source luminance' is selected under 'Create
mask from'.

- When you click OK, your mask is applied to Layer1. This makes some areas of the layer
opaque, some transparent, and some semi-transparent. White mask areas show the layer
areas opaquely, black mask areas make the layer areas transparent (letting pixels from
lower layers show through), and gray mask areas make the layer areas semi-transparent:

I like to think of layer masks as "acid" that eats away at the nontransparent
areas of a layer, letting the contents of lower layers show through.
You can now merge the mask with the layer by choosing Masks | Delete and then
clicking on Yes when you're asked whether you want to merge the mask with the layer.
(If you click No instead, both the mask and its effects will disappear.)
Merge the two layers by clicking on one of the layers' Layer button on the Layer palette
and choosing Merge | Merge Visible. Then apply any other effects you like.
I used Colors | Posterize to get this final effect:

Back
Copyright ©2000 Lamander
All rights reserved
|

