What is flocking, and why do it? Flocking is a material
that is very very non-reflective,
more so than any paint you can buy. The reason for flocking an
optical tube is to cut
down on internal reflections that reduce contrast. Compount optical
systems like
Schmidt Cassegrains (SCTs) and Maksutov Cassegrains (MCTs) suffer most
from light
bouncing around inside the optical tube reducing contrast. It
is my opinion also that
70 percent of the problem causing SCTs to produce "fat" star
images and light scatter
around bright objects like Jupiter or Sirius is internal reflection.
It is also my opinion
based on experience that SCTs will, for example, split double stars
more cleanly and
resolve globular clusters better, show more extent on nebulae and greater
differentiation
on contrast features on Jupiter and Saturn with flocking.
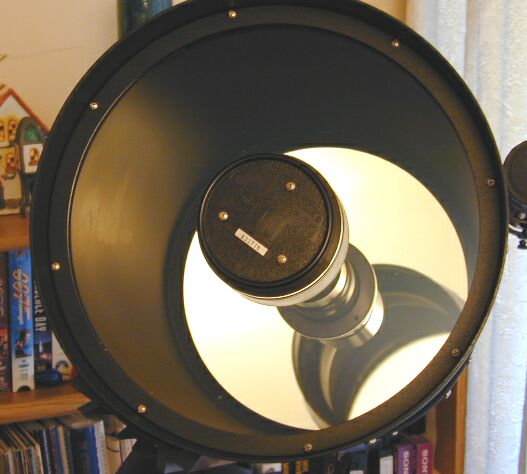
Let's look at a typical unflocked C11 optical tube and a flocked tube:

The light you see bouncing around in the tube is only sunlight being
reflected off of the walls
of a room - no artificial light has been introduced into the tube.
Now lets look at the tube
after it has been flocked (same tube, 2 hrs later, same room and brighter
natural lighting):
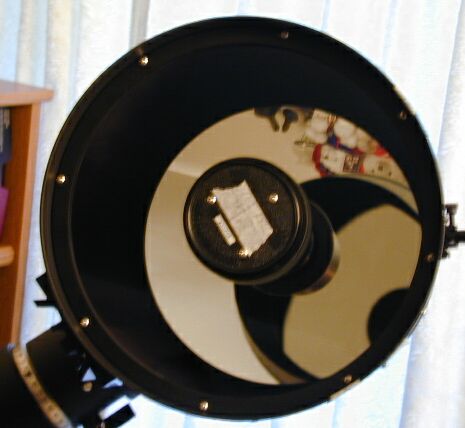
see the difference? No light bouncing around inside the tube.
Now let me tell you this - I've
flocked a C5 and put it up against an unflocked C8 on deep sky objects,
and the flocked C5
shows more contrast and nebulosity extent, cleaner images on bright
objects, and more
resolution on globulars. I think flocking has the effect of improving
an SCT by two magnitudes
of light grasp. How can this be? Optical authorities will
tell you that an SCT system looses
about 30% of its light grasp in internal reflections and loss of contrast.
Flocking is the easiest
way to solve this problem. Interested in learning about
how to flock etc.? Read on.....
Flocking material is available from several suppliers and in two types.
I have exclusively
used flocking paper made by 3m and sold by Edmund Scientific, and I
use the self adhesive
type. It is more difficult to work with, but stays in place better
over the long haul.
The best way to hold the ota tube and maneuver it to meet your needs
during the process
is to keep it on your mount. This will work even if you are going
to completely remove
the tube from the rear cell as long as you remove the front bolt(s)
from your dovetail
plate. Make sure you have excellent lighting available.
When the flocking starts going in
it gets very very dark and hard to see inside your tube.
Before disassembling your SCT for flocking, you need to make some reference
markings so
that you can reassemble all of the components in the same orientation.
If you do not do this,
it may not be possible to achieve collimation again with your instrument.

I use masking tape. Place across junctures of the front and rear
cells and the tube, then
cut carefully with a sharp knife. lets you realign these components
as they were before
you started. Marking the front and rear cells is only needed
if you are going to fully
disassemble the 'scope in order to flock it. I usually don't
fully disassemble with
a larger SCT because it's easy enough to gain access to the innards
without doing so.

These marks are critical - you need to be able to realign your corrector
plate in two
axes and also to re-center it after disassembly. I use
masking tape and a straight
edge. The cross on the secondary cell aligns with marks on the
tape to the top
and to the right of the cell.
Tip the ota UP a little to prevent the corrector plate assembly from
falling out when
you remove the retaining ring. Watch carefully for any loose shims
- you will need
to reinstall them in their correct positions. Actually, I prefer
to shim the corrector
plate with the the fuzzy side of self stick black velcro. I place it
all around the corrector
plate recess in at least 6 equally spaced locations. This is
more durable and centers
the corrector plate quite well. If you find that your corrector
plate is greatly off -
center when you first remove the retaining ring, and if your scope
was attaining good
collimation that way, try to reproduce the same alignment on re-assembly.
With the corrector and secondary assembly out, the tube looks like this:
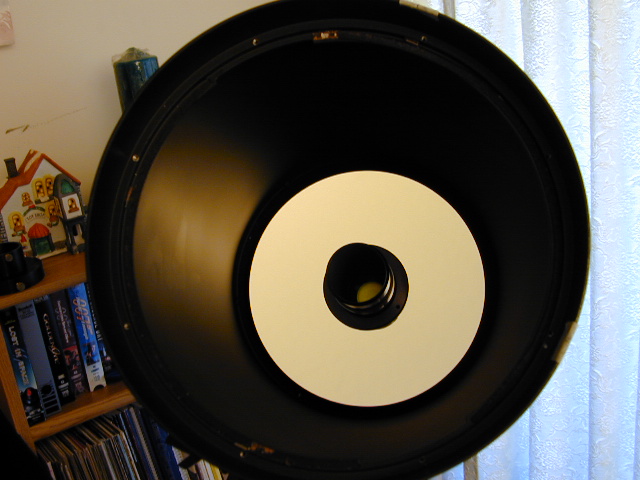
Our contrast robbing reflection is still with us. There are screws
that protrude
through the ota tube top and bottom. These are in a line with each
other and provide
a guide for starting our flocking paper so that it's square with the
tube. Measure the
depth of the tube to cut your paper. Unless you're very adept,
don't try to flock the
tube with a single piece - two or three is best. Pre cut
the piece for length and
peel back about one inch of the backing material. Align the piece
with a set of
opposing and aligned bolts. Rub the material onto the tube in
sections of a few
inches at a time as you peel the backing away. When you're done
with your first
piece it'll look something like this:

See the difference between the flocked surface and the original tube?
Look at that
reflection. Just natural light bouncing off of the mirror.
You can let successive piece(s) of flocking overlap by 1/8" or so.
If you overlap
much more the piece will tend to curl up a little.
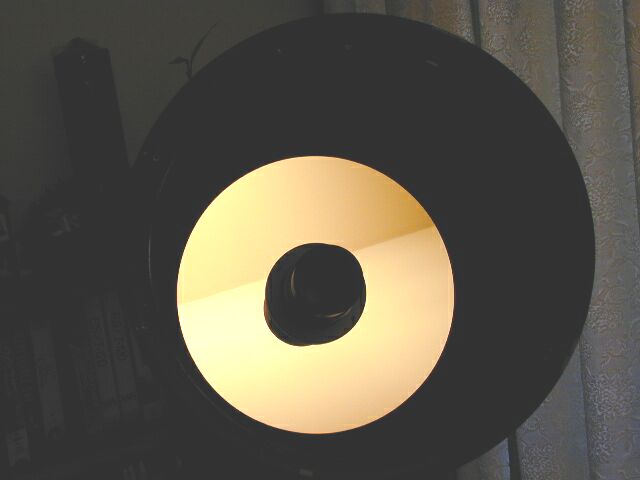
Here's what it looks like when you're done. Its so dark it will
fool your camera's
exposure system!
While you have the corrector plate and secondary off let's give it some
attention.
You will find that the "black" material inside the secondary cell is
also very reflective:
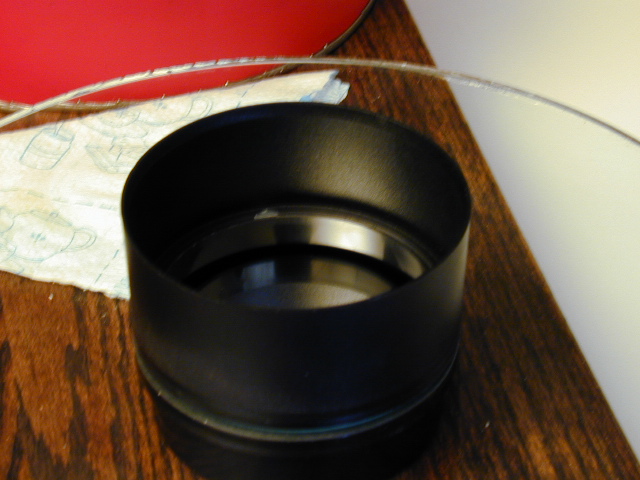
This side view shows the reflection on the inside of the secondary holder.
It is very
important to control reflections around the secondary mirror.
Even a baffled SCT or
MCT needs this attended to. Don't try to line the inside of the
corrector in one piece,
do it in two or three. Be aware that it is not a cylinder inside
but is conical. The sides
slope somewhat outward. After cutting and fitting flocking,
let's look at the result:
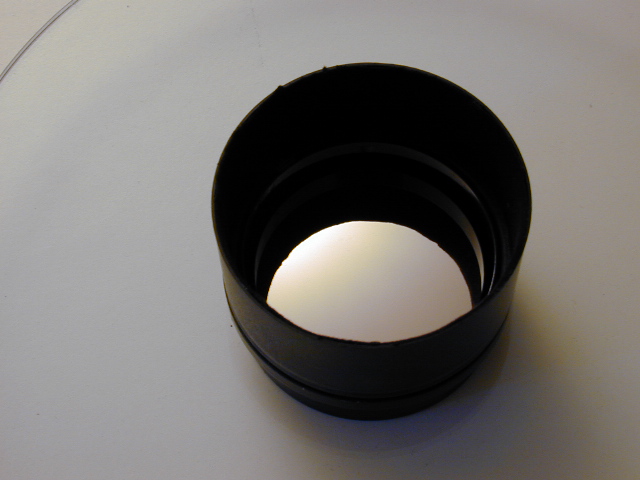
There is still some reflection in the very base of the secondary system,
but for the most
part it is much much darker in there!
Flocking the exterior of the rear baffle tube is optional. I think
it helps, but it has to
be done carefully because of its proximity to the main mirror and because
the baffle
tube on some SCTs is multi part and the parts slide or "telescope"
in and out with
mirror movement. If you elect to flock the outside of your baffle
tube, turn your
focuser to its limit in each direction and observe the action of the
baffle tube before
you apply any flocking material.
I am not entirely happy with the inside of the baffle tubes either
- some are completely
smooth and shiny (low end SCTs) and others have milled ridges like
mini-baffles, but
are still obviously too shiny. I have not at this point addressed
flocking the inside
of the baffle tube, since it would be pretty much impossible to remove
self adhesive flocking
material once applied. I may experiment with flocking paper that
is not self adhesive and
is attached from an accessible place outside the baffle tube.
In the mean time, I think that
removing all extraneous reflections inside your ota mitigates if not
eliminates the need to
flock the inside of the baffle tube.
When you replace the corrector assy. into the tube, line up your marks
rotationally
and make sure you replace shims as needed. Once you have both
sets of marks lined
up, replace the retaining ring. The screws in the retaining ring
should only be tightened
as much as you can with two fingers. If you over tighten, you can distort
the optical figure
of the corrector plate. Screws should be tightened in an order
so that you are replacing
opposite screws as much as possible to even out the tension on the
retaining ring.
When you're done it looks like this:

If you've got your marks lined up and everything looks good, let's try
the daylight
collimation
method to make sure your optics are aligned right, then you're done.
One last thought - you might want to flock the inside of your flexible
dew shield,
too - unless it's an Astrozap unit, it's too reflective inside.
Enjoy!