You've spent your hard earned (or stolen) cash on your 4Runner or RAV4, but you didn't get to achieve the coveted limited status and get all the perks and amenities of the higher class, more Lexus style interior. Replacing all your seats with leather, and swapping out the dashboard will cost you more than buying the Limited in the first place, so what do you do?
The answer for alot of us is the wood dash kit. Many people make kits, but not all kits are made alike, so you should find out if the kit contains real wood, if the pieces will conform to the curved dash properly, and which kits require professional installation.
Recently, the kind folks at Joshua Tree Wood Trim (http://www.woodtrim.com) sent me an Italian Burlwood kit for my 1996 4Runner. After carefully reading all the instructions, I went about installing the kit. Total installation time was about 2 and a half hours, and I went VERY slowly. THe key to a good installation is patience!!
 |
The Kit: The kit arrived flat, a large box about 3 inches thick and maybe 3 feet long. Everything was well packed in styrofoam liner and set up so that it would NOT scratch! The instructions are brief, but clear and to the point. Each piece needs to be carefully "dry-fit" to the dash. That is, put the piece in place BEFORE removing the adhesive. The pieces are initially quite stiff, but after laying them out on the dashboard of my 4Runner in the sun for 10 minutes really softened them up! You'll be surprised just how soft and floppy each piece can get. Then, you'll need to use isopropyl (rubbing) alcohol to wipe off each part of the dash. Even if it looks clean, I'll bet it's really dirty !! Then wipe off each portion of the dash with the included 3M automotive adhesive prep. |
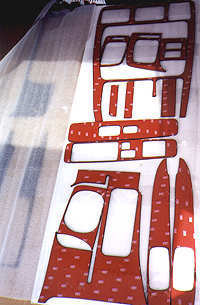
| Here is a view of the kit pieces. This is the bottom side, showing the 3M automotive adhesive backing. | |

|
The Key step: Rember again that the key to a good installation is patience. Each piece should be carefully fit in place after warming on your dashboard in the sun. It may take some bending, especially for the center console to get it to fit. On mine, I also had the added duty to drill a hole for my alarm system LED to poke through. To do this, dry fit the center console piece and press firmly. The LED will leave a nice intentation in the back of the 3M adhesive. Take a power drill and drill from the ADHESIVE side to the wood side. It'll drill like butter. Very easy to do! After you're convinced you have the pieces fitting properly, you'll need to PEEL off the backing. Another tip: For all but the smallest pieces I recommend pulling off only 5-10% of the backing first. Then position that amount of the adhesive down on the dash and slowly peel off the rest of the adhesive as you carefully fit the piece in place. Then firmly press down each part of the wood cutout. Remember, once that adhesive is stuck down. It is almost IMPOSSIBLE to remove. It's like trying to lift an elephant. That stuff STICKS!!! |
 |
The desired effect: A clean looking installation that looks nicer than the manufacturer's! Joshua Tree has included all the right pieces! I especially was happy with the center console, and the door areas! (I'll try to add more pics soon!) One more tip: When you're all done, leave the car for a few hours to cure. The pieces must take some time to bond to the dash, and If the car is warm, the pieces will hold their final curved shapes better. Any questions? |
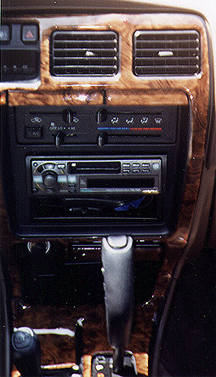
| Nice, ain't it! Lexus Eat your heart out!! | |
 |
 |
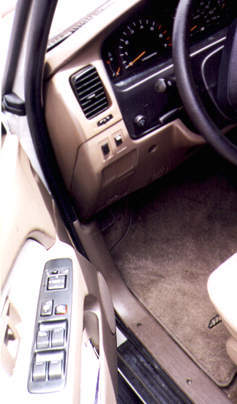
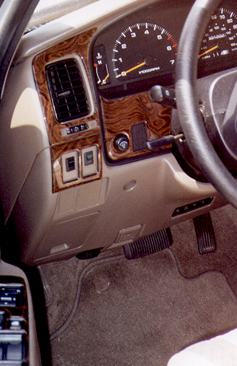
| The before and after... what a difference a day makes! (the kit includes small rectangular pieces to plug up the switch holes if you're not using them! Also, (not pictured) the dash kit includes wood trim to cover all the way up to the center controls where the rear window switch and ECT power switch are!) | |
| The final word: | |
| You can spend all sorts of $ on things
to enhance the look of your SUV, this is one relatively inexpensive way to really
upgrade yours! I was very satisfied with the kit, the really sharp and clean cut
edges of the pieces, the look of the real wood (most important) and equally important
the professional attitude and tips I got from Joshua Tree Wood Trim. They have been nice enough to extend Toyota SUVworld readers free UPS ground shipping (2-3 days usually)!! |
|
 Free shipping for Toyota SUVworld Free shipping for Toyota SUVworldreaders!! Just mention us in the "comments field" of your order form to receive free UPS ground shipping on your kit! |
Have a product you'd like us to review? Let us know!