Home made Intercom
Ankit Rohatgi, 4th July 2004
Introduction
A cheap intercom based on TDA2003 amplifier and 555 timer (Buzzer circuit).
Features
Cheap, efficient but slightly noisy. Not wireless and not as convenient as a telephone.
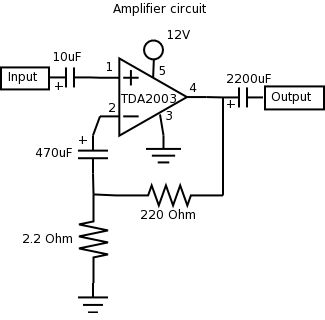
Amplifier
Two such amplifiers will be required. It's based on a TDA2003. It can be substituted with a LM386, NTE1232
or TDA2002.

Buzzer
This is handy for initiating communication (Informing the other side that you want to talk). It's a shrill and farily loud
555 based buzzer. Only one such circuit will be required if you plan to use a 6 core wire. Make 2 of this if you want to use a
2 core wire.

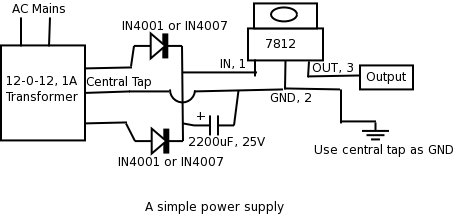
Power Supply
A 12v battery or an AC adapter which can supply upto 1.5A of current would do.
You'll need a good filter over the AC adapter. Here's a simple power supply circuit. Works great for me.

Layout
The layout can be a bit complicated on paper but, once you have the Amplifier and Buzzer circuit ready, it becomes really
simple in the head. You can fit things in any manner you like but, do consider the following:
Amplifier: Keep input wiring as short as possible. Always attach TDA2003 (or it's substitute) to an appropriate
heatsink.
Power: Minimize power usage. The intercom shouldn't consume any energy in standby mode. Minimize use of Buzzer and
amplfiers. If you have multiple amlifier and buzzer circuits, make sure that only one of them is running at a time. You will
get a hissing sound if a buzzer cuircuit is running along with an amplifier.
For Beginners: It's helpful to draw all the circuit diagrams, pin diagrams, wiring plans etc. before you start to
solder.
PCB: It isn't important to get a good quality PCB. A general PCB would do. Even a homemade PCB made out of cardboard
or plastic and some Aluminium Foil would do. Just see to it that the input signal to the amplifier is shielded and short.
Boxes and Controls: Simple plastic boxes would be sufficient to house the circuits. A heatsink for the power
supply transformer is adviced if you live in a hot place like Delhi. Make holes on the box where you plan to fix the TDA2003 heatsink.
Here's how I connected my intercom. You could use a different approach. I have used a 6 core telephone cable to connect the
'terminals', you'll need 2 buzzer circuits if you want to use a 2 core wire.


Notes
Speakers: 8 Ohm ones will also work.
Using the intercom: Speak, don't shout. Keep mouth 3-5 cm away from the speaker. The sound should be clear and loud
enough to be heard comfortably at a distance of 50cm from the speaker in a fairly silent house. If you feel uncomfortable in
using this, watch some old millitary movies in which they had those "Hi! over! Bye! Over and out!" kind of phones.. you'll
learn how to use this :))))
Estimated cost
Cost could vary depending on your location, the quality of components you use, length of connecting wires and the layout.
I'll try to give you an idea: A TDA2003 (without heatsink) costs Rs 10 (~ 20 US cents) at the shop I got the stuff from. I used 15m of 6 core
telephone cable to connect the terminals. The entire thing (along with the power supply, boxes and speakers) cost me around Rs 300
(~ 6.50 US $) i.e nearly 30 TDA2003s.
Suggestions for Improvement
You could attach two speakers at every terminal. One (a small 4 Ohm, 0.25W would do) would act as a mic and the other (10W)
as the speaker. This way you can build an intercom which feels more like a telephone and is easier to use
Any suggestions? Mail me: ankit_rohatgi@yahoo.com
Future Plans
Making a multistation version
Making it wireless


