Transfering a file using the FTP method does not have to be difficult. The key is having all the right information in the right places, then it's very simple.
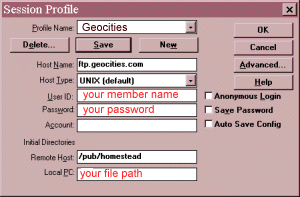
Once you have your FTP program you have to set it up to transfer your files from your hard drive to your website server. The FTP I use is WS_FTP and when you open it up you see a pop-up screen like the one below.

You name your profile so that you can save the setup and not have to enter it every time you want use it. Then you must know the server/host's ftp address and you can get that from your website server. Here at Geocities the host address is ftp.geocities.com as I've shown in the diagram. You must enter your member or user name in the USER ID box and your password in the PASSWORD box.
File Path You also have to enter the path to your files on your own computer, that is the local PC box. You just have to determine the path and enter it. My path for my computer is C:\progra~1\anansi\homepage. Remember - backslashes on your path, forward slashes on the remote host.
If all the information is correct when you go online and click OK, you should see a scrolling series of commands on the lower left of your screen. The last one should be "226 - Transfer Complete" Then you should have a screen with two boxes; Local PC at the left and Remote Host in the right. You click on the files in the Local PC box that you want to transfer and then click on the right pointing arrow between the two boxes. Again you should see a log and get the "226 - Transfer Complete" message. Once you are finished you just click on Exit to disconnect.
Some servers allow you to delete and rename files in your directory with your ftp program, Geocities does not support this at this time.
Back to HTML Editors & FTP Utilities | Back to HTML Help Index

