Pilgrim & Indian Village

From: "Kids Create!" by Laurie Carlson
 
Pilgrim & Indian Village
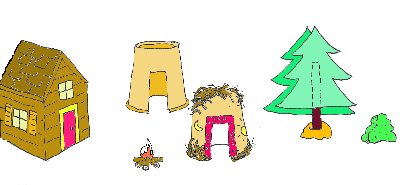
 
Building a Pilgrim and Indian village is a nice way to get ready for Thanksgiving.  Indians lived in different kinds of houses, depending upon which tribe they belonged and to and where they lived.  This type is called a Wigwam.  You will find the directions for making a Tepee on another page in this site.
 
Basic Materials
 
Milk cartons: the small half-pint size served in schools or any small boxes
Yogurt containers: the short, squat ones
Drinking Straws
Construction Paper
White Glue
Tempera Paint
Liquid Dish Detergent
Pencil, Scissors, Paint Brushes, Clay
 
First you will want to choose a nice base for your village.  You can cover a table top with brown paper or maybe you have some gift wrapping paper that looks like grass.  You could also use a large piece of cardboard as a base and paint on grass and dirt.  If you use large pieces of cardboard for the base, you can glue the houses and trees in place, and the
whole village will be movable.
 
 
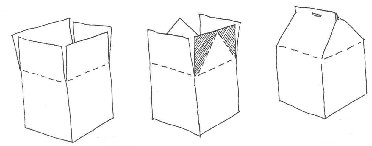
1.  Remove the stable from the top of the milk carton.  Trim with scissors as shown in the drawing below.  Cut down from the top, to 1 inch below the folded edge of the carton at all four corners.  On the sides with creases, trim off the corners diagonally, leaving a triangle flap on two sides.  Fold the sides in and restaple at the roofline. 

2.  Add a squirt of detergent to the tempera paint, so the paint will adhear to the waxy surface of the cartons.  Paint the cabins as desired.  When they are dry, glue on paper doors, windows and details cut from construction paper or draw on with markers. 
House Instructions
 

3.  To make wigwams for the Indians, turn the yogurt containers upside down, and paint with tempera.  When dry, spread with white glue and stick on pieces od dry grass and straw. 

4.  To make trees, cut two identical tree shapes from green construction paper.  Cut a drinking straw in half, so it's about 4 inches long.  Glue the straw between the tree shapes to serve as a trunk.  Roll a ball of modeling clay, and push the end of the straw into it to stand the tree up.  Another idea for making trees is to go into you yard and look for small twigs that look like miniature trees.  Roll a ball of modeling clay, and push the end of the twig into it to stand the "tree" up. 

5.  To make bushes, tear green sponges into pieces and dab with splotches of tempera paint.  If your yard has some moss, you could also use that to make bushes. 

6.  If you want to add people to your scene, use modeling clay or pipe cleaners and cut paper.  Make some wild turkeys and deer, too.  Use small twigs and rolled paper logs to create cooking files. 
 

LET YOUR IMAGINATION GO!  THIS IS YOUR VILLAGE.

MAKE IT YOUR WAY!


Back to Holiday 
Craft Index


This page hosted by GeoCities Logo Get your own Free Home Page
 
 
  1