
A Treasure Box for Dad


How to:
This box is made of foam board, a paper-covered foam material used in framing pictures. To start, divide a nine-inch square of the board into three-inch squares. It's important to keep the corners at right angles so that the edges of the box will join properly. If you have one available, a T-square or triangle will be helpful.
Lay the square on a stack of newspapers or other protective material, and have an adult use a ruler and utility knife to remove the four corners. Next gently cut through just the top layer of paper and foam on the center square. Carefully bend the sides up on each side to make the box shape. Match the sides, and tape each side joint in several places.
To make the lid, turn the container top down onto another piece of foam board, trace around the form, and cut out the shape. Cut three pieces of mat board smaller than the inside dimensions of the box, and glue them together. Use rubber bands to hold the pieces in place till they dry. Remove the bands and glue the pieces to the inside center of the lid. This built-up area will help keep the lid in place.
Mix the wallpaper paste according to the manufacturer's directions. Tear newspapers into squares or short strips, and working on wax paper, begin pasting the box starting at the seams. Cover all the corners and the seam around the bottom. Use the handle of an artist's paint brush to help push the paper into the indented areas. Now cover the bottom and the sides, extending the layer about 1/2" over the top and into the box.
After the box is completed, papier mache the lid, including the bottom. While it's not necessary, you can make a knob by attaching a large bottle cap to the box top. Tape it to the lid, then cover and paste it to the form using small strips and the papier mache mixture. Apply an extra layer or so at the joint.
When the box is dry, you're ready to paint the surface decoration. Apply one coat of gesso (primer) to the container. After this dries, paint the box a background color, and then apply dot designs with short dowel rods and cotton swabs. Another option is to use fabric paints in squeeze bottles to apply dots, squiggles, and other shapes.
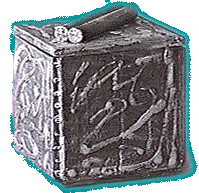
In our example, we drew designs on the box and lid with white glue. After the glue dried, we applied gesso and then painted the box and lid black. Finally, we dry brushed a light coating of silver over the surface, and we painted short dowels and glued them in place to make the knob for the lid.
You'll need two pieces of felt for the box lining, one for the bottom and another to go around the inside. Measure the bottom, the distance around, and the height of the inside to determine how much felt to cut. Subtract about 1/4" from the height to allow the lid to fit properly. Use fabric glue to fasten the material into the box. When you're finished, sign your name and the year on the back or the bottom.
Marilyn's Imagination Factory
©1997 Marilyn J. Brackney


