- Lock Twist .
- Pinch Twist/Ear Twist .
- Toe Twist/Split Twist .
- Pinch-pop series .
- Loop Twist/Fold Twist .
- Bird Body/3-bubble Roll-through .
- Apple Twist/Tulip Twist .
- Apple Link .
- Hook Twist .
- S-Hook Twist .
![]()
How To Make Balloon Sculptures
![]()
Table of Contents
Balloon Twists
Here's the scoop on some of the basic twists used in balloon sculpture. By combining these twists in various ways you can create thousands of figures from your balloons. More twists will be added as the need arises.

Lock Twist
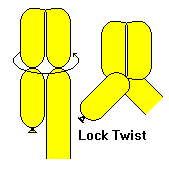
Twist two bubbles, usually about the same size. Bring opposite ends together so that the two bubbles are parrallel and touching each other. Twist them together to lock in place. This is the most common method of making legs and ears on simple figures.
.
.
Pinch Twist (Ear Twist)
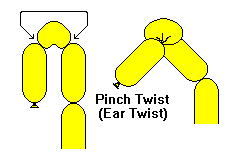 Twist a 1 to 1.5 inch bubble, leaving it a little on the soft side.
Then twist the two ends of the same bubble together. This makes an
ear-shaped bubble that is good for ears, lips, or sometimes to hold
another bubble in place.
.
.
Toe Twist(Split Twist)
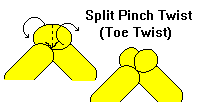 Begin with an ear twist. Grab the two sides of the bubble and twist it
in two, making two bubbles about 1/2" or less in diameter. These
are good for adding fine detail to faces or hands and feet.
Pinch-pop Series
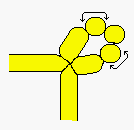 The pinch-pop series is used to separate two sections of a balloon. It
consists of three small bubbles in a row within a loop of bubbles.


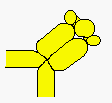
Make a pinch twist in each of the outer bubbles in the series. Then toe-twist each of the pinch twists to secure them. Both the pinch twists and the toe twists should be given three full twists to ensure that they will hold.


Now comes the 'Pop' part. You pop (break) the center bubble to allow the rest of the loop to separate. The pinch twists and toe twists will seal the ends and keep the balloon from deflating.
.
Loop Twist(Fold Twist)
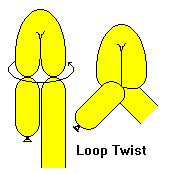 This is a lot like the ear twist, but it is done with a much longer
bubble. Just take a long bubble, fold it back on itself, and twist the two
ends together. This is good for large ears, hands or feet on multiple
balloon figures.
.
.
Bird Body (3-Bubble Roll-Through)
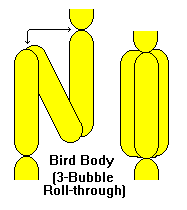
Twist three bubbles, usually about the same length. Twist the opposite ends of two adjacent bubbles together to make a pair. Now take the third bubble and carefully push it through the pair, rolling the outer two bubbles around it, so that you have three bubbles all joined together at both ends.


Apple Twist (Tulip Twist)
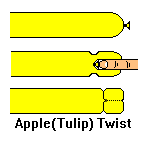 No, this is not a pastry. It is a technique used in round balloons to make
an apple shape. With long 2" balloons it is sometimes called a tulip
twist. Push the knot about 2" down into the balloon with your index
finger. With the other hand, pinch the outside of the balloon and grab the
knot. Carefully pull out your index finger and twist a bubble at the point
where you pinched the balloon on the knot.

Apple Link
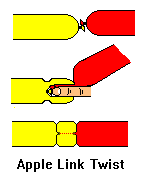 This twist is done exactly like the apple twist, except that you hold
the knot of another balloon along side of the knot that is getting the
apple twist. When you grab the knot from the outside, grab both
knots, and the two balloons are linked together.


Hook Twist
 The hook twist is similar to a very deep apple twist. Push the knot
as far into the balloon as your finger will reach, and grab it
through the balloon with the opposite hand. Instead of just pulling
your finger out, bend the finger and peel the balloon off from
the outside of the curve. This takes a bit of practice, but it
allows you to make some unique figures.
S-Hook Twist
 Once you have mastered the hook twist, try the S hook. This works
the same way, except that you bunch up the balloon to get your finger
even deeper into the balloon. I think it makes a terriffic
squirrel tail.
These Instructions are provided by
PROFESSOR WONDER
How to Make Veggie Tales Balloon Characters
![]()
Updated 2005