Hand Caning a 100-year Old Chair
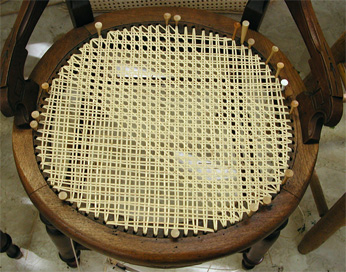
The image above shows Jim's hand-caning in progress. The two strands of horizontal and vertical canes have been installed. Installation of the diagonal lower-right to upper-left is in work.
Since lengths of cane are insufficient to cover the entire distance, wood golf T's are used as anchors at start and stop points. (Special cone-shape pins were purchased for the project, but we liked the Murphy flea-market golf T's better--cheaper too.)
We purchased our four dining room chairs at Clarence, New York flea market for $15 each. Since then, Jim has been waiting for a chair caning class at the folk school so he could learn to recain them. The course required students to bring chairs refinished and in good repair. The chairs were stripped by Jim using lacquer thinner and then finished with Tongue Oil.
While removing the old cane, we noticed that three chairs had previously been recaned. This was accomplished by carving a groove around the chair so that pre-woven cane could be used. (This method is much speedier than hand-caning.) However, pre-woven cane had been glued into the groove.
Cleaning the groove of the old glued-in cane and spline was a problem. We found that a mild vinegar solution helped dissolve the glue. Also, a special tool was purchased from Woodcraft to help with the cleanup. It is important to thoroughly clean the groove as the replacement pre-woven cane and spline must be carefully chosen to fit perfectly.
One chair had not been recaned and was not prepared for pre-woven cane. Noting this opportunity, one chair of each type was taken to the folk school. Jim could learn to use pre-woven cane on one chair and would hand-weave the other chair.
It took Jim, an inexperienced weaver, the better part of three days to hand-cane the above chair. However, using pre-woven cane, a similar chair was caned in about an hour.

