 |
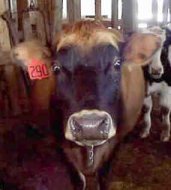
Olivia is a registered Jersey that I acquired from a near by dairy farm. At first we were happy to milk the cow and drink the milk....After a time after skimming off the cream, I decided to try making butter. To our surprise, it was great!! We spent the summer drinking milk and making butter. Well, in the fall she freshened (had a calf). Olivia gave more milk then the family, chickens, cats amd dogs could drink so I decided to look into making cheese. If other folks could, why couldn't I? |
I found books on cheese making and they all said different things. I finally happened across The New England Cheese making Company. They had cheese making supplies, and better yet, recipes I could follow and recipes that worked! The mozzarella cheese I've learned to make is great! I must admit, it took a few tries to get it right. The chickens appreciated all of my mistakes though so nothing was a waste. We love this cheese on pizza or just cut in chunks to eat plain or with crackers and meat. One thing we've discovered though is the shelf life of homemade cheese is considerably less than the shelf life of store bought cheese. No preservatives! In these photos you see the cheese as I am heating and pulling it to work it into shape and after we've used it on pizza. By the way...the pizza was great! I decided I wanted to try and make other cheeses. I found a recipe for a Colby cheese. The recipe called for buttermilk to be added to my milk, let the mixture sit over night, stir in rennet, cut the curds, heat, drain, and press the curds. This sounds fairly simple doesn't it? It's really not. More like an all day process! The first time I wound up with an edible squeaky cheese. Not bad, but not what I was looking for.....I tried again, and let the cheese cure for a month for different "flavor". WOW!! that WAS different. It took a lot of mouth wash to get that flavor out! One recipe called for unpasturized milk to be used in a similar way. I tried that but YUCK!! Only the chickens were happy with this result! |
I finally happened along a recipe for Stirred Curd Cheddar cheese. I got the right cultures together and set out again to make cheese. I followed the directions (something Bill will tell you I have trouble doing). I pressed the cheese then waxed it. We let it sit on the shelf for about 10 weeks. I turned it as required. When it was tasting time I cautiously tasted a very small piece, remembering the flavor of the last one. To may amazement it was GREAT!! Since then, I've been making cheeses when ever I have extra milk. I make Mozzarella, Neufchatel, Stirred Curd Cheddar, Farmhouse Cheddar, Ricotta, Monterey Jack, Colby and Colbyjack. One of these days I'd like to make some Swiss Cheese too.
Photographs of the Cheese making process
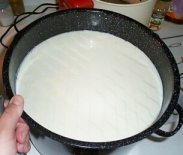
When I first set out to make cheese, I really had no idea how things were supposed to be looking at certain stages of the process, so I've put together some photos to give you the general idea of the process. When I first begin, I take 2 gallons of whole milk. This has to be heated and culture added. The milk then ripens for 30 - 60 minutes. Then the rennet is added. I use rennet tabs that I get from The New England Cheese Making company. This photo shows the cheese curd after it's hardened to a clean break. I then cut it with my stainless steel knife into these little cubes. |
|
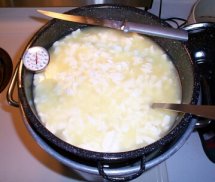
Miss Muffett was on to something good! These are curds and whey. After cutting the curds as in the above picture, the curd is heated slowly. This process firms up the curd and pushes the whey out. I heat my curds over a double boiler. They must be stirred gently so the curds don't get all broken up. |
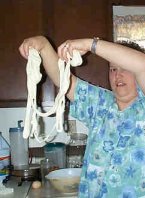
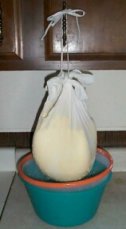
This photo shows the cheese as it is hanging to drain. I use cloth diapers for my "cheese cloths" Not the prefolded ones. A clean shoelace makes a great tie. Not all cheeses need to hang to drain. |
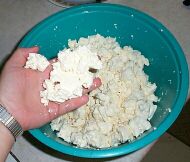
This shows the curd after it's salted and just before it's put in the press. This is my favorite part. The curds taste quite good at this stage! This is the stage where you could add herbs and such for flavoring. The curd size before pressing, is determined by the type of cheese that is being made. |
||
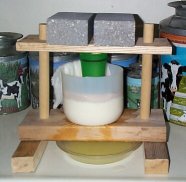
Next is a picture of the press with the cheese in it. Most cheeses stay in the press for at least 12 hours. The longest pressed cheese that I make stays in the press for 24 hours. Bill made me this press with some scrap lumber. According to the books hardwoods work best. I now only press with one brick for weight. I'm still learning as I go! |
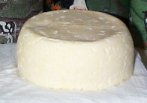
This is how the cheese looks after it comes out of my press. I usually cut it into two and trim the edges for easier waxing. The cheese takes about 3 days to dry at room temperature. Then it'll be ready for waxing. |
||
I used to wax my cheeses using a brush. Not only was that messy, but it wasn't a good way to do it. If you couldn't get all of those pockets filled, it left air pockets resulting in moldy cheese. Not that the cheese was a total waste. We trimmed the mold off and ate the good parts. |
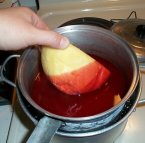
Now, I dip the cheese into the melted wax. It makes for better coverage and better cheese. No mold noted so far since I've been doing this. The downside is having to buy ample wax so that it could be melted in a pot for dipping. As far as I'm concerned it's money well spent. I wax labels on the cheese as well so I know which is which. |
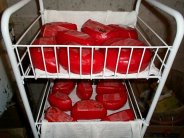
I store my waxed cheeses in the basement in the cellar. The temperature and humidity are about right. I turn my cheeses every day when I remember. I try to wait at least 4 weeks before eating a cheese. The longer you wait, the
better it tastes.
Thanks for checking out my cheese page. I hope you found it useful!


 .
.