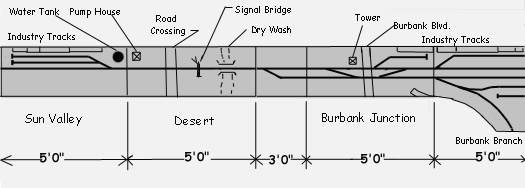
My HO layout is modeled after a short section of the Southern Pacific's main line at Burbank Junction where the Coast and the Valley lines split from the double track main line leaving Los Angeles. During the 1960s I had spent countless hours watching freight and passenger trains pass the junction. Years later my imagination was captured by this time period to recreate in miniature the place I had enjoyed so much, so long ago.
This is a shelf layout modeling a heavy traffic main right-of-way with trackside industries located next to each other in a cityscape. The industries are built up as space saving flats of buildings with loading doors to receive and ship freight car loads of industrial products. The layout width on the average is 14 inches or nearly a 100 scale HO feet wide, this being the width of the prototype railroads right-of-way.
Starting about ten years ago I had built a five foot module of single track main line to sit on shelf brackets. At that time, about all I could do was run an engine back and fourth. This fired me up to build a second module with a small yard with industries. The layout was then 10 feet long with several turnouts, I was on a roll now feeling much better about layout building than the arm chair railroading that I had been doing.
After moving to a larger home and rebuilding an upstairs room that measured 9 x 23 feet for a layout and home office space, the shelf layout was setup along one side of the rooms longer length. On every wall stud a standard metal shelf bracket topped with a 1x3 inch board was placed to support the modules. The module units are screwed together but rest freely on the bracket boards to allow for expansion and contraction, after 5 years there are no track problems.

The third module would be focal point of the layout, Burbank Junction Tower has two sets of high speed crossovers using number 8 turnouts. The fourth module was built starting at 14 inches wide at the Burbank Tower module then expanded to 32 inches for the corner of the room. Here the double track main line disappears under auto bridge at this end of the room, only the westward leg of a wye is modeled, this being the eastern end of the Burbank Branch. This branch is planned to run to the other side of the room to North Hollywood. Both of these sections use a fascia boards that depicts one side of a concrete drainage channel. I considered each module finished when basic scenery such as painted track and ties, ballast, ground texture, and the fascia board, smaller details like switch stands, signals and pole lines are added later during detailing projects.
The height of the track from the floor is 60 inches, this works well for my eye level at 70 inches. This may be seem a little high but I prefer a horizontal view of my trains during an operating session. This also still allows plenty of space below the layout to be used for cabinets and book cases. The main line is level just as its prototype but the scenery ground level on some modules does drop below track level to look like fill. Several industry spurs drop down a scale foot below the main line past the turnout, although this is done for looks the spur track at the industries are level so cars do not roll when uncoupled.
Wood working is not on my fun list of things to do, a cabinet maker friend cuts plywood and lumber to size. I've never wanted to own an electric table saw or other wood working machinery. Wood-wise I have a small molding crosscut hand saw and a electric drill for pre-drilling screw holes that suits my needs.
The sections are built of one half inch plywood with a 1 x 2 inch frame. This provides plenty of strength to hold the track and structures. This is like building a book shelf without the heavy books, model trains are really light weight.
I matched a color chip of blue to the sky in a photo of a SP water tank, the local hardware store mixed up a quart of flat indoor latex paint. I removed all the layout modules and painted from above the shelf brackets to where the roof of the house comes down to the vertical wall behind the layout, this showing about 14 inches of sky blue. While the sky paint was still wet I brushed on white latex paint for clouds. I still need to go back and paint mountains, roadways and distant structures. The next cleaning session for the layout will be when this painting project is done.
I was fortunate to find more help to understand the operating end railroading along this main line thanks to a retired operator that worked at the Burbank Tower during the 1960s. I met him on a railroad email list and we corresponded over my many questions. Now I can operate my Burbank Junction Tower much like its prototype. I found that this research was just as satisfying as building the layout, if you model a particular prototype location, you will find railroaders that are willing to share their knowledge.
I also purchased Employee Timetables and Special Instructions at train shows for the years that I was interested in modeling. This helped me make my own timetable for the Los Angeles Model Railroad including Special Instructions for operating the tower.
A trip to the Burbank Historical Society provided early photographs of both the railroad and the trackside industries providing valuable modeling information.
Some of my pictures taken during 1960s included several of the Burbank Local diesel switcher, it was a Baldwin diesel AS-616 that was used the branch line. This is what I wanted to use for the switching power, it was sort of an ugly duckling and at the time I thought all diesel's must looked like these. I had purchased a vintage Hallmark brass Baldwin diesel and installed a modern can motor with plastic universals to the gear towers. It runs very slowly, it sounds like a noisy Baldwin because of the gear towers, but it runs just fine. I also added the SP style details such as number boards, horns and a bell on the long end of the hood. In those days the long end was considered the front of the engine. It was painted in the Gray and Red scheme and numbered following my photographs.
Other diesel's that run on the layout are Proto 2000, GP-9s, GP-20s and a Atlas Alco S-2.
I use a generic card system for the local to pick up cars at Burbank and work out to Sun Valley and back. For the prototype this was a busy section of railroading, local jobs had to do their work quickly and get out of the way before another Coast or Valley Route train was in the block. There are not main line trains running yet until the layout someday expands, for now the Burbank and Sun Valley Local are the only trains in town.
My layout is designed for one operator, very few model railroaders have shown up and wanted to operate. If by some chance someone does want to operate, I let them be the engineer (operating the control) and I work as the breakman with the switch list. This is because the turnouts are hand thrown from under the layout, I know where they are without having to see them. The crossover switches at the tower will be electrically operated from a panel looking much like the prototype during its last years, the tower was removed in 1967.
Having a clear view through a window of my back yard, looking towards Sun Valley end of the layout, I will be installing a real Searchlight Signal in my back yard along with the poles and glass insulators to bring the wiring into the layout tower control panel. This signal will be used for westward movements for trains to pass the tower. So when the westbound crossover is lined from the tower control panel, the signal will display a yellow aspect for the diverging route, green for straight and red for the eastward crossover when lined against the main.

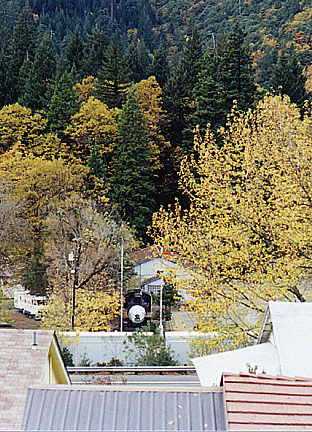
Looking out the other end of my attic window, there is a great head on view of a real semaphore and a steam locomotive over in our local park. I'm also working on a radio control method to get this signal to operate and work it into the towers eastward train movements. This is a long range project, maybe several years.
The power pack is a Hogger walk-a-round for one operator control allows me to walk to each end of the room. I placed on/off switches along several of the layout modules that are used to turn off power to a number of tracks, this is so I can have other engines parked on the layout when I want to operate them.
I thought it was important to install terminal blocks on the underside the modules, if I want to expand the layout with another power pack or change to DCC, a few jumper wires can be moved around to make this happen. Building small modules like these allow for tilting each section on edge and holding with a C-clamp on the shelf brackets for wiring and other work.