Make Your Own Deeky!
Buttons
Make Your Own Deeky!
(All credit for 'Make your Own Deeky' goes to Leet/Blueshift @TF2K5 MUSH. Thanks, Matt!)

 Congratulations
on having the guts and the sufficient time to invest in creating a little
model of everyone's favourite Junkion! Sadly however,
a model of Wreck Gar ain't available yet, so you'll have to make do with
Deeky! Hey! You do realise I'm going to get
you for that, Pipes..? *WHAP!* OW!
A quick note before you start - many people prefer to use card instead of paper for these models. This is perfectly fine for Dee-Kal, although for best results the head and the two horizontal strips that extend from the crotch area should be left as paper, flexibility being very important for these pieces.
 Printing.
To avoid Dee-Kal getting too big, and not too small to be impossible to
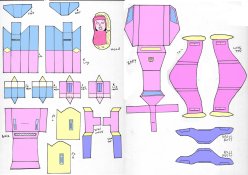
make and transform, the initial sheet needs to be resized to be printed
onto one sheet of A4. Do not resize the object physically, since this
would result in a loss of resolution - instead either import said image
into Word and resize, or else resize in Print Preview.
Now cut out all the shapes and follow the below steps:
- Cut the marked slits in the side of each leg, then tape together both
legs along the long horizontal side. Tape down the sides of the flaps
to seal the top of the legs, but not the upper edge of the flap - this
needs to be left as an open slit, and will become vital in the transformation
later. Now fold the feet sections and place them against the legs to
make them look to be in a standing position, the soles of the feet lying
flush with the bottom of the legs. Tape the front of the legs to the
top of the feet, so that a hinge is made. When the feet fold downwards,
to lie flush with the front of the leg, the toes should overhand the
edge. Trim the bottom as necessary to make sure the legs and feet stand
upright securely (although do not worry about this too much - extra
support becomes available in robot mode).
- Take both upper and lower arms and tape. Tape both lower and upper
arms together, the white area of the upper arm being at the very top,
and the 'hands' being at the very bottom. The taped hinge should result
in each arm being able to hinge upwards, the hinge being on the same
side as the hand.
- Cut out the large rectangular slit on the back section and tape together. Take both exhausts and tape together. Line up the back of the exhausts (the flat ends) with the front of the back section (that with the slit) and tape to the /top/, placing the sellotape for the join on each edge of the section, so that the exhausts may hinge up and down, allowing leeway for the transformation. Note that the top of the exhausts are the protruding side.
Buttons
Buttons
See Also
See Also
- Tape together the body. The back of the crotch area should bend over and be taped to the back, the black line marking the place where it lines up with the bottom of the back. Glue the head together and trim off any excess, then tape the head securely (tape on both sides) to the middle of the yellow section on the shoulders.
- Glue together both sides of the wings, and both spoiler sections,
upper and lower. Fold the lower spoiler section together (the blue part
is the top, whilst the bottom is pink. Glue the upper spoiler to the
lower section, so that the wing section faces away from the pink tab
that extends, whilst the larger end faces away. With the spoiler lying
at the back of the back section (the end without the slit), tape the
tab to the black line, so that another hinge is made, allowing it to
hinge upwards, so that when folded upwards, the tab at the end of the
spoiler fixes into the slit.
- Fold the wings along the black lines - first inwards, then the second
line outwards, so that the middles section is bent inwards. Glue this,
downwards facing, to the top of the body, so that the wings protrude
/outwards/
- Tape each leg to the side of the body. Now tape the upper arms to the side of the body, so that they pivot. Slide the slit in the back section over the head, turn over then tape at the back to create a hinge. To release the head for robot mode, hinge the back section down until the head emerges, the with your fingers, pull the head out and let the back section lie along the back. This is why the head should be made from paper - double-sided, it is firm enough, but needs to bend enough to break free from the transformation. Now tuck the side flaps on the crotch area into the slits on the legs. Your model is complete! Trim the feet as possible to allow Dee-Kal to stand.
To transform -
Fold the spoiler back, then hinge the back section off over the head to
lie against the back. Fold the feet down, then hinge the legs to lie beside
her sides, both the exhausts and the arms laying above the feet to lie
upon them. Take the crotch tabs and fold them into the slits on the /top/
of the legs. Reverse this procedure for robot mode.
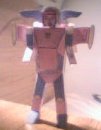
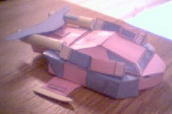
Below are some pictures to show the completed model to help with
any difficulty:
