
Note: this is not a period item but very useful on car trips and when camping.
Supply List
2 yds fabric for top
2 yds fabric for backing
1/2 yd fabric for pocket (May be the same as the top or backing.)
2 yds low loft batting
Matching thread
Matching crochet thread or yarn for tying
sewing machine
safety pins or straight pins with large heads
scissors
rounded mattress or upholstery needle
1 pair small, clean pliers
Instructions
1. Lay out backing fabric, fold in thirds the long way (hot dog folds). Measure the width. This measure is the length and width that your finished, square pocket should be. Add your standard seam allowance to this measurement before you cut out the pocket.
2. Cut out the pocket front and back. Lay right sides together and sew leaving an opening at the bottom for turning it right side out. Clip corners diagonally being careful not to clip any stitches and turn right side out. Top stitch around the edges of all 4 sides. (This will also close your opening.)
3. Lay the backing material out flat, right side up. Choose one end for the bottom. Pin the pocket in the center, leaving a seam allowance at the bottom. Place it pillow side down. If there is a top and bottom to the picture on the pillow side, place the bottom of the picture at the bottom of the quilt. Sew three sides leaving open the side toward the center of the quilt.

4a. Again lay the back of the quilt out on the floor, right side up.
4b. Lay the top of the quilt, right side down, on top of the backing so taht the right sides lay together. If there is an up and down to the front of the quilt, make sure you place the bottoms together.
4c. Lay the batting on top of the wrong side of the top fabric and trim, leaving the batting hang over the sides an inch or two on all 4 sides.
4d. Pin the layers together putting the pins in the batting side. This is why straight pins need to have large heads so you can find them in the batting. Be especially careful to pin around the edges where you will be sewing.
5. Begining at one side of the pocket, sew around the quilt ending at the opposite side of the pocket,k leaving the pocket area open for turning. Clip all four courners diagonally. Make sure all three layers have been caught in the seam. Trim the edges and take out the pins. Turn right side out. Fold under the open edge and sew closed by seaming along the top stitching on the bottom of the pocket.
6. Smooth quilt out on the floor. If not tying immediately, pin the layers together and store rolled.
7. ISing a mattress needle threaded with crochet thread or yarn, take a 1/2 inch stitch and clip the thread so that there is approximately 2.5 inches on each tail. Tie the ends together in a square knot. If you ahve trouble pulling the yarn or thread through, use the pliers. Place a tie approximately every 6-8 inches. Cover the entire quilt with ties being careful not to tie through the pocket. If you pieced the batting,k you may need to place the ties closer together to prevent the batting from shifting with use or in the wash.
8. Fold quilt up into the pillow and you are finished.
Folding Instructions
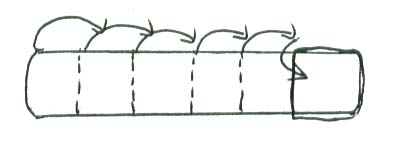
Lay the quilt top up on the floor (pocket facing down). Fold in thirds.

Turn pocket inside out and flip over the folded end of the quilt.

Starting at the end opposite of the pocket, fold or roll until you can stuff it in the pocket.

Return to the Medieval Arts Page.
Unless otherwise noted, all text and drawings are copyright 2004 P. Girard
Email the page owner Lady Almaith