First you must make sure that the actual door is properly
aligned and positioned in the door opening. This is crucial to a successful
adjustment of the window. The factory manual covers this in detail so I
am not going to go into it in detail. But the general idea is that you
should make sure to have the door centered and evenly spaced in the door
opening, make sure the upper crease in the body work matches up well with
that in the door. The factory spec allows for up to one millimeter (either
front or rear of the door) for the door to be recessed in comparison to
the body surface in order to minimize the wind noise. The door adjustment
can be done at the door hinges and the striker plate positioning on the
body side. The hinges have 3 bolts each on the door side and the body side,
each can be loosened to adjust for the door placement. I believe that one
can also buy shims to put in underneath the hinge mounting plates should
you require such adjustments. This adjustment, I heard from the body shop
technician, literally took him 2 hours to get it right... and still it
was slightly off causing a misalignment of the window at the top. In my
case, the window was tilting a little too high at the rear of the door
on the driver side door, causing the front part to leak/produce wind noise
at speeds above 30mph. The height adjustment was made previously but due
to the rear end being too high, I could not get a good seal at the front.
Assuming you have well-positioned door :-)
Remove all interior door paneling, it makes the job easier
since you are going to be opening and closing the door repeatedly. Also
remove the vapour barrier, if you have it. If you don't, or if you happen
to rip the one you have, you can make one from a nice heavy gauge vinyl
sheet (industrial garbage bags, from hardware stores etc) and some duct
tape.
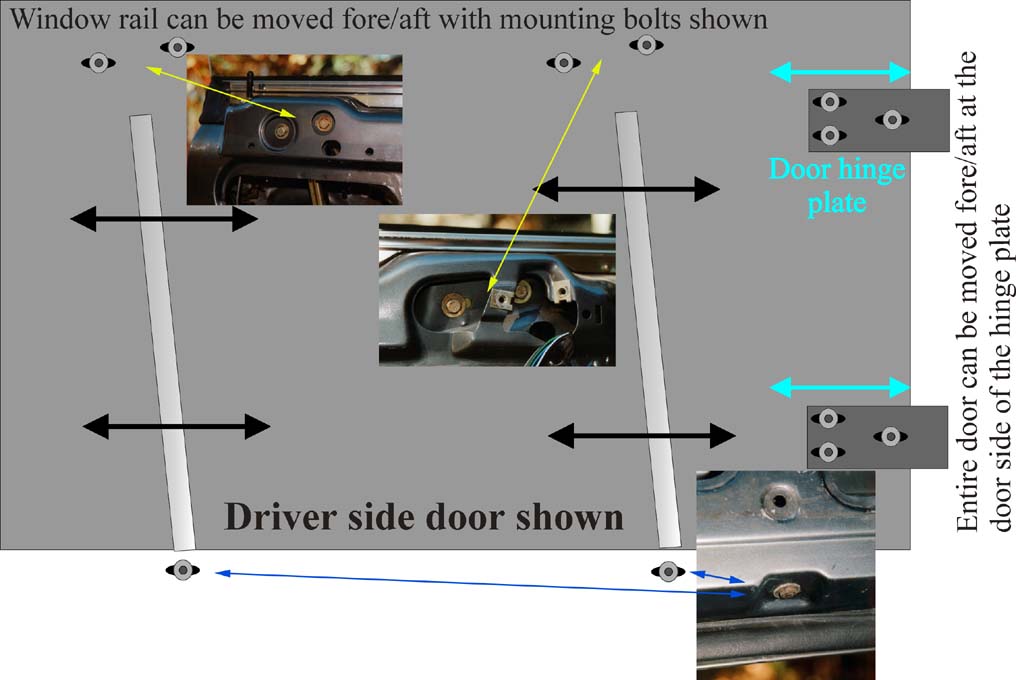
Not all of the adjustments may be needed in your case!! please use your best judgement! It's presented in the order that I think should be checked or adjusted, you may want to do things differently... 1) Window rail positioning: The window slides up and down along two rails, one front and one rear. These rails can be positioned forward or back, may be +/- 1/4 inch or so to move the entire window forward or rearward by the corresponding amount. I didn't actually have to do this part of the adjustment so if anyone out there's done it and find some mistakes/misinformation in this writeup, please let me know. Referring to the Figure 1,

the rail seem to have two sliding/adjusting bolts at the
top and one at the bottom. Again, I did not do this adjustment so there
may be more bolts, especially at the top. I just didn't see any other adjusting
bolts for it. These bolts all take 10mm hex head, ones at the bottom may
require counter hold. Loosening these bolts and sliding the entire window
forwards or rearwards should do the trick. This may be a two person job.
Go slow, little adjustment at a time and see the general fit before making
more adjustment. Always a good idea to mark where things were before you
started to mess with them. I used a fine point permanent marker and made
an outline of the washer/bolt position before loosening them, just in case.
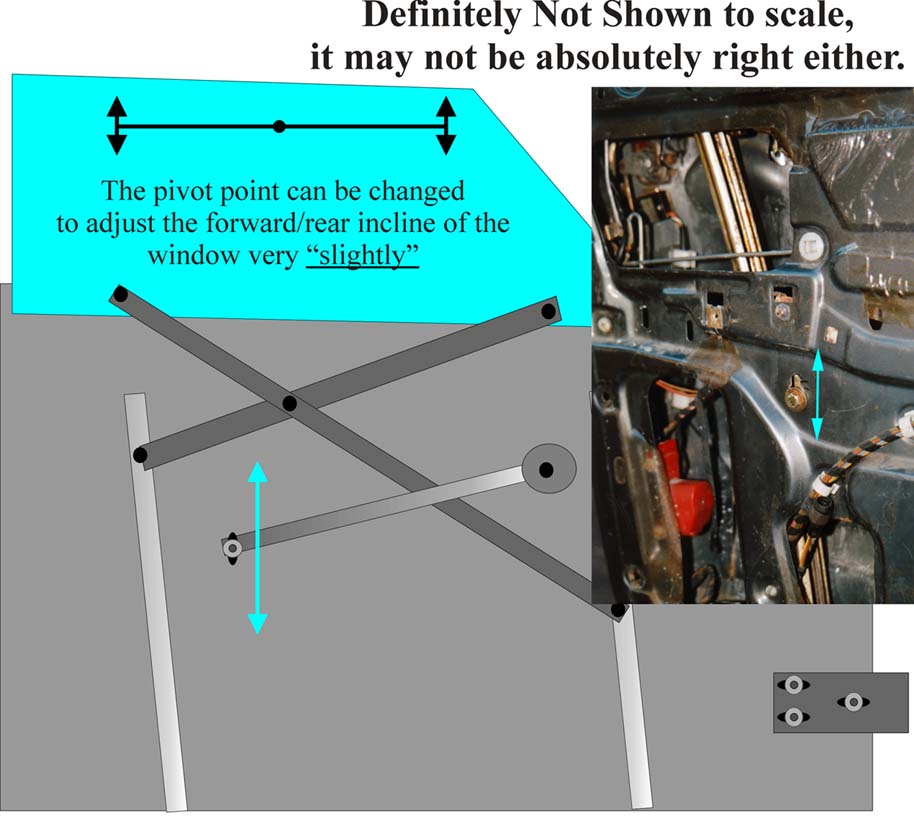
2) Window top tilting angle adjustment: There seems to be a single adjustment point to correct the alignment if your window is too high at the rear (as was my case) or too high at the front. The amount which can be adjust by this is VERY little, I maxed out the adjustment and the relative change in the window position was very small but adequate. This is one of the reasons why your door should be in the correct position to begin with. Referring to Figure 2A ,

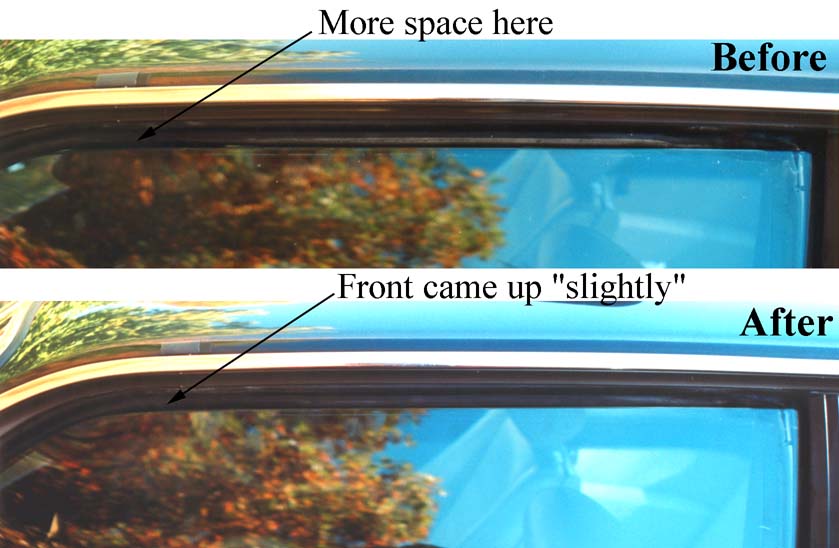
there is an adjustment bolt at the midway down the door to the rear. This slides up or down to change the relative pivoting point for the window up/down mechanism (or so the technician states). If you want the front to come up, you lower this bolt in it's sliding hole, if you want the front to be lowered, you slide it up. The adjustment was hard to do, as the pivot arm felt pretty solid when the bolt was loosened. What I did was to loosen the bolt, move the window up/down with the electric switch, you'll see that the bolt will move in the sliding hole as the window goes down/up. You secure it when the bolt goes up/down a little and see what that has done to the alignment. The Figure 2B

shows the before and after shots. The adjustment was maxed
out, the effect was very small. The top panel in Figure 3 shows that the
gap between the window and the gasket is bigger at the front than at the
rear before adjustment. After the adjustment, this is reduced quite a bit
(bottom panel).
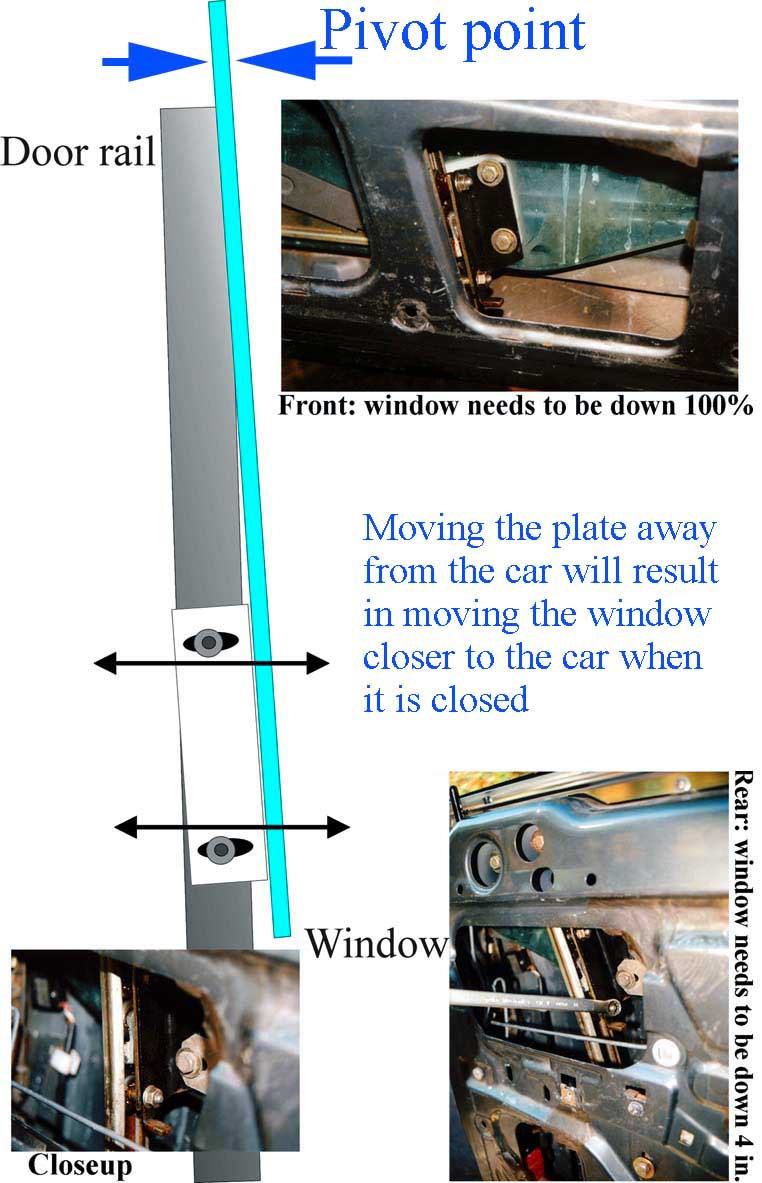
3) Window angle (in relation to the body) adjustment: To adjust the rear part of the window, lower the window about 4 inches until you see the adjuster through the access hole to the upper rear of the door as in Figure 3.

The two bolts for this are facing toward the front of
the vehicle, you need a 10mm box end wrench or something with reach and
clearance. As it's shown, the pivot point for this mechanism is the window
sill, meaning that if you push the adjust plate away from the car, it results
in pulling the top end of the window closer to the car, and vice versa.
The adjuster plate for the front of the window can be accessed by lowering
the window all the way, and through the access hole to the lower front
of the door, see the figure for details.
4) Window stopping height control: This is real simple
adjustment, I would do this the very last when everything else is well
adjusted, an icing on the cake, so to speak:-) There is a locknut in the
mid front section of the door which secures a bumpstop that slides up and
down by adjusting the position of this nut, see Figure
4. 
You must lower the window about an inch or so by your
window control switch, adjust this bump stop, then run the window up until
it stops. If too high/low, adjust again. Very small adjustments are usually
required. This adjustment usually takes the most finess since you are trying
to strike a good balance between the door closeability and the window sealing/minimizing
wind noise.
The whole process should take you a good amount of time, again, there's never a perfection when it comes to this adjustment process. It's a balance... you can make the window seal like a vault, but will have hard time opening/closing the door, and vice versa. There's a LOT of trial and error involved here, very much an art/Zen, whatever you want to call it:-) Good luck with it, I know I thought I did a good job on the adjustment but I could do with a little more... My thanks go out to JG Barnes and J Seaway for some information from previous posts found on Lars' archives, also to Al Sutlick for detailed instruction on interior trim removal procedure a while back.