WARNING: Much of the discussion about how the special effects shown on this web page were generated depends on your knowledge of various concepts used in the Photoshop image processing software package. If you are unfamiliar with Photoshop, then I suggest that you review the "Compositing the Transporter Dematerialization Effect" section of the Star Trek Projects Web Page or click here!
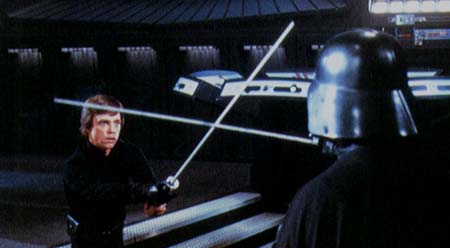
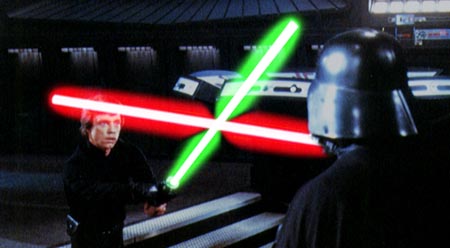
This web page discusses a technique that will allow you add very convincing light saber and laser special effects to digital images. For example, the technique discussed below would allow you to turn a raw scene such as Luke and Darth fighting with ligth saber sticks in the emperor's throne room set:

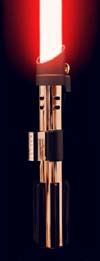
Each effect begins by shooting a background plate. The background plates are the base images that will have special effects added to them. In our example, we will use the below picture of Darth Vader's light saber as our background plate. No special measurements of the light saber had to be taken to support the effects effort. I basically just put the light saber on a stand and shot it under appropriate lighting.
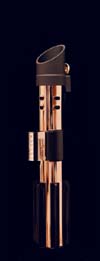
Darth Vader's lightsaber background plate
After the background plates were recorded onto a roll of 800 speed film, the film was taken to a regular photo processing lab where a 4x6 print of each background plate was then made. I then made a black and white Xerox enlargement of each of the 4x6 prints that I wanted to add special effects to. The Xerox enlargements will be used as a guide to determine where the special effects will be added to each background plate. The exact size of the enlargement didn't matter, I just made the enlargement big enough so that I could easily work on it with tools like a pencil and a knife. After I had made the enlargements of the background plates, I was now ready to start adding the effects.
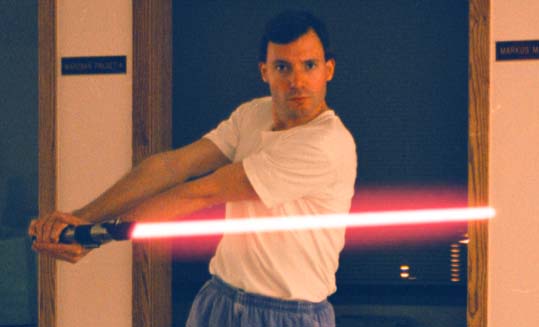
I started by placing a piece of black construction paper underneath one of the Xerox copies, and then I taped both pieces of paper down to a table. I then used my pencil and knife to very carefully cut out a hole in the Xerox and construction paper combination where the actual light saber or laser beams should appear. Below is a picture of what it looked like with a hole cut out of the Xerox and construction paper artwork for an effect of me holding Darth Vader's light saber.

The Xerox copy of a background plate with an effects hole cut into it
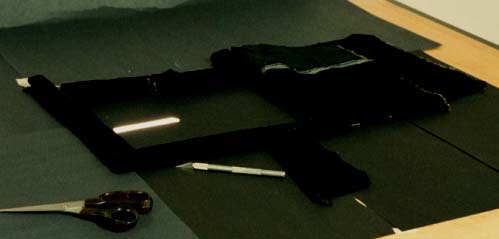
The light table ready to record a lightsaber effect
Once the saber and laser effects have been recorded onto film and the roll is developed, I was now ready to bring the raw effect into Photoshop for further processing. The first thing I did was to scan the background plate of the light saber as well as its special effect into my computer. Next I brought the image of the saber beam up into Photoshop and used the Hue/Saturation command to shift the color of the saber glow from yellow to red, which is the color of Darth Vader's light saber. The below picture shows what the saber beam looked like just after the color shift operation.

A raw lightsaber effect before placement and scaling

The raw lightsaber effect correctly scaled and positioned in frame
The next thing that I needed to do was to create an image of the saber beam that will eventually be used to create the resulting special effect. The above image of the saber beam in its final location is actually not suitable for this purpose. The reason is because the glow effect fades to black in the above image. If I were to just use the above image in the generation of final effect, the glow in the final effect would have a black tint to it. Why? Because to generate the final effect, I will be combining the background plate with
a combination of a variable density cover matte of the saber beam with the actual saber beam effect element. We will make the variable density cover matte shortly. Since the cover matte is used to combine the effect with the background plate, we want to use the cover matte to specify the look of the glow in the resulting image. Therefore we don't want to use the effect itself to specify the look of the glow.
In addition, the saber glow pixels in the above image are a mixture of both red and some degree of black. If we were to use this image as the effect, then this mixture of red and black in the glow will show through the cover matte to the resulting image. The resulting black tint in the glow would ruin the effect. I know this seems a little confusing but I will be talking more about this topic very soon and I believe it will become clear as we go along.
The way we get around this problem is to just create the saber effect without any glow around it, and then rely on the variable density cover matte to provide us with the glow in the final effect. To do this I first make a copy of the above saber effect in a new file. Then I use the paint brush set to the brightest red pixel color in the glow. Then I just paint the entire scene to be this bright red color except for the saber beam itself, which stays white. The below image shows what the correct saber beam effect element should look like.

The finished lightsaber effect element
We now have the background plate and the saber beam effect element. Next we need to generate a variable density cover matte element that can be used to combine the background plate with the above saber beam effect element. To do this we start with our glow effect element from above.

The starting point image to create the cover matte element
 . .
. .
 . .
. .

Original element Photoshop matte My matte
We now have the three elements that we need to composite the final effect. As shown below, we have the background plate, our cover matte to control the compositing of the effect, and the effects element that will be applied to the background plate.
 . .
. .
 . .
. .
 . .
. .
BG Plate Cover Matte Saber Effect Final Effect
Analysing the lightsaber glow in light and dark areas of the frame
My custom compositing algorithm works by first opening and reading in both the background plate, the effects plate, and the cover matte images. The program also opens the output image file. It then looks at these four images one pixel at a time, but as it's looking at a pixel it is looking at the same pixel in each of the four images. To determine what the color should be for each particular pixel in the resulting effect, the algorithm first assumes that the background plate is going to be represented in the output image at its full color. That means that if any saber effect is going to affect the background plate, then the effect is going to be added to the color of the background. Doing this insures that the background is not going to be blocked out by the saber glow. The program then looks at the red, green, and blue color channels in the saber glow for the current pixel, and it essentially scales the effect into the unused portion of each of the color channels in the background plate. The cover matte's transparency value is also factored into the calculation as well. Once the effect has been integrated into the background plate for each pixel in the image, then the resulting image is then written out to the disk as a raw 3 channel color image. This raw image is then imported back into Photoshop where the image is scaled to the correct size and saved out as a JPEG file for display.
Below is the basic C/C++ program for implementing the above algorithm. Some of the basic input/output work you see is just pseudo code, but the main compositing engine of the program is shown in C/C++. You should note that this same program was used to composite my holographic image onto the Trade Federation battleship.
//Notes:  The color input and output images are assumed to
//be stored as RAW, interlaced, 8 bits per channel, 3 channel
//red, green, blue ordered images.  The matte input file is
//stored as a RAW, 8 bits per channel, 1 channel grayscale image.
//The background plate, effect, matte, and output files are all
//processed one scanline at a time.

/*******************************************
 Program: Composite
 Written By: Timothy S. Fox
 Date: May 25, 1998
*******************************************/

Open the background plate input file
Open the special effect input file
Open the matte input file
Open the output file

for (number of rows in the image)
   {
   Read in a scanline from the background plate
   Read in a scanline from the effect plate
   Read in a scanline from the matte plate

   //process the output image's scanline one pixel at a time

   for (column=0; column < width_of_image_in_pixels; column++)
      {
      //normalize the matte value which is between 0-255 .
      //This calculation only needs to be done once for the
      //red, green, and blue channels of this pixel.

      mask_value = matte_pixels[column]/255.0;

      //normalize the the red component of this pixel.

      effect_value = special_effect_pixels[column*3] / 255.0;

      //apply the matte to the effect's color value to obtain
      //the red color value that is to be scaled into the
      //unused portion of the background plate's red
      //color component.

      composite_value = mask_value * effect_value;

      //now scale the adjusted effects red color value into the
      //unused portion of the red color channel of the
      //background plate

      result_color_comp = background_plate_pixels[column*3] +
           ((int) ((((255 - background_plate_pixels[column*3]) /
                     255.0) * composite_value) * 255.0));

      //do bounds check and assign this pixel's final red channel
      //of composited special effect into the output array

      if (result_color_comp > 255)
         output_image[column*3] = 255;
      else if (result_color_comp < 0)
         output_image[column*3] = 0;
      else
         output_image[column*3] = result_color_comp;

      //Perform the above calculation for the green and blue
      //components of this pixel except that the output_image[],
      //special_effect_pixels[] and background_plate_pixels[]
      //arrays should be accessed as [column*3+1] for the green
      //component and as [column*3+2] for the blue component.
      }

   Write this scanline to the output file
   }

Close all of the input and output files.
You are done!!!!
The result of running my image processing algorithm on the above three elements shows that when a saber glow crosses in front of a white area in the background, the saber glow automatically blends into the white as you would expect. But when the saber glow crosses over a dark area of the background plate, then the glow is allowed to stay its brightest. This result is what you'd expect to get if you were to just superimpose onto film the background plate with the effect. See below. At this point the effect is now complete.
 . .
. .
 . .
. .

Background Plate Saber Effect Composite Effect
The technique described on this web page for generating light saber effects is actually very close to the way that Industrial Light and Magic generated the light saber effects for the Star Wars trilogy. To create the effect of Luke Skywalker holding his light saber, George Lucas would start by filming Mark Hamill on the set doing whatever he was supposed to be doing with his light saber. During filming, Mark's light saber actually had a rod sticking out of the handle that was supposed to be the length of the saber beam. (Refer to the first picture on this web page.) This rod later helped animators to gauge where to insert the saber beam in each frame.
Next they would develop the film and then load it into an animation camera mounted above an animation table. For each frame, the animator would place a piece of clear plastic, called a cell, onto the animation table into a series of pegs called registration pins. The registration pins provided a way to precisely align the cell with the image being projected onto it from the above camera.
Next the animator would project a particular frame from the previously shot film down onto the animation table. The artist would then use a pencil to very carefully trace out on the cell the image of where the light saber beam was for this frame. This cell was then taken off the table and placed in a stack with other cells that already had saber beams recorded on them from other frames. This process would continue until all of the frames in the sequence had saber beams recorded on them. Below is a picture of one of ILM's animation tables.
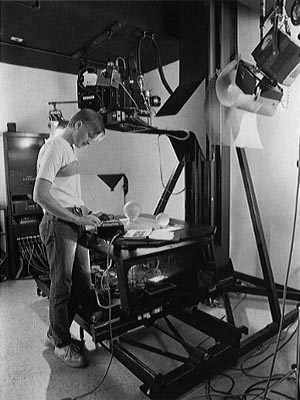
A.J. Riddle programs a shot on an ILM animation camera
Unlike the original trilogy's photochemical process used to generate light sabers, the new prequel's sabers were generated completely in the digital realm. The process began by again having actors dueling on stage with their stick light sabers. After the film was processed, the original negative film sequence was scanned into a computer frame by frame.
Next, the rotoscope team would create an articulated matte of each of the blades as they danced around the scene. A compositing team would then take these mattes and plug them into an ILM proprietary compositing program called Comptime. Comptime was then responsible for actually generating the look of the sabers and compositing them into the scene. After all frames had been processed in this way, the scene was then recorded back out to film for sound editing and integration into the finished film.
This is actually not the first time I've ever used the technique described on this web page. Back in 1993, I did some test light saber and phaser effects using a slightly modified version of this technique. The problem with what I was doing back then was that I was doing the entire process described here as an multiple exposure in-camera effect. This means that I was putting both the background plate image and the saber glow effects down onto the same piece of film through the use of double and even triple exposures.
The problem with using this technique is that I have no knowledge about where the effect should be superimposed on the film. Remember, you have just taken a picture of someone holding a light saber or phaser that you want to add an effect on top of. How do you figure out on the second exposure where to put the saber effect? Although this technique was able to produce very good pictures when I was able to align the background plate with the effect, I found that this was a very difficult way to do it. In fact, until I entered the digital realm, I had completely abandoned this version of the technique.
Well I hope you've enjoyed learning about the techniques described on this web page. I had a lot of fun figuring out how to do them and then producing pictures with them. I realize that this technique is neither particularly easy or quick to do, and it couldn't be used for producing anything but a few frames. But a few frames are typically all I need so I'm willing to go to the effort. You may be asking yourself if there isn't some easier way to produce these effects?
The answer is yes, there are probably other ways these effects could be produced, but I can't figure out a way to produce light saber effects with this level of realism in any other way. Trying to produce saber effects strictly with Photoshop results, in my opinion, in an "airbrushed" or "painted on" look to most pictures. My pictures have certain random quality to them and the background is used to actually modulate the effect. I think it would be difficult to better the results I'm able to get, at least for few frames.
What kind of time is involved in producing effects this way? Well its not exactly for the faint of heart. Most of the pictures on my hand props page required about 7 hours each to do from start to finish, but my Logan's Run sandmand pistol shot required an incredible 19 hours to create! The reason the pistol shot required so much time was because I had to spend 3 hours to just get the "flame" effects onto film, plus several hours to record the pistol background plates. Then, each of these "flame" elements had to be twisted, scaled, and color shifted to get them into the correct position within the frame. In addition, I had to do 8 separate compositing steps to form the resulting picture.
I hope this discussion has inspired you, and not scared you, to go grab your camera and start playing around. I've always been amazed at what can be done with a few hundred dollars worth of equipment, some spare time and some imagination. Hey, for a few bucks I just managed to duplicate an effect that was originally done on equipment that costs many hundreds of thousands of dollars. Well, good luck!!!