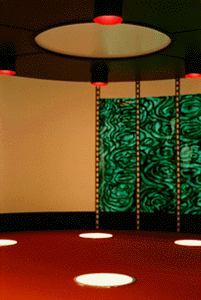
Creating the transporter beam-out effect required the use of five different film elements that when composited, or combined together, can create any number of frames of the effect, at any stage of completion. The five basic elements needed to do the effect are described below.

Element 1
Element 2
 .
.
Element 3 Element 4
My transporter effect only required one static holdout matte and one static cover matte since I didn't move around from frame to frame. When movement of the principal object in the scene is required, then the filmmaker is required to create a "traveling matte". A traveling matte is a whole series of holdout mattes and cover mattes that exactly cover the shape of the moving object from frame to frame. Usually traveling mattes are created by placing a person or model on a bluescreen stage. The bluescreen behind the actor or model provides a background that can be easily identified and removed photographically, and then the holdout mattes and cover mattes can be generated.
Through the use of traveling mattes, it's possible to allow spaceships to orbit planets, dinosaurs to walk on earth again, and Forest Gump to shake President Kennedy's hand. Traveling mattes allow filmmakers to break the bonds of time and space to create almost any imaginable image because elements that are shot many months or miles apart can be seamlessly brought together to form a new and never before seen image. Of course, each separate element in the scene requires its own traveling matte, and scenes containing many different elements can become very difficult to sequence correctly on film. Remember that each little area on each frame of film is normally only exposed once, so to create a good effect, all of the different elements must be exposed in the correct order. The asteroid chase sequences in The Empire Strikes Back required many dozens of separate traveling mattes, and all of them had to be exposed in the correct order to create the different ships and asteroids flying around.
Things get even more complicated when you realize that the color image component that eventually fills in each matte is actually composited from a red, green, and blue piece of black and white negative film. The reason that each color element is further broken down into three primary color negatives is so that the person compositing the special effect has complete control over the color balance of each component in the effect. With this knowledge, you can begin to understand why some of the individual asteroid sequences required many hundreds of separate pieces of film to be brought together to form the resulting images. You can see how this process can become a real bookkeeping nightmare.
Element 5
Over the years there has been quite a bit of confusion about how the glittering transporter effect was created for ST:TOS. I was recently contacted by a gentleman named Pony Horton (phorton@sabot.net) who actually worked for one of the main effects houses that created Star Trek's effects. Pony let me in on how these effects were actually created. Here's his description of the process.
In 1978-79 I worked for Van der Veer Photo Effects, one of several optical houses that handled effects for ST:TOS. I personally worked with an old-timer named Hugh Wade at Van der Veer, and Hugh is the man who actually invented the "sparkle" elements of the beams themselves, which were then provided to other optical houses to ensure visual consistency.
Now, here's the secret: it wasn't glitter against black, or glitter stirred in water, as LeVar Burton stated during the 30th Anniversary special. It was Alka-Seltzer in hot water, lit from below, and shot through a fish tank! They discovered the effect while shooting Alka Seltzer commercials in the early '60's, as hot water makes it bubble better. They shot the bubbles under white light with macro lenses at high speed, probably in the 48-72 fps range, and composited the element in the optical printer with amber filters. Interesting note: you can see inconsistencies in the color and size of the sparkles from one effects house to the next. Some are golden, others silvery. Some are large bubbles, others fine. Sometimes they'd do the "heart core" as the first and last part of the beams you saw, other times they'd just super the whole shape at once.
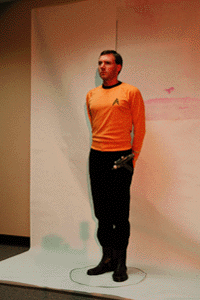
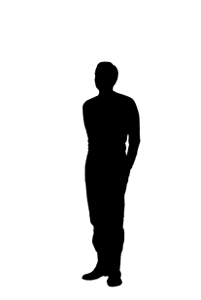
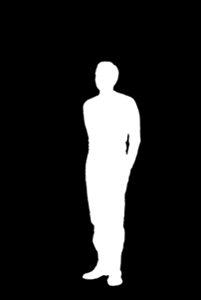
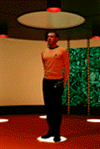
Before 1997, I was forced by my available technology to create the transporter effect on film by superimposing multiple images onto a single frame of film loaded in my camera. This in-camera compositing technique works similarly to the way a optical printer works. I started by having an 11x14 inch color print made of Element 1, which is the transporter room. This print served as the background plate that the effects work was superimposed onto. I then took Element 2, which was recorded on slide film, to an image processing lab where they scanned the film into their computer. They then isolated my image from the background and created the holdout and cover matte elements. They placed these matte elements on two separate pieces of clear 11x14 inch plastic. They also produced a color version of Element 2 on a 11x14 piece of plastic as well. At this point, I had an 11x14 color print of the transporter room as well as three pieces of 11x14 inch plastic film.
At this point I was basically ready to create the effect. I started by finding a large piece of cardboard and laying it on the ground. I then anchored the cardboard to the ground by placing several books on top of it. It was imperative that the entire setup not move while each frame of the effect was being composited in the camera. Otherwise, the effect would be ruined. Next, I taped my 11x14 inch print of Element 1 down to the cardboard so that it also could not move either. Next, I needed to register my three 11x14 plastic prints with the transporter background print.
Registering the sheets of plastic containing the various images involved placing the three plastic sheets over the 11x14 transporter room print in such a way as all three prints would exactly line up together. I then placed three tacks all the way through three corners of the images. The holes in the plastic sheets acted like guides to insure that when I would later combine various elements together, the elements will always line up correctly with each other. I then loaded my camera with 100 speed color film and positioned the camera directly over the setup so that the transporter room print fully filled the viewfinder of my camera. The setup to do the effect, with the holdout matte overlaid on the transporter room print, is shown below:

The In-Camera Optical Setup
Frame 1
 .
.
 .
.

Frame 2 Frame 3 Frame 4

Frame 5
After the project was complete, I took a step back and evaluated the results that I had received, and I discovered several problems associated with the technique I used to generate the effect. One problem with the optical approach is that I was essentially taking a picture of a picture, and taking a picture of a picture always produces an inferior picture. It's like making a photocopy of an original document, the copy is never as good. Taking a picture of a picture causes unwanted color shifts and a general washing out of the image. These color shifts result in dark colors becoming darker and light colors becoming lighter. The image will also have an overall increase in contrast and film grain. I was also having problems with my matte elements as well.
I found that despite my best effort, I simply couldn't completely get rid of "matte lines" in my resulting images. Matte lines are imperfections in the compositing process that result when the holdout and cover mattes are not perfectly aligned. If there is any gap when the two mattes are used, this will result in certain areas on the film remaining unexposed when the various images are projected onto the unexposed film. This results in those funny looking black or blue lines that surround elements in special effects scenes in movies. For example, the Star Wars trilogy had its fair share of matte lines, but most often they occurred on spaceships that were traveling against black space so you didn't notice them. I should not have been too surprised by the kinds of problems I was having using this technique, given the very primitive kind of setup I had to create the effect. At this point, the project was put on the shelf for about two years until about January of 1997. Then I entered into the digital realm and everything changed.
By the middle part of 1996, I had nearly completed upgrading my computer with memory, disk drives, and the Photoshop image processing software I would need to composite the Jedi Knight special effect.
Photoshop is a digital image processing software package that runs on a variety of hardware platforms. This commercial software package has a variety of tools and plugins available for manipulating scanned digital images. Photoshop is now my primary software tool for creating special effects.
In January of 1997, I also decided to buy a film scanner. The film scanner allowed me to scan positive and negative 35 millimeter film directly into my computer at a very high resolution without having to pay an arm and a leg to have an image processing lab to do it for me. Once I had the film scanner, I was in a position to correct all the problems I had encountered with the optical compositing process I used to do the original beam-out effect.
 .
.

Element 1 Element 2
The first thing I did was to take out my old film of Element's 1 and 2 and scan these pieces into my Mac at a resolution of 2012 x 3000 pixels. Next, I had to create the holdout and cover mattes. This was done by working with Photoshop's alpha channels.
I typically use alpha channels as a drawing layer to create digital holdout and cover mattes. You draw on the alpha channel in black, white, or grayscale. After the black and white image is complete on the alpha channel, you can instruct Photoshop to use the alpha channel as a holdout matte. The background layer, sometimes called the canvas, is used to store the background plate that is going to have something done to it. When you make the background layer active and load an alpha channel, the alpha channel will not allow any changes to be made on the background plate under the holdout matte. I used this technique to change the color of the sand for the Jedi Knight project. In my beam-out project though, I was only interested in using the alpha channel to create the holdout and cover mattes I would need to use later.
 .
.

Element 3 Element 4
Photoshop layers are used to combine two or more different images into one image, whereas channels are used to protect areas of an image from being altered by some image processing operation. Creating the actual beam-out effect for each frame of the effect was a two step operation. In Step 1, I first loaded Element 1 into Photoshop as the background layer. Then I created a new layer and associated a layer mask with the new layer. A layer mask is used to store either a holdout or cover matte, and the matte determines what part of the image on the new layer is actually going to be combined with the underlying background plate. I then pasted my just created cover matte, i.e. Element 4, onto the new layer mask. Then I pasted Element 2, which is me in costume, onto the new layer. Remember, the background layer contains the empty transporter room. By changing the transparency value associated with the layer, I could make it look like I was in any stage of transport, from being fully there to not being in the transporter at all.
For example, if I made the transparency value of the new layer 75%, then my image was at 75% of its full intensity, and the background would show through me at 25% intensity. The layer mask, which contained the cover matte Element 4, was blocking out the entire conference room that I was actually standing in from showing through to the resulting image. The cover matte also allowed the rest of the transporter room outside my image to be preserved at full intensity in the resulting image. To complete Step 1 for each frame, I simply merged the new layer with the background transporter room layer at five different transparency values that ranged from 0% to 100%. I then saved each one of the five frames off to the disk drive. Once the merges were complete, what resulted was me standing in the transporter room at five different levels of invisibility. The only thing that was left to do was add the energizer effect to each of the five frames created in Step 1. Adding the energizer effect was done in Step 2.

Element 5
Next, I loaded one of the frames I generated in Step 1 into Photoshop as the background layer. Then I created a new layer and layer mask, and I pasted the just created and now bounded transporter effect into the layer mask. Why did I do that? Because I wanted to use the bounded transporter effect as a cover matte! I then painted the new layer I just create to be a solid white color. Remember, all the little energizer bits and dots on the layer mask are white, and anything that's in a cover matte that's white is really transparent and will therefore allow whatever's on the layer associated with the layer mask to show through to the resulting image. What's on the new layer that's therefore going to show through the energizer effect to the resulting image? There is nothing on that layer except white. So wherever there's any energizer effect on the cover matte, there're going to be an equal amount of white energizer effect in the resulting image. After I merge the layers, I now have added the transporter effect to this frame! To generate the other frames in the sequence, I simply have to shift the transporter effect around to a different location , generate a new cover matte, and apply it to the next frame. As a final touch, behind my image I added a disappearing shadow to each frame of the effect. That's how the effect was generated in digital! I know this whole process seems somewhat difficult, but it really isn't once you get the hang of it.
Doing the entire digital effect only required about two full days of work and this project was completed in February of 1997. The results of this process were incredible. Since I based the digital effect on the original scanned film, I was always working with a first generation image so there was no film grain or color shifting, and the holdout and cover mattes were always perfectly aligned so matte lines were impossible. I ended up printing the resulting frames out to a dye sublimation color printer and had them framed up. The pictures now sit on a wall in my office at work, and they look really great. I've found that once you've done complicated special effects in digital, trying to do them in any other way now seems inferior. Maybe that's why Industrial Light and Magic have largely sold off their optical printers and replaced them with digital film scanners and recorders!