For those of you that have been following my excursion into doing my own lift, well, here it is.
It is nothing easy, but, it is done. If you do a lift ourself, have a buddy with you as there are moments where having 2 people sure would have been nice. Another good recommendation, if the instructions say it takes 10 hours to do, plan on 20 and you will be right in there, especially if it is your first time like mine.
The entire process started with putting the truck up on a lift, removing all 4 tires. I then went on to start tearing apart the front end. Pretty much, you end up tearing off the entire front end at one point before you start putting stuff on. I'm not talking just disconnecting the sway bar, break a ball joint or two and calling it good. Literally everything.

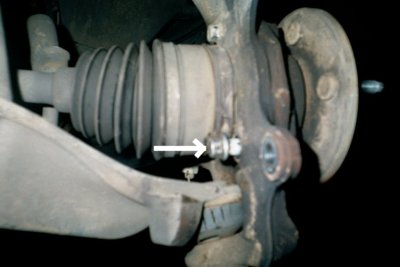
Here is a picture of the passenger front spindle. The white arrow is pointing to 1 of 3 bolts that you end up removing to remove the spindle from the half shaft. WARNING: these bolts are really easy to round the heads off of is using metric sockets(yes they are metric bolts). I ended up taking a 5/8" socket, taking a hammer and forcing the 6 point socket onto the head of the bolt(just happened to be just big enough) and then removing the bolts that way. I ended up stretching the socket slightly, but, it did the trick. Another note, if you have a ball joint separator tool, it probably won't work here. The half-shaft gets in the way of doing the upper ball joint and you supposedly need some special tool from Ford. I cheated and used a pickle fork and broke the upper ball joints that way. You can get away with the normal ball joint separator for the tie-rod ends and lower ball joint.
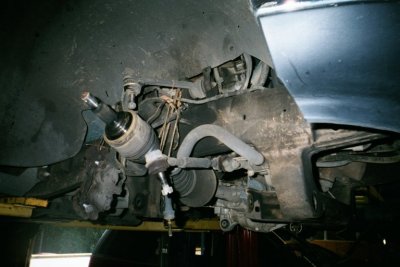
This is what you are essentially left with before you start bolting parts back on. Notice spindle/brake assembly-gone, front differential crossmember-gone, swaybar links-gone, lower A-arm-gone, shock-gone, and torsion bars-gone. Pretty much, all that was left in place was the swaybar itself, half-shafts, front differential(only by 2 of the 5 bolts), and upper A-arms.
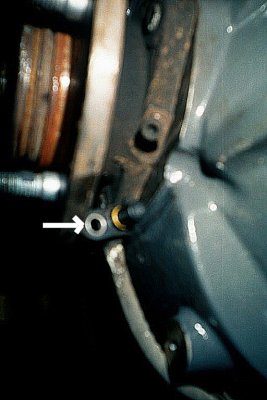
For those of you that were ever curious where the wheel speed sensors are, well, the picture above shows there the sensor gets located. It is actually easy to find. Just find your brake line and there will be a wire that is attached directly to the brake hose. Follow the wire and whala, there's the sensor.
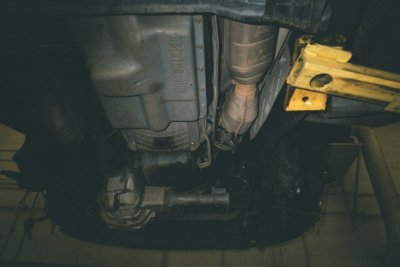
Also at this point, most of the cross members that are located under the truck are removed at this point too. The torsion bar cross member and front differential cross member were removed at this point. The only cross member holding the front end together is the forward most member which is welded directly to the frame and the tranny cross member(which got removed later on when the front differential cross member got re-installed).
At this point the front differential cross member gets bolted back in(you really need two guys for this, I got away doing it myself only because I had access to a tranny jack and managed to balance it on top as I manipulated it into position). Then the front differential gets totally unbolted and lowered into the new bracket. The tranny jack then went back to support the tranny as I undid the tranny cross member and bolted the new cross member in.
From here, the front end got re-assembled. Due to problems with the camera (what a piece of junk I am finding out it really is), I don't have any pictures to show. Essentially you do the reverse of what you did to dissassemble the front end. Pretty easy actually. The only difference is that you end up modifying the brake shield. This was easily done and all that was basically removed was the portion that recesses away from the disk itself.
At this point, you end up breaking the brake lines and installing the new longer brake lines. Just a word to the wise, the driver's side line has a plug in it that the passenger's side doesn't and is not plugged in the kit (TRUST ME!!!!-brake fluid everywhere as I tried to figure out why that one line leaked like a siv).
This portion was a day and a half (12 hours) worth of wrench turning, nuckle busting fun.
From here, you move to the back axle. This process is actually pretty easy as there aren't any really tough things to do other than this one bolt(from lower arm to frame). Let me tell you. I would love to talk with the Ford engineer that tells the person on the assembly line to put the bolt in that way and tell him where to put that bolt. Pretty much, to get out this one bolt(which has to be removed in order to install the lower arm), you either end up dropping the fuel tank from the truck (hello, can you say lots of time draining fuel, disconnecting hoses, etc) or cutting the head off of the bolt. Now, remember me saying that the gas tank was right there. Well, you can't just take you welder and chop that puppy right in two. Per the directions, you are supposed to take a aw and cut it in two (this is a 3/4" bolt about that you can only get about 4" worth of stroke on the aw). Needless to say, either way you went, it was going to be a long haul. While I don't advocate doing this, I broke the rules. I pulled out a pneumatic grinder and very CAREFULLY!!!!! ground the head of the bolt off (stupid, yes, did it work, yes, do it again, probably not). I only used the grinder because I was on a time limit due to the lift that I was on and had to get the truck put back together in only 3 more hours.
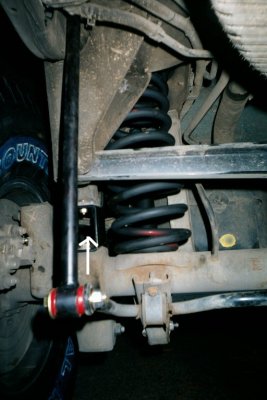
From here you end up supporting the entire rear axle on the tranny jack, disconnecting the sway bar completely, removing both shocks, lower/upper arms on the driver's side, lowering the axle down, removing the spring, installing the spacing block, re-installing the lower/upper(new piece) arms, moving over to the other side and repeating just also disconnecting the axle cross bar now and adding a spacer in there. WARNING: problem area #2. Ford has these nice little fasteners that they have put everywhere on the underside which amounts to a self holding nut (actually a very neat idea). The one for the cross bar to rear axle is REALLY EASY to strip out. Due to time contraints, I ended up putting this bolt in much later (for those of you that run into this same problem, it is an M16 bolt-about 3.5 inches long requiring a M16x2.00 nut-more on this later). This area is indicated by the white arrow, just located on the passenger side(not shown in this photo).
The re-installation(other than the 2 problems I have noted already) actually went really well. Just, when you do the driver's side shock top bolt, have lots (and I mean lots) of extensions(I ended up having a 3' of extensions) when installing/removing that bolt. It isn't tough to do, just takes a steady hand.
At this point I ran out of time and had just enough time to toss the wheels back on the truck. The truck drove home fine with the one bolt missing from the rear end and not having the brake lines bled(that made for an interesting 10 mile drive home-just a little tid bit of knowledge, the brake pedal goes quite a long ways on the Expy, I thought my foot was going to literally end up at the throttlebody it went so far). This was the end of day 2 (16.5 hours down).
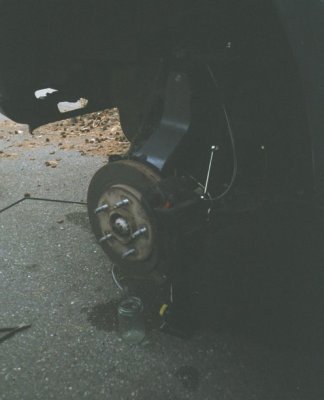
The following morning, I went out and immediately bled the brakes. This is a very easy thing to do. As the picture shows, I ran my clear tubing up and over the upper A-arm so I could see if any more air bubbles were coming out. The pedal felt much better after this procedure, especially after that joyous ride home from installing the lift. The caliper vent line is an American fitting (not metric-go figure, now you need two sets of tools to work on a vehicle-is this justification to get a bigger tool box and more tools????? Hunny????), 3/8" wrench worked great here.
I also finished putting in the longer sway bar rods for the rear end (used the factory ones to get home and made sure not to twist the truck up any). I also added the last few miscelaneous bolts that I didn't have time to install earlier.
I haven't taken the truck out 4x4ing yet as I haven't changed out the gears in the differentials yet and the truck is overgeared right now (great for the highway, but, you look at a hill and the truck is shifting gears to beat the band). This is what the final product looks like.
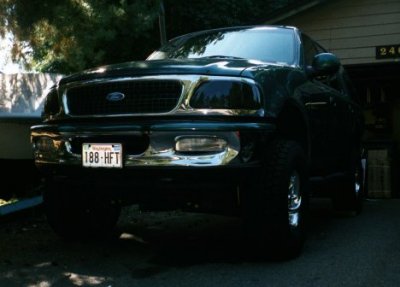


The biggest comment that I normally get asked about is if I need an oxygen mask to drive the truck. I just look at them and say, "well, probably should, but I haven't installed it yet". They just shake their heads and walk off. The truck sets about 7 inches higher than it did factory (about 2.5 inches because of the taller tires and another 4 inches due to the lift) and is quite a site to see driving down the roads from what my friends tell me.