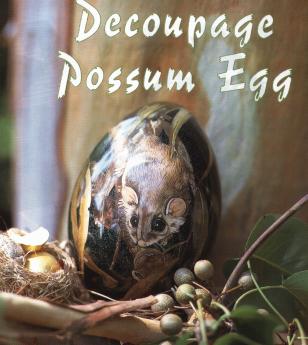
Actually it is the real life every day me - Morgan - that does this for a living. I design decorative arts and crafts projects - and this one was recently published in a magazine called Craft and Decorating (with credits to them for the beautiful photography they did of my work).
MATERIALS NEEDED
blown emu egg
suitable decoupage paper
curved decoupage or cuticle scissors
blu-tack
Liquitex Gloss Medium and Varnish
1 ltr clear water based varnish
240 grade stearite sandpaper
scalpel
5 minute Araldite
round finding for bottom of egg
wooden satay skewers
kitchen sponges, container of water
small round brush
jar full of rice
TO MAKE
Preparation: For this egg with an Australiana feel I felt that the natural colouring of the emu egg was the perfect background for the images I had chosen. If , however, you would like to paint a background for your egg you will need to apply several coats of gesso and then sand the egg smooth before applying the desired colour of acrylic paint. Unlike other decoupage projects where the paper is sealed first with Liquitex Gloss Medium and Varnish, presealing the paper makes it too thick to glue down easily when working on curved surfaces, so we leave the paper unsealed at this stage. When we glue we will be using the sealer as an adhesive and this in effect seals the back of the print at the same time as attaching it to the egg.
Cutting: Cut the pictures from the paper using the curved pair of scissors. hold the scissors in your dominant hand. Using small cuts and the tips of the blades only, slowly and carefully cut around the outside of the images. When you have cut out all of the pictures you need, use small amounts of blu-tack to hold them in position while arranging and rearranging your design until you are happy with it. The egg should have a hole at both top and bottom where the contents were blown out. It is important to make sure that you leave the bottom hole open and cover the top hole with images, so take this into account when arranging your composition.
Gluing: The Liquitex dries and grabs very quickly so it is best to only work on about one square inch at a time when gluing. Start with an underneath image, lift back a portion of the picture, remove any blu-tack and, with the small round brush, cover the area of the egg underneath the cutout with Liquitex. Lay the cutout back down into position and smooth it over with your brush until it is in the desired position. With a barely damp piece of kitchen sponge press firmly over this part of your cutout for about 30 seconds. This will fix the picture to your egg. Working inch by inch around your egg, glue each of the cutouts down. If you have a particularly large cutout it will wrinkle if you try to glue it down as a whole. You will need to clip into the image in an unobtrusive area so that the cut is not obvious and this will allow the image to sit flat. Allow the composition to dry and then apply two coats of Liquitex and allow the whole egg to dry overnight.
Varnishing: The top hole in your egg has been covered but the bottom one left open. Into this open hole insert as many wooden satay sticks as necessary to give a snug fit. Your egg will now look like a popsicle, sitting on the end of a skewer. Holding onto the stay sticks, submerge your egg into the tin of varnish, make sure the varnish comes all the way up over the egg, roll the tin around if necessary to ensure the entire egg is covered. Lift the egg up out of the varnish and wait for a minute to to allow the excess varnish to run off the side of the egg. when the varnish stops running and starts dribbling insert the satay sticks into a jar of rice and let the egg stand upright. The excess varnish will run down the surface of the egg and collect in the rice. Allow to dry for at least 5-8 hours before removing the egg from the rice, remove any rice that has adhered to the sticks and re-dipping the egg. Continue in this manner until 18-20 coats of varnish have been applied.
Sanding: Remove the skewers. Using a scalpel, cut through the varnish right at the base of the egg and around the sticks (but not through the sticks). Once the varnish has been cut through you can twist the sticks gently and remove then. Using the sandpaper wrapped around a sanding block, sand the egg in a back and forth motion. Sand the entire surface of the egg until it is dull and smooth with no shiny dips or spots. Wipe the egg with a damp sponge to remove any traces of sanding dust and let dry for at least another hour. Reinsert the satay sticks and dip twice more. Allow the final coat to dry 24 hours before removing satay sticks.
To Finish: There is still a hole in the bottom of the egg which can be dealt with in two ways. You can glue the egg into a stand or the bottom hole can be attractively covered. There are round gold caps that you can buy from Egg Artistry supply stores that are made specially for this purpose. Glue one into position with some 5 minute Araldite to provide an attractive cover for that bottom hole.
