|
|

|
|
|
Paint Shop Pro 7
|
|
|
Selection tool |
Cut Out |
|
|
Flood Fill |
Text Tool |
|
|
Layers |
Inner Bevel |
|
|
Shapes |
P
Ornaments Font *
|
|
|
Sculpture (Optional)
|
|
|
|
|
|
|
|
|
|
|
|
Creating the
back panel: |
| Step
1: Open up a new
image 400 x 400 with a transparent background. We are going to start
with a larger background than what your final result will be to give
you room to work. |
|
|
| Step
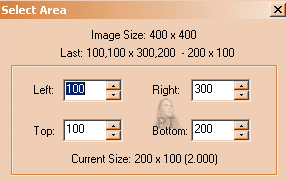
2: Double click on
the selection tool icon. Choose the rectangle selection tool, no
feathering and with the antialias checked. Enter the dimensions as
seen to the right. Also make certain that the radio button
"Custom size and position is selected. Flood fill this
selection with the color of your choice. Deselect. |
|
|
| Step 3: This next step is
a little tricky and you may not quite place it where you want it the
first time. Use the selection tool again, but this time choose the
ellipse selection tool. Place your cursor at the bottom center of your
rectangle, (should be lined up at the 200 x 200 location pxl mark if
you have your rulers turned on.) Slowly drag your cursor up a few
pixels and then across to the left until your image looks like the
image to your right. Hit your delete button and then deselect this
selection. |

|
|
|
|
Step 4: Decrease this image size by 80% and
then duplicate this layer. (Layers/duplicate). Use your mover tool to slide
one of the layers to the left and one to the right until they are lined up.
Merge visible layers. You should now have a single layer image that has
retained a transparent background.
|
|
|

|
|
Step 5: Decorating your shelf: First of
all, if your shelf is light in color change your background color to black.
If it's dark in color change your foreground color to white. Set the
foreground color to null.
|
|
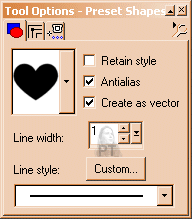
Step 6: Go to your shapes tool
and select heart 1 with the options to the right marked. Star drawing from
the upper left section above where the point comes down at the center of the
image you have just merged and move diagonally to the right. If you
need to resize any anyway, place your cursor on any of the four corners to
make it larger or smaller. If you need to center it more, place your cursor
on the center square it.
|

|
|
|
Step 7: Now go to
Selections/From vector object and then save to alpha channel. You
can now delete the vector layer. You should now also hit the delete
key on your keyboard to cut the heart shape out. |
|
Step 8: Add 2 new
layers and drag your merged layer above the two new layers by
placing your cursor on the layers toolbar and pushing up. Go to
Selections/Expand/2 pixels. We are going to apply cut-out effects on
the lower two layers. On one lf the new layers use the settings as
shows; on the other use -4 instead of 4. Shadow color for both
should be black. |
|

|
| When you
have finished adding both cutouts, deselect and merge visible. |
|
|
| Step
9: Keep your
foreground color set to null and change your background color to
white. |
|
|
We are now going to be using the text
tool to add the other two decorations to either side of the heart.
|
|
|
Windows lists the P regular or P ornament
font as "P". Floating and antialias should be checked.
|
|
|
Under styles:
Stoke should be set
to null and fill to white.
|
|
|
Under textures:
Stroke and fill
should be set to null.
|
|
Choose the lower case letter
"a" for your first decoration with font size set to 30 (you will
need to type in the value 30). Use the mover tool to place this ornament
where you think it would look good in relation to the heart cutout, then
promote to layer. Duplicate this layer, then go to image/ mirror. Use the
mover tool again to adjust the position of the second ornament.
|
| Add a drop shadow, 2
vertical, 2 horizontal, opacity 44, blur 1.2, shadow color black. When
you are satisfied that your two ornaments are placed where you would
like them, merge visible. |
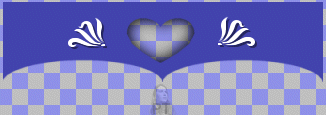
| You should now have
something that looks similar to this: |
|
|
|
| Creating the
shelf top and sides: |
| Step
10: Add two new
layers. On the upper new layer: Go to the selection tool and this
time choose the rounded rectangle. As far as you can star on the
left hand side of the layer, stretch all the way across to the right
side of this layer and down a couple of pixels. Flood fill with the
same color as you did the back panel. Deselect and then go to
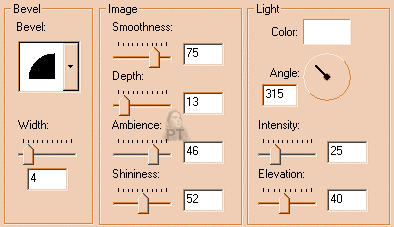
Effects/3D effects/Inner bevel and use the settings as shown below. |
|
|
| If the shelf top
looks too tall, just use the deformation tool to shrink its height.
Click on the square that appears in the upper center of the image
and the pull down until its at a height that looks
appropriate. |
| Step
11: On the lower
new layer: Use the rounded rectangle selection tool again. This time
start level with the top shelf and over just a few pixels and draw
down past the back panel section until you have the side as long as
you think they should be. Flood fill with same color as the panel
and shelf and use the same inner bevel selections as before. If the
side appears too wide, then adjust them with the deformation tool.
Duplicate this layer. |
| Step
12:
Use the mover tool to adjust the positions of the shelf top
and sides. Your layers should be in this order: |
Shelf Top |
|
Shelf
Side |
|
Shelf
Side |
|
Back
Panel |
|
| You want to slide
each shelf side just a little under the shelf top and over the back
panel. When you are satisfied with all positions, merge visible. |
|
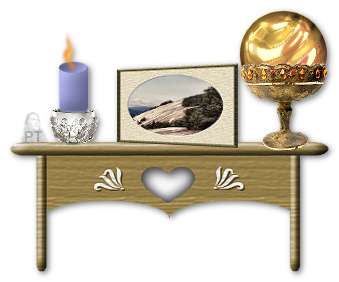
Congratulations! |
|
Your shelf is now
ready to be tubed or decorated as you see fit. |
|
|
|
|
|
|
Note to Advanced PSP users:
I
thought that this tutorial would be easier for beginners if the layers were
merged visible after each major portion of the tutorial were done. You
don't have to merge any of the layers until you feel like it.
|
|
|
Download the PDF of this
tutorial here.
Download Free Acrobat Reader
here.
|
|
|
|
|
|
|
|
|
|
|
|
|
|
|
|
|
|
|
|
|
|
|
|
|
|
|
|
|
|
|
|
|
|
|
|
 |
|
|
|

