|

|
|
|
|
|
|
|
|
|
|
|
|
Step 1: Select
an image of your choice, then duplicate it (Shift +D) and work on the
copy. Since animations tend to be large files, crop and/or resize your
image so that it is no larger than 100 x 100 pixels.
|
|
Step
2: Duplicate your background layer (layers, duplicate). On the
upper layer (Copy of background), go to colors, colorize and choose
a Hue and Saturation that you like. I am using Hue: 163, Saturation
78. Since this still looks a little dark to me, I am going to punch
up the brightness a little by going to adjust Brightness/Contrast
and and increasing brightness: 41, contrast 16. |
|
|
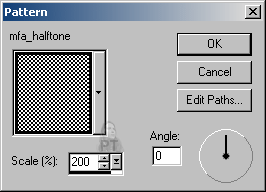
| Step 3:
Add a new layer and on this layer flood fill with my halftone
pattern using the settings as shown to the right.
Your image should now
have three layers:
- Top layer has been
flood filled with the halftone pattern
- Middle layer is
your colorized image.
- Bottom layer is
your original image after the cropping and resizing.
If you haven't opened
up animation shop, go ahead and do so now. In the next several steps,
you will be changing the different blend modes and the pasting into
animation shop. |
 |
|
|
|
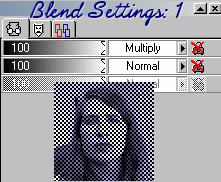
Step 4:
In PSP, go to you layers palette and set the blend modes as show
on the right.
- Top layer: 100%
multiply
- Middle &
bottom layer: 100% normal.
Use your right mouse
button on the title bar of your image and click copy merged. Now paste
into animation shop as a new animation. |
 |
Step 5:
Go back to PSP. On the layers palette, change your opacity levels
again as shown on the right.
- Top layer: 70%
multiply
- Middle layer: 80%
normal
- Bottom layer: 100%
normal
Use your right mouse
button to copy merged. Go to animation shop, right click on your first
image and paste "after selected frame." |
 |
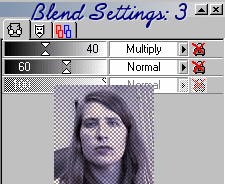
Step 6:
Go back to PSP. On the layers palette, change your opacity levels
again as shown on the right.
- Top layer: 40%
multiply
- Middle layer: 60%
normal
- Bottom layer: 100%
normal
Use your right mouse
button to copy merged. Go to animation shop, right click on your first
image and paste "after selected frame." Before you do this
make certain that you are pasting after frame 2. Look down at the
bottom of the frame and if it indicates this is frame 1, then just use
the sliders at the bottom to go to frame 2.

|
 |
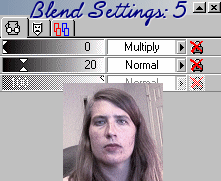
Step 7:
Go back to PSP. On the layers palette, change your opacity levels
again as shown on the right.
- Top layer: 11%
multiply
- Middle layer: 40%
normal
- Bottom layer: 100%
normal
Use your right mouse
button to copy merged. Go to animation shop, right click on your first
image and paste "after selected frame." Before you do this
make certain that you are pasting after frame 2. Look down at the
bottom of the frame and if it indicates this is frame 1 or 2 , then
just use the sliders at the bottom to go to frame 3.
You should now have
four frames. Still working with animation shop, go to edit, select
all. Go to animation/frame properties and change the timing to 60 in
the "display time" box. Then go to edit, select none. |
 |
Step 7:
Go back to PSP. On the layers palette, change your opacity levels
again as shown on the right.
- Top layer: 11%
multiply
- Middle layer: 40%
normal
- Bottom layer: 100%
normal
Use your right mouse
button to copy merged. Go to animation shop, right click on your first
image and paste "after selected frame." Before you do this
make certain that you are pasting after frame 2. Look down at the
bottom of the frame and if it indicates this is frame 1, 2, 3 or 4
then just use the sliders at the bottom to go to frame 4.
With this last frame,
go to animation/frame properties and change the timing to 120. Then go
to Animation/Animation properties. Canvas color should be transparent,
looping set to indefinitely if you so choose. |
 |
|
|
|
Step 8: Now you are
ready to save. I always run the optimization wizard and create new image
before I save to see what kind of trouble I'm in with the file size.
|
|
|
|
|
|
|
|
|
|
|
|
Download the PDF of this
tutorial here.
Download Free Acrobat Reader
here.
|
|
|
|
|
|
|
|
|
|
|
|
|
|
|
|
|
|
|
|
|
|
|
|
|
|
|
|
|
|
|
|
|
|
|
|
|
|
|
|
|
|
|
|
|
|
|
|
|
|
|
|
|
|
|
|
|
|
|
|
 |
|
|
|

