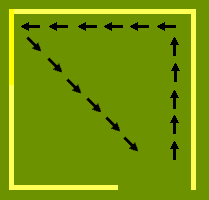

These are the most commomly used gaiting patterns in junior showmanship. The black arrows indicate where in the ring you are suppose to gait when the judge asks for the stated pattern. If you are suppose to switch hands with the lead and gait with the dog on your other side, the X marks the spot that you switch at and switch back. The red arrows indicate where you should gait with the dog at your other side. Always listen to the judge for your gaiting pattern and where he or she wants you to gait!!


| Picture | Explaination |
 |
Down and Back This is the most commonly used gaiting pattern. After the judge asks for the pattern, they will point you in the way that they want you to do it. If they don't, go ahead and follow the right side of the ring. Gait at your dog's speed to the end of that side, turn around, and gait back the way you came. The judge might give you special instructions on how to do this, so listen carefully and always follow directions! |
 |
Triangle This is also a commonly used gaiting pattern. It can reveal if a junior can gait properly without getting tangled up in the dog in turns. Take the right side of the ring until you come to its end. Then, take a left and gait along the back side until you reach the other side of the ring. Then take the diagonal floor pad (or path if you are outside) straight to the judge. If you dog is gaiting out of control, you can make little courtesy turns at the corners to get it back under control. Do not feel rushed when you gait, take as much time as you need. |
 |
The L This is a pattern used to see what kind of control the junior has over the dog and the lead while gaiting. This is most commonly used in the open classes, but be prepaired to do it in novice too; you never know what you are going to have to do. Start by following the right side out to the back one, and then gaiting to the other side after turning left like you do with the triangle. When you have reached the opposite end, change your lead from your left hand to your right hand and have the dog cross over onto your right side. (The best way for your dog to cross over differs from dog to dog and handler to handler. You must experiment to see which way is the most comfortable.) Then, with the dog on your right side, gait back to the right side of the ring, then switch the lead and dog back to your right, turn right, and gait back to the judge. If you are asked to do the L and you are not comfortable with changing hands, don't change hands. It is better not to switch hands than look like clumsy trying to switch hands. |
| Picture Coming Soon! | The T This pattern can only be used for grass/dirt rings or rings that have center runs of nonslick mat. This is a pattern used much like the L; it is used to see how much control the junior has over the dog and over the lead. First, walk to the center strip on the judge's side. Gait down the center strip and turn left, keeping the lead in your left hand. When you get to the corner, switch hands with the lead so it is in your right hand and the dog is on your right side. Gait along the back side of the ring to the opposite corner with the dog at your right side. When you get to this corner, switch hands again so the dog and lead are on your left. Gait to the center mat and turn and gait across the ring following the center mat. Again, if you are not good at switching hands, it is better to do the pattern without switching hands than to mess up. |
|
Key:
| |
Checklist of stuff to think about when you gait:<
|
|