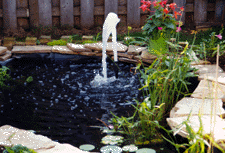
Ponds are a delightful addition to a garden. They add a touch of tranquility that is otherwise hard to achieve; they are a centre piece as well as a conversation piece; and they also give gardeners a whole new dimension in which to test their skills. Water gardens can add a large variety of exciting plants (and animals) to your garden. The addition of a "water feature" such as a fountain or waterfall provides a nice visual effect but also rewards the gardener with the pleasing sound of falling water.
It was the promise of this tranquil effect that first attracted me to the possibility of installing a pond in my yard. I built our pond several years ago and have been very pleased how it has added to the garden. There is no doubt that, since it's installation, the water garden has been my favourite part of the garden.
For those of you considering building a pond, I have provided the following outline of the process that I undertook in establishing my pond along with thoughts and ideas that may be useful to you.
Pond Planning
Planning the water garden is essential! Where? How big? How deep? What shape? What purpose? Will it be accessable? Will it be safe? Do you want it to be formal or natural? How much do you want to spend? Do city bylaws permit a pond and if so are there any resprictions? These questions and many more should be answered before you begin to dig.
Rule of Thumb!
When planning the water garden always decide on a size and then ... if the site permits, increase it by 10%. It is far easier to add that extra foot of space before the pond is up and running.
When you first consider building a pond ... READ! There are soooo many good ideas that you could incorporate into your plans. Visit other ponds, both those set up by suppliers and those of individuals ... and ask questions! (No question is a dumb question if you don't know the answer.) Now, armed with this new found wealth of information, you can be an individual and develop your own unique design ... or you can have someone do the planning for you ... but even then you should be able to voice your preferences.
Our plan was for the pond to provide a pleasing sight as soon as one enters our back yard or exits the side door of our home. Restrictions included the existing deck, a fence line, a gazebo, and a city easement which prohibited the building of permanent structures within 4 feet of our one property line. (This was due to the presence of a water main running through the property.)
Given these limiting factors, our pond would be as large as could be built in this confined area. For us, the general size was dictated by the structures around the proposed pond. We also wanted a narrow raised flower bed to surround the pond. Raising of the bed would serve several purposes: blend in with the woodwork required to raise the waterfall area (discussed in a future segment); make working in the bed easier; and prevent runoff from the lawn, etc. from entering the pond. This last element is important since runoff may contain chemicals that could harm the fish, play havoc with the chemical balance of the pond, and dump unwanted debris into the pond.
Now that it was decided how to keep unwanted water out ... how do you keep wanted water in? Pond liners (the stuff that keeps the water in and the dirt out) can be divided into several types. Ridged liners (similar to a child's wading pool), soft liners and concrete liners. We chose to go with the soft liner because it gave us the most flexability in determining how the pond would fit into the yard.
Getting Started
No! ... digging isn't the start. Several important steps preceed digging.
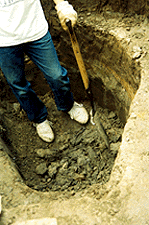
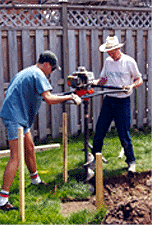 Depending on the size of your proposed pond, you may consider the benefits of having the excavating done for you. I did it myself and was amazed at the amount of dirt that came out of "that little hole". Some of the dirt was used to raise the surrounding garden and the waterfall area. The remainder was "hidden" in various parts of the yard - even under one section of lawn!
With the hole dug, remove any sharp objects such as sticks, roots or stones from the walls and floor of the whole. Putting down a layer of sifted sand (about an inch or two) then the felt liner ensures that the rubber pond liner will not spring a leak. DON'T use the rubber that is used to manufacture inner tubes or roof liners! There are unscrupulous people out there who may offer you these materials at a fraction of the price, however, they both contains chemicals that will kill the fish placed in the pond.
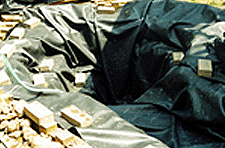 Once the liner is installed, fill the cavity with water. Allow the water to sit for several days before introducing any plants or fish. In our community, the water is treated with both chlorine and chloramine. Chlorine will dissipate with time but the chloramine will need to be removed with a chemical treatment that you can obtain from your pond supplier or local pet shop. If you are installing a fountain, underwater lights or any other equipment ... now is a good time to do it.
Ok ... now that the pump has been pumping and the filter filtering for several days, you can add the plants and fish. IMPORTANT: Make sure the temperature is acceptable for introducing the fish ... and do so gradually as per the directions from the supplier ... or the fish may end up doing the back stroke in your pond ... what a waste of good fish.
Something to consider: What will you do with your fish and plants during the winter? In our climatic zone, ponds must be over 3 feet (91.5 cm) deep if you want to leave hardy fish outside and have them survive through the winter. Tropical plants (and tropical fish) will need to be brought inside while hardy plants will need to be placed in deeper water. If you don't have the "deeper water" option, you will need to find a home for your plants and fish to pass the winter months. I bring several of the less hardy varieties of fish into my home during the winter. Their winter home is a sixty gallon aquarium in my office.
As I had mentioned earlier, the pond is raised higher than the surrounding ground. This was accomplished through the use of a retaining wall. The retaining wall around the pond consists of segments of 18" 4" x 4" (45.5 cm - 10 cm x 10cm)pressure treated posts, nailed together and standing on end. The wall is strong yet decorative and unique.
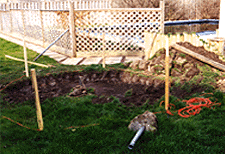
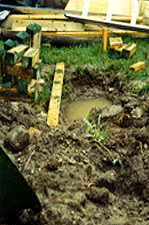 Several sections of the retaining wall, waiting for installation, can be seen in the photo at left. That puddle is the the beginning of the pond. After the post hole digger had been used, several days of rain filled the holes with water. This wet weather delayed further digging for several days but the sun eventually came out and work began again. The fact that I had no specific date by which the work needed to be completed made the job more enjoyable.
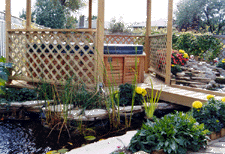
I definitely think the finished product was worth the effort. The photo to the right was taken during the first summer - about one month after it's completion. Each year the pond's character changes ... as it matures. Further work has since added more flagstones around the edge and planting of more perennial plants around the border. The waterlilies have been divided several times and Parrot Feather (a tropical plant) has covered much of the remaining water surface.
A highlight for visitors, besides the pond itself, is feeding or even petting our fish! The koi have grown so accustomed to humans that they will allow you to stroke them ... of course giving them a little food each time also encourages good behaviour.
Some of the plants and animals resident to the pond are featured in the Close Ups section. In that section, photos of individual subjects give viewers a better look at them.
Animal Life
At present the pond contains:
The guppies were initially put in the pond to control mosquitos. The fish prospered in the pond so they have been returned there every spring.
The three minnows were obtained from a local river and added there by my daughter. NOTE: This practice is generally discouraged since it may introduce diseases to your pond environment. However, in this case, these fish and the rest have prospered ... and some have multiplied!
The koi and the oranda were placed in the pond during it's first year of operation. The koi, initally only 3 inches (7.5 cm) in length, are now all around 12 inches (30.5 cm) long.
The comet goldfish came from various sources: rescued from a drying pond; individuals who had grown tired of caring for fish; carnival prizes; and breeding of two fish we actually purchased for the pond.
The resident bullfrog was also obtained from the local river. It is quite happy in it's surroundings and has now been living here for a year and a half. Over that time period, it has grown accustomed to humans and will allow people to get very close ... even to gently touch it.
"Animal life" also includes unwanted visitors. During the first year of operation, several raccoons discovered the pond. Fortunately they did not harm any of the resident fish, however, they did make short work of devouring the half dozen apple snails that had been recently introduce to the pond. Only broken shells were left ... scattered throughout the rock garden. The snails were not replaced. Cleaning of the pond is leftto the muchsmaller common pond snails. As well, a sonic deterant, on a timer, was installed. The raccoons have rarely returned since then. Whether the device is actually effective or the raccoons just found a better supply of food is opn for discussion.
Conclusion
I hope you enjoyed your visit to my pond and that it has inspired you to venture into adding a "water feature" to your garden. There are many other aspects of maintaining a pond that werenot covered here. They may develop into future articles ... as this site evolves.
Links to several other pages within this site (and a link to external sites) have been provided below. This list of pages will grow and change as this site matures, so check back often. You are always welcome to visit my garden.
...and you are certainly welcome to provide your comments and sign my guestbook.
Have a nice day and come again!

Visitors since Sept.24/98