HOW IT WAS BUILT
My car mp3 player was built after school for about a week. It took probably about a total of 20 hours to complete. I used some old computer parts I had lying around. I ordered the 40x4 LCD from Timeline Inc for $30 w/ a backlight (shipping $5). I picked up the ac-dc converter at Big lots for $30 (there usually $60+) its 300watts so I figured that would be enough power. The 12 ft printer cable was also purchased there for $5. I had all of the wood left over from another project; it was all cut into boards of diff length all 1ft wide. I arranged all the parts needed into the smallest configuration possible then cut all the boards. After they all fit I cut out where all the ports would be. This was difficult because the jigsaw I was using is older than me and was not sharp whatsoever.
After assembling the box I cut some plexi-glass for the lid and spray painted the inside with a template of the paintball team I am on, Fallen Angels. The paint worked better from the inside because it would not get scratched and it gave it a glossy appearance from the outside. I lost 2 Dremmel cutting discs cutting the plexi-glass and one of them hit my friend in the neck. I would have used a larger saw but the blade in it was not fine enough and would have cut the glass into splinters. Once it was all dry I attached it to some hinges and added a handle and magnetic things to keep it closed. Well now that my box was done I was on to the hard part soldering.
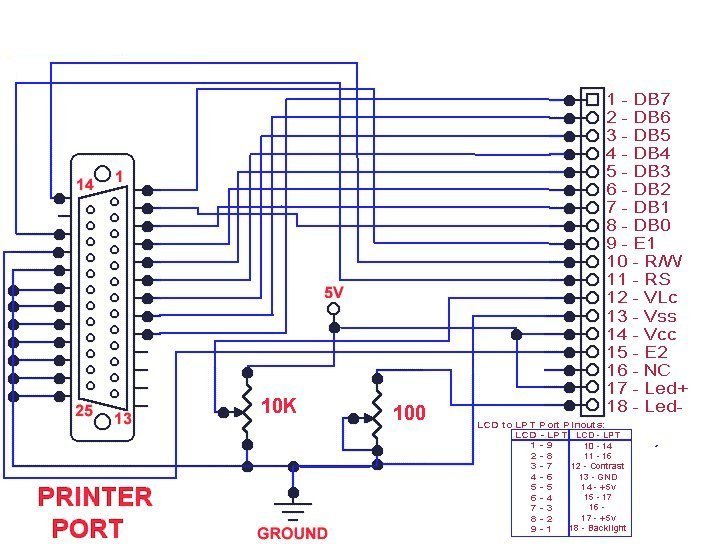
I got the lcd in the mail with a ribbon cable attached, that had to go, so I carefully Dremmeled the cable connecter off and de-soldered all of the pins. Then I chopped off the printer end of the printer cable to reveal 25+ wires which I stripped, then I attached the appropriate wires to the holes in the LCD board according to the diagram (see pics section) at the other end of the cable I cut off the insulation just before the parallel connecter and used the unused wires to transfer the 5v+ power and ground to the backlight and LCD. I also used 2 wires for the power on/off switch and 4 for the keyboard connecter. (see wire hook up diagram) once all that was soldered and taped up I basically had 1 cable that I could plug into the pc via the parallel port, a molex connecter for power and the motherboard connecter for the power switch with a keyboard cable sticking out of the side. On the other end was the LCD, power on/off button, and keyboard controller chip and buttons. I then tested it all and ran it in my car for a few days to make sure my carís power system could handle it.
Everything seemed fine so I cut out the dummy panel in the empty dash bay and installed the buttons and hid the keyboard chip behind it. I then used some Velcro to wedge the LCD into place and hold it securely. O yea I almost forgot I mounted the LCD into a plexi-glass box made from scraps and hot glue. I added a 10k pot from radio shack to control the contrast and a switch at the top to control the backlight. Well after some sanding and grinding the LCD and keyboard fit correctly into place without any permanent damage to the car. I also mounded a switch to kill the power to the ac-dc converter otherwise my battery would die. The small switch next to it is for the fm modulator which sends the signal into the stereo via direct connection to the antenna @ 88.1 fm.
The actual software isnít too complicated. I am running the current vs. of winamp and windows 98. using a plug in (look in download section) I am able to control and display whatever I want to the LCD. But how do you control it? Well do we all know how a keyboard works? Well if not its basically 12 pins and 18 pins, I combine any 2 m one from each side and you get a character (most of the time) I tested it until I got the numbers 1-0 and a few random characters that winamp would like. Then I soldered buttons to those pins, so basically all of the buttons represent key strokes to the computer. Using the plug in I could configure this to actual functions like play and pause. I also made my pc so that It doesnít boot into explorer rather just winamp. I also disabled scandisk which scans your hard drive if you improperly shut down (which I do). By doing all of this my pc boots and is ready to play (it auto loads a play list) in about 1min Ė 1:20 min. to shutdown the pc I simply turn the power off. Well thatís about all I have time for right now Iíll put more up later.
NEW!!!
Download LCD print to test your LCD
Download the LCD WinAmp Plug In!
Here is some of the connection detail.


