What would you give to be completely organized this coming holiday season? ...for the calm serenity of having everything you need to wrap Aunt Edna's gift at your fingertips?

We've all done it. Said we were going to get organized and then had to go hunting for the scissors, the tape, the gift tags, the pens, the stickers, the address list, the gift list, the extra Christmas cards. Every Christmas, it is the same story. Eventually, we scavenage up a shoebox or some sort of container or make due with a plastic bag, and then, just when we think we've got all our ducks in a row, someone comes along and helps themselves to our supplies.
The project I am proposing is the making of a keepsake Christmas caddy which you can give family members as a Thanksgiving gift, filling it with all the goodies you know every gift giver needs at Christmas time. Of course, you don't have to fill it with Christmas supplies. It is also the perfect thing to fill with cookies, fruitcake, a bag of Starbuck's Christmas blend, a jar of hardcandy, dried flowers and ribbons. What you choose to put into it is really up to you.
The Caddy
You will need:
2 - 12 inch lengths of 1x10 (pine will do fine)
12 - 12 inch lengths of 1/4"x 2" lathe board
1 - 12 inch length of 1" dia. dowling (circular or square cut)
2 - 1-1/4" wooden finishing plugs
small brass or plain brad nails(if you use a thicker wood than the lathe board, you may wish to use wood screws and counter-sink and fill with wood plugs)
Elmer's Wood Glue (for the finishing plugs)
sand paper in various grits
wood carving tools (wood burning tools)
a hammer
a jig/saber saw
a rubber mallet
a router (optional)
a drill
chalked tracing or carbon paper
a pencilDon't worry if you do not have access to all these tools. This box is meant to be rustic to some extent and you can make due without them with just a little more elbow grease.
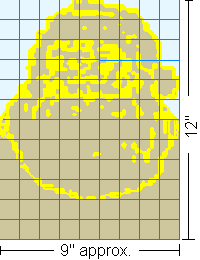
Instructions: Step One. Lay-out your end piece pattern as pictured above. Tracing the design onto the 2-12 inch sections of 1x10. Remember, you want the grain of the wood to be vertical.
Step Two. Cut out the pattern, keeping to the outside edge as much as possible. Remember to leave about 6" up from the bottom square.
Step Three. Lining up the bottoms of the end sections flush with the design face inside, drill a 1" diameter hole (or keystone for square dowel) at center about 1/2" from the top. This will make the design come out facing the same way when finished so that cut-outs will be reverse. Once you've cut the hole, add counter sink for the finishing plugs. You may now skip to Step Five if you choose.
Step Four. Carve the design onto the side pieces. The yellow section represent those areas you DO NOT TOUCH or the raised portions for the Santa face. You may add detail if you wish. If you are going to paint or wood burn the design, do Step Five first then re-apply the design with tracing paper. Remember you will want to remove all of the tracing by sanding it out later as it tends to get into the wood grain.
Step Five. Sand the wood to remove all burrs, clean the edges and remove the tracing chalk. If you have an edge router, rout the edges now or sand edges to a slight round. If you've never worked in wood before, you begin with the lowest number of sandpaper (40 or 50 grit depending on the package) and work up to the highest number (320 grit ought to be sufficiently fine). When sanding is finished, the wood should feel as smooth as glass.
Step Six. Assemble the pieces. You may wish to wrap the end pieces in cloth at the pressure points if you use a bench vice. Line up the bottom lathe sections to the bottom of one end section and nail to the bottom allowing enough overlap for the sides. Attach the sides. Insert the handle dowel. Reverse and line up the other end section. Nail in place.
Step Seven. Add the finishing end plugs to the handle on the outside end sections. Apply the wood glue to plugs and tap them in place with the rubber mallet (use a covered hammer if you do not have one). Allow to dry.
Step Eight. Finish sand the entire box, removing any marks, smoothing any indentations, and removing any knicks from assembly. You may now skip Step Nine if you choose.
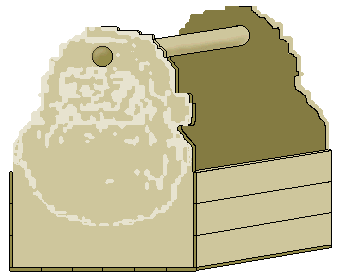
The finished project.
Step Nine. Stain, varnish, or paint the box as you choose.
The finished box can be used as a gift basket, to hold received Christmas cards, filled with ornamnets or homemade foods. It is ideal as a supply caddy as mentioned above. What you put in it is limited only by your imagination.
You can also adapt the basic pattern to any design you choose as long as you keep a squared bottom on the end pieces. I am currently using a caddy given me by my brother as a carry-all for sewing supplies rather than having extra spools of thread, tape measure, scissors, pincushion, and bobbins laying all over the place. The end piece patterns were maps of Michigan.
-- AngelPie_Mouse.
This page and its graphics were created by
exclusively for The Yahoo! Crafter's Place Chat Club.
It is best viewed on a 800x600 screen set for True Color
withor
and
is hosted by. Get them NOW!


