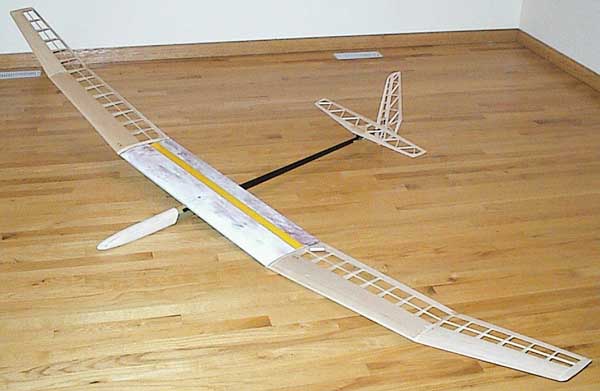
Plans for this sailplane can be obtained from the Allegro Lite Yahoo Group . Look in the files section under Bubble Dancer. There's a lot of dialog on the group, here's a rundown on what to expect.

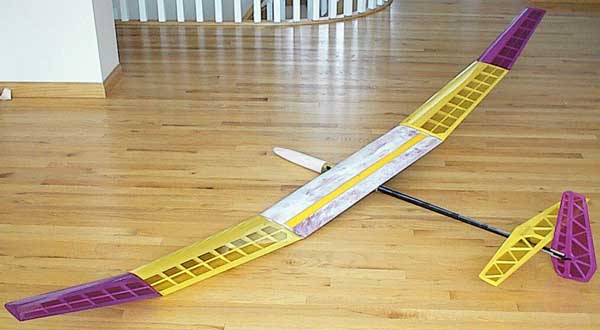
When the Bubble Dancer was first published, it was clearly a sailplane design in a class by itself. Probably still is. The plans and specs came out in 2000, and I started on one immediately. For thermal duration work I will have both ends of the spectrum, the BD and the ballasted Cobra. After a few aborted attempts to get the framework together, I decided it would be better to wait until I had enough time and patience to do it right. Two years later, this web page show the work in progress on the plane, and I have chosen to take as few shortcuts as possible. Normally I take lots of shortcuts. Looked at as a single project, there's an overwhelming amount of work to be done, so the best way to tackle the hundreds of tasks is to split them up. You will have to really like working with your hands and be quite patient to get the plane to go together properly. Also, since there are no construction notes for the plane, making up the assembly procedures as you go along will require some pre-thinking. When in doubt, make some sketches and do a dry run to see if the procedure will work. Several times I ended up scrapping a part when the piece did not come together.
I've built several of Dr. Drela's designs as well as using similar techniques in some of my own sailplanes. This one is going to be unique and will require a lot of tooling. The weight targets are unachievable with my skills, so we're shooting for weights that are within 10% of his specs. I'll be happy if it comes out at less than 38 ounces ready to fly.
Fabrication and construction of the plane goes a lot easier if you have a few special tools. Some of these can be made yourself and will save time and improve accuracy. Look at the Tools file in the website.
Scale - It's impossible to build light without a good scale that reads to at least 0.1 grams. Buy one before you even start building the plane, you will be selecting the wood with the scale. I have an Ohaus 700 triple beam balance off Ebay for $25.00, some prefer to go digital.
Precision Miter Box - used primarily for the shear webs, I also used it for the angle cuts on the stab and rudder ribs. Plans are in the files section. Mine is made from oak.

Angle Sanding Blocks and Table - a basic tool for faceted sanding jobs, used for leading edges and other curved surfaces.
Belt Sander - Saves time when having to remove lots of balsa from flattish surfaces.
Balsa Stripper - Almost a necessity since you cannot get low density stick stock and will have to make it yourself from sheet contest balsa.
Bench Vice - Holding the spars for wrapping is much easier with the spar clamped into a solid vice.
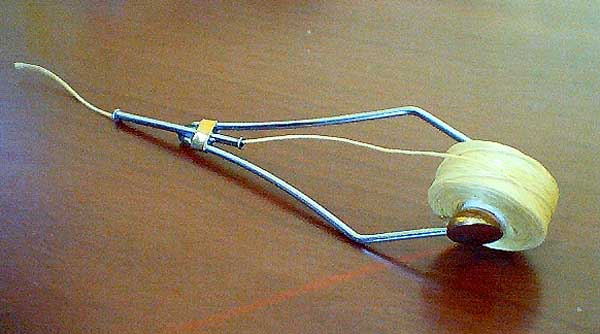
Fly Tying Bobbin - this is a very useful tool for wrapping the spar. Available at Walmart in the fishing section or at any fishing store for $4. I used the K&S Kevlar thread for wrapping the spars and it comes on a small spool that fits onto the bobbin. Put on a vinyl glove to keep the thread clean and then maintaining tension while precisely positioning the wraps is easy. If you're using tow, wind the tow onto a large empty spool and use the bobbin.
I like pod and boom fuselages from back in the Legionair days, and I wanted to have the ability to make open class pod and booms for any other TD designs. So some thought was put into this pod so that it could fit any wing between 9 and 10.5" chord, and any boom from 0.6" to 1.1" diameter.
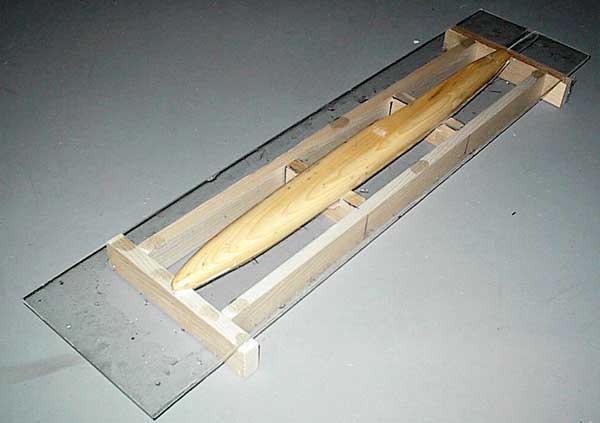
This picture shows the pod plug sitting in the Plexiglas splitter plate. I find the break even point for making a proper mold versus buildup somewhere around 3 fuselages, and I'll make at least that many so the effort is justified. The plug is made from clear grain spruce with 3 coats of West System epoxy. It was roughed out on the bandsaw and router table, finished shaped by hand sanding with templates. The cross section is an flat oval, tall enough to hold mini servos in line. It's also been waxed about 20 times.
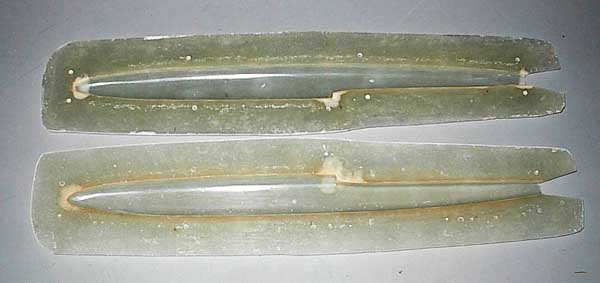
And here is the first mold after one pod has been done. The white parts are thickened epoxy to stick to the tight radii in the form. A gel coat of fast set epoxy with milled glass can be seen at the parting line. I find this vastly increased the durability of the edge when pulling parts. Note the eight registration pins in the upper half, and there are no bolt holes. The mold goes into a bench vice and is clamped from the outside during assembly. Seaming is done through the boom hole, except for the canopy area in front of the leading edge lip. That seam is done after the canopy opening is cut out.
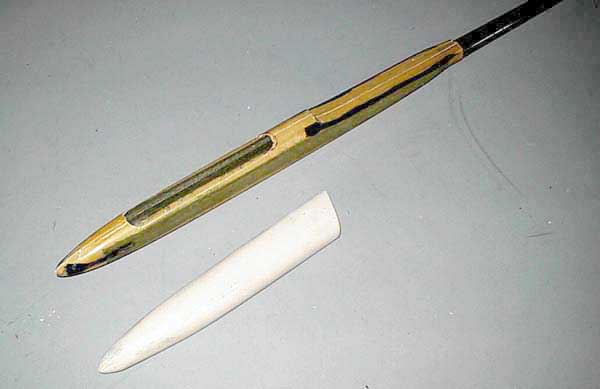
This the the first pod pulled from the mold. It's always exciting to pull the first item from a mold, will it stick? Will it look like a POS? Each half was vacuum bagged into the mold and joined after trimming. There's no other way to do this layup. Unfortunately I didn't get enough dog ears into the vac bag and there are a few puckers in the tip of the nose and the wing saddle. They won't affect the strength of the pod and are out of sight. The canopy cutout is done but the wing saddle hole is to be cut later. The pod lay up is 3 layers of 1.7 oz Kevlar on bias, with a 1/2" rail on each side made from a CF/balsa/CF sandwich, CF tow at the nose and wing saddle. The rail runs all the way from the tailboom joint to the nose and is right under the wing saddle. It will take a serious dork to fail this fuselage. The pod and boom weight is 168g with nosecone. The nosecone is braided FG sock pulled directly on the mold plug and weighs 38 g. An ounce can be saved if a small hatch cover is used instead of the nosecone. Overall this pod is 1.5" longer than the plan BD (V2) pod. I did this to ensure that no nose weight would be needed, and the pod could be used for larger sailplanes. BTW I built a complete balsa/FG pod (V1) and the nose was too short for balance.
The tailboom is 5 layers of Uni-CF with inner and outer bias FG. John O'Sullivan's rollfuse technique works well for booms of this diameter. This boom is overkill, but it was made before the final boom spec was issued. The tail moment has been kept the same as the plan.
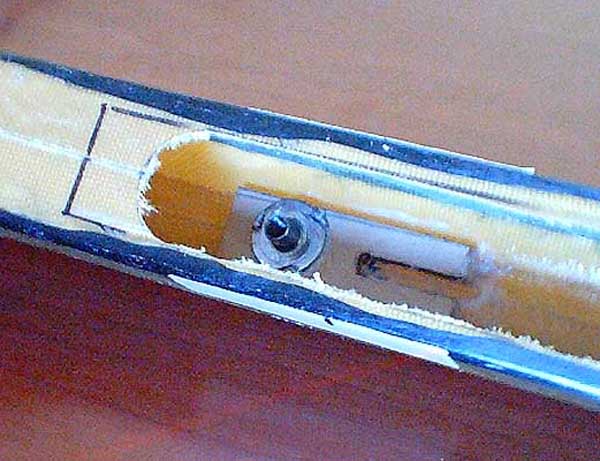
This picture shows the wing mounting blind nut in the bottom of the fuselage, looking through the hole in the wing saddle with the nose to the left. A 1/4" plywood plate has been shaped and solidly glued into the bottom of the fuse. A hole is drilled through the wing, centered in the hardwood block. Aligning the wing to the saddle, the blind nut is threaded onto a 10-32 screw and glued onto the plate. Once secure, CF tow will be laid over the flange of the blind nut to anchor it to the plate from above. Then the towhook is installed into the slot aft of the blind nut. Winch loads now completely bypass the fuselage pod.
Early in the life of the Bubble Dancer design, there was some concern about the torsional rigidity of the built up wing. I like to launch hard and all over the sky so this concerned me. My solution is to build a hybrid wing, a composite center panel with built up tips.

This is the center panel core ready to be bagged. A spar has been fabricated using CF caps, balsa webs and Kevlar wrapping. The 3/8" joiner tubes are already inserted into the spar ends with the correct dihedral angle. The spar is grouted into the wing with epoxy and microballoons. You can also see the balsa inserts for the rear incidence pins and the spruce block for the main wing bolt. Also barely visible is a 1/16" balsa strip at the LE of the spoiler bay. This will ensure a straight edge for the spoiler hinge. The only thing left before bagging is to add the ply end ribs.

And here it is after bagging. The core was bagged in two steps due to the finicky positioning of the Mylars. The first bagging was the bottom surface and the spoiler bay. No Mylar was used on the spoiler bay so that the bag could conform to the foam. Step two covered the top, fore and aft of the spoiler bay. Each of the Mylars had the Kevlar trimmed right to the edges, and then positioned so that they lined up precisely with the edges of the spoiler bay. CF reinforcements were put over the bolt block and the incidence pin locations. Who likes the faux finish? The skin is a single layer of bias 1.7 oz Kevlar.
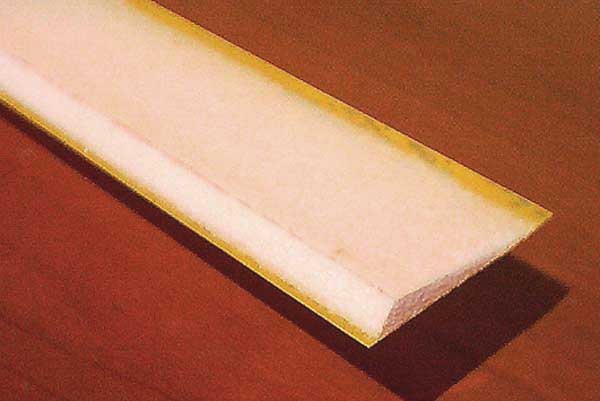
This is the foam core spoiler. The wedge of pink foam was bagged between two Mylars. The skin is two layers of 1.7 oz FG on the top and a single layer on the bottom. There's a bevel at the leading edge to allow the spoiler to seat properly in the bay. Since it's difficult to get a straight leading edge for the spoiler hinge due to the foam warping, a small lip is formed at the LE to be trimmed straight after curing. The spoiler weighs 16.9 g, a balsa spoiler would weigh about 20g, and would be quite a bit more flexible.
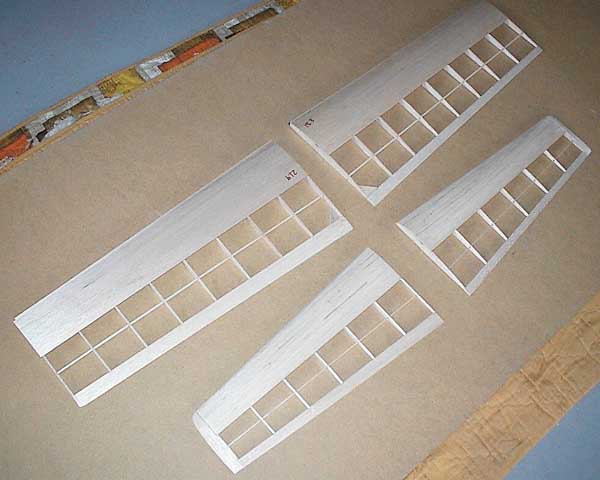
Here are the mid panels and tips with some final sanding to do. They are built strictly to plan, except a ply root rib will be added for strength.
It took me 2 hours just to stick build the fin and rudder. Part of the problem is ensuring a really tight fit to the tail boom. Any gap will be filled with epoxy so weight savings are crucial here. Since the boom was already attached to the fuse pod, and it is thicker than the fin, I built a small plug with the exact dimensions of the boom where the fin is attached.

It's the balsa piece with the red pen stripes. The fin body could then be built, sanding each piece of the frame on the boom to get the right profile (end view). After this much of the frame is made, it can be pulled up from the board to make sure the fit is good. You can also see a short strip of 0.007" CF at the hinge post. I've lost two RES planes in the last 25 years due to the fin blowing off in a high speed dive, this CF will make the fin stiffer.

Here you can see the plug pulled out after the frame is completed, and the boom will fit perfectly.
The stab goes together quite easily, no strange techniques used here. The mounting system is something else. Although there is talk of someone supplying a V-mount and stab plate, it's time to mold again. The V-mount is no problem, I built one out of aluminum and CF according to the notes in the Files section. There was way too much slop in my hinge system, the fit to the stab looked like it would require a lot of carving and, most worrisome was the wearing of the holes in the aluminum. So I built another mold for the V-mount but wanted a different stab mounting system.
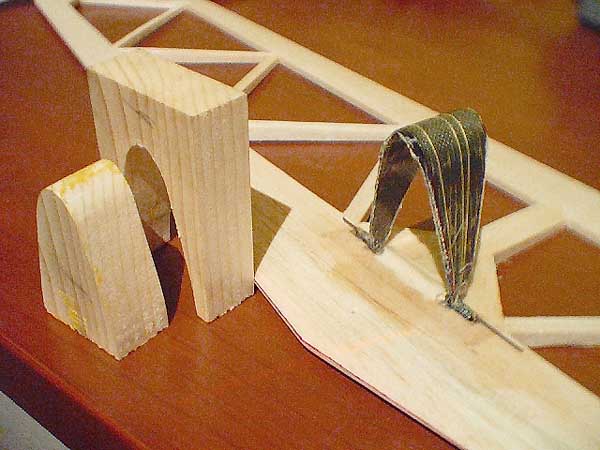
This is what I chose to do. The picture shows a 2 part V-mount mold made from 3/4" pine. The V-mount has 2 layers of 1.7 oz. Kevlar, a couple of loops of Kevlar thread and 3 layers of 3 oz. Uni CF. A small brass tube is placed across the bottom for the hinge. When molding the part, the brass tube is punched through the fabrics and then the fabrics are folded over the brass tube to give a solid glue joint. After trimming to shape, Spectra line is wrapped around the V-mount arm and the brass tube. The center part of the brass tube (between the arms) is cut free and glued to the stab at the hinge line. Finally, a 0.047" music wire pin is inserted to hinge the stab, held in place with a small piece of tape. This method appears to be quite a bit lighter than the plan but will require that the control clevis be unhooked to remove the stab. A control arm has yet to be glued into the stab.
The plane is done. Estimated time to here - 75 hours. Estimated time wasted - 17 hours. I made a serious effort in the last week (ca. 20 hours) to finish this thing. Quite frankly, as the mess in the workshop grew, I had better get it done or else put it away for another 2 years. Starting from a kit will save the time required to cut the ribs and webs (3 hours), build the boom and pod (15 hours including the mold), V-mount (1 1/2 hour) select the wood (1 hour). A built up center panel would take longer to build that the foam core job. So my guess is will take 40 hours to build from a kit. I want to see the instruction manual to build one of these, somewhere around 50 pages of notes and diagrams?
Since we got 8" of snow yesterday (Nov 9, 2002), flying will probably not occur for a while yet.
November 23, 2002 - I gave the plane a few hand throws in the yard last week to check it out, and can get a couple of thermal turns easily. The starting point for the CG is at the rearmost recommended position. Then it was off to the histart, just a wimpy little job with a short line. In a 6 mph breeze, the plane goes kiting up the line and can hang on forever. With a little more breeze at altitude, the plane goes backwards. Speed variation on the plane is slow and hover.
Even at the higher weight, the plane has a nice low sink rate and small turning radius. There's a little bit of dutch roll coming out of a high bank turn but the entry is fine. The first day's flying off the winch is under dead calm conditions, and no wind shifts from thermals nearby. A light tension launch on a 200 foot winch line with a moderate zoom gets the plane up there to float around. After specking it out, a dive test shows that the CG is still too far forward. Remember, the boom on this plane is 3 times stiffer than the plan so the low tail flex will allow a more aft CG. At the recommended CG, the plane can be free flighted for several minutes in the calm conditions. The spoiler allows vertical descents without worry. The plane was specked out on each flight but its pretty boring to float around at max altitude for 10 minutes at a time. One thing that's good is the low speed handling is so good that the plane has never landed in 20 or so test throws and flights. I've caught the thing every time without any drama.
November 29, 2002 - Global warming continues unabated, it's 8 oC and dead calm today, the low solar incidence and patchy cloud cover will reduce the thermal activity considerably. A good day for more low lift testing. First launch off of a real length winch line, bigger zoom, and 20 minutes later the spoilers are tested again with a 1000 foot vertical descent. The rearward CG has slowed the plane down even more so it just hangs in the sky. The second and last flight is over one hour in 3 thermals. Thermalling pilot input consists of; find thermal at 200 feet, center thermal with a turn diameter of 50 feet or so (my plane turns better to the left), put in 3 clicks of left rudder and 1 click of up trim, put transmitter down and wait 4 minutes while the plane climbs out to over launch height. I did this twice during the flight just to watch the plane free flight away. You not only have time to eat a sandwich, there's time to go to the cooler and make the sandwich. After 50 minutes, I flew the plane in a straight line into the wind for 12 minutes without attempting to stay in any lift, watching it slowing descend to the ground. This type of flying is not really very exciting and could easily drive you away from the hobby if that's all there is. The local fliers call it the Dirigible.
Now if this were a magazine review (advertisement) you would be reading about how this plane is the greatest, will win every contest, handles every weather condition yada yada. Or my favourite "it slows down to a crawl but has great legs when you feed in a touch of down elevator." How about "fantastic quality parts, goes together easily and flies straight out of the box." Since this is my webpage and I have no commercial interest in the design (despite the fact that many people seem to want to buy a kit or fuselage), I will say this: the plane is on the very upper end of the skill requirements for plan building. This is the case for the Allegro Lite as well, as demonstrated by the low percentage of kits that have reached completion since issued 2 years ago. Hold your hand up if you have ever built a kit that is more demanding than the AL. Add to that now the issue of building your own pod, and a nice boom. This is even with the high level of detail provided for the unique construction methods and the support of the designer for the endless series of elementary questions.
For the purpose that the plane was designed, it seems to do well, but I'll only be using it on the low lift, low wind days. There are probably less than 10 days a year in Calgary that are like this, and I've only flown one or two. Other days the lift is plenty strong enough to take a normal TD plane out. The performance envelope is too narrow to be my fun flying machine and when the lift is good it's more enjoyable to cover the sky at a more rapid pace. Maybe it will serve as a handlaunch plane when I'm too lazy to set up a winch.
I freely admit that this plane has turned out heavy. I gave up on weight management as the plane approached completion since it became clear that it was not going to make it. The same problem came up on my Supergee, the airframe was 20% heavier than spec with my best efforts. Even my Ultracote Lite covering job came out heavier than the plan spec, with only 1/8" overlap at the seams. Gravity in Calgary must be higher. I have to reduce the tailboom and radio weights, and would be down in the 32 ounce range.
| Bubble Dancer Item Weights | ||||
| Target | Actual | Delta | Over (%) | |
| Right mid and tip panel with joiners | ||||
| Uncovered | 82 | 131 | ||
| Covering | 16 | 17.5 | Huh? | |
| Joiner rod | 32 | 13.8 | ||
| Covered | 130 | 148.5 | 18.5 | 114% |
| Left mid and tip panel with joiners | ||||
| Uncovered | 82 | 135.3 | ||
| Covering | 16 | 17.4 | Huh? | |
| Joiner rod | 32 | 13.8 | ||
| Covered | 130 | 152.7 | 22.7 | 117% |
| Center panel | ||||
| core | 93 | |||
| core with spar and reinforcements | 159 | 187.5 | ||
| Complete without spoiler | ||||
| Spoiler | 18 | 17 | ||
| Total without servo | 242 | 262.3 | 20.3 | 108% |
| Total with servo | 299.8 | |||
| Stab | ||||
| uncovered | 16.2 | |||
| covered with horn | 20 | 21.3 | 1.3 | 107% |
| Rudder and fin | ||||
| Uncovered | 13.3 | |||
| covered with horn and hinge | 16 | 19.9 | 3.9 | 124% |
| Fuselage | ||||
| Tailboom | 35 | 62 | ||
| Pod | 129 | 104 | ||
| Nosecone | 21.5 | |||
| Towhook and wing mounting bolts | 13 | |||
| Vmount | 4 | |||
| pushrods and clevis | 13 | |||
| servo tray | 5.5 | |||
| Pushrod anchoring | 2.5 | |||
| Total Fuselage | 164 | 239.7 | 75.7 | 146% |
| nose weight | 0 | |||
| Radio | ||||
| Hitec 555 | 23 | 23 | ||
| Aitronics 141 (R & E) | 34 | 64 | ||
| Hitec 85 MG (spoiler) | 9 | 22 | ||
| 1100 AA nicads | 90 | 94.5 | ||
| wiring | 7 | |||
| tape | 3 | |||
| switch | 11 | |||
| Total Radio | 156 | 224.5 | 68.5 | 144% |
| The final story | 858 | 1054.9 | 210.9 | 123% |
| 30.3 | 37.2 | ounces |
PS - After removing some weight from the nosecone the plane now weighs 37.2 oz. Another 1/2 ounce can be saved by replacing the receiver antenna with a light gage wire, but why bother?
If you have read this far, you are probably interested in obtaining a Bubble Dancer. The design of a plane like this is intended to meet certain goals and these may also be what you are looking for in the next TD plane. Recognize that minimum sink alone is not the answer to ultimate performance. In a free flight design, this is probably one of the most important factors, but RC planes have to come back upwind and the basic physics of flight cannot give high penetration and low minimum sink, particularly with a non-flapped airfoil. Those who believe this are only fooling themselves.
Performance is quite often defined in the competition arena where designs will converge on the best performance envelope for the defined task. No competitors in the 2002 F3J world champs registered a model along the lines of a Bubble Dancer (<35 oz. and +3m span) as one of their three planes, according to the model list published. This is despite the fact that this design is theoretically capable of achieving the task time of 10 minutes without the use of lift. Fly your guaranteed ten minutes, get into the fly-offs and worry about what plane to use for the 15 minute task. If this type of performance envelope and flight strategy was at all competitive, wouldn't at least one of the 70+ world class contestants consider assigning one of their planes to such an approach? Maybe the next go round will show this approach. The point of this rant is that a sailplane designed for minimum sink is not a cure all for contest work. A difference of 0.5 ft/s (30 f/minute, quite a lot in relative terms) in theoretical minimum sink between two designs has little impact on achieving the short target times of thermal duration contests. It is far more important where and how you fly than the minimum sink of the plane you fly. Having said that, a minimum sink design limits where you can fly and how far downwind you are able to follow the lift which is a major factor in keeping a plane in lift.
The lightweight/minimum sink sailplane model has certain uses, none of which appeal to me or appear to have real advantages in normal contest work. They are by nature more fragile, harder to zoom and the RES planes are more difficult to land. Build one if you want a plane that can float around better than the others planes, but recognize that it will have little or no advantage over other planes in staying up.
Now this does not mean that such a plane is not fun to fly in the right conditions. I have flown the BD at the limit of visibility for half an hour without concern because it is so stable. The frame is strong enough to take any flight loads so looking away and losing the plane for a while is not a concern. Practice putting the spoiler up and getting a stable emergency decent mode, and you can get your 1 hour flights without too much trouble when the lift is good, and there's no wind.
Copyright W. Man-Son-Hing (2002)