

The most important thing is to do research. The first thing we did was check out the different pond pages on the web. My first exposure to the Internet was The Garden Exchange . In this site there are many forums on all different gardening topics. It was here that I scanned other "ponders" questions, and the responses given by others. It also gave me links to many different web-sites that were useful to help with pond construction. One of my favorites is Pams Puddle. After learning about Pams pond there are links to other experts on the web who can help by offering their experiences and advice. Here you can view the The Internet Pond Society The Internet Pond Society newsletter. Here you can also read articles from pond construction,animal and plant life, or even take a virtual pond tour in "Reflections" which features different parts of the U.S. and International ponds each month.(It so happens I co-author that column, but I'll go into that later).
We also visited some local pond centers to see what they had done. Here we were able to get first hand knowledge,some visual ideas, and also some idea of cost. One thing they emphasized was that we build it large enough. Do it right the first time!!

The next decision was where to situate our pond, and the shape of
our pond. First we had to decide where we had access to electricity for the
pump. We also had to decide what we wanted in terms of plant life.
If we wanted a vast variety of flowering plants, we needed to put our
pond in a sunny area. This narrowed down our choice to next to the deck.
Here we would have access to electricity, full sun, and we could even hear
the waterfall from our deck and living room!
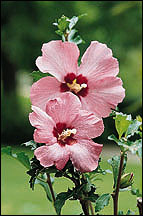
Now that we narrowed down where to put it, we needed to decide it's shape. We used an old hose and moved it around for a few days until we found exactly what we wanted. What we decided on was a free-form shape that encircles a beautiful lavender Rose of Sharon.


Next was the most backbreaking part(other than hauling the fieldstone). The digging. This was completed by my husband in 2 days. We put some of the dirt we removed in the upper corner to be the foundation for our waterfall. We did the same with any large stones which would be used to make the falls more stable. We knew we had to go 24 inches deep to prevent solid freezing and to be safe for the fish. Our final depth was 34 inches on one end and about 32 on the other end. In the center of the pond is a shelf, and all around the edges there are shelves at different depths and widths to accomodate different types of pots filled with plant life.
After we trimmed any roots that were exposed and removed any rocks that were sharp we lined the hole with old blankets. Someone had suggested old carpeting-but we couldn't locate anyone who had any to get rid of. Then we carefully lowered the liner into the hole at equal distance from the center. Although there were ridges in the liner we were told that they would flatten themselves out when we filled the pond with water.

Well, it was time to take off our shoes and get into the water. First, we used a stopwatch and timed how long it took to fill a 1 gallon bottle with water. Then we put the hose in the hole and began timing. When filled, we could divide how long it took to fill the gallon bottle by how long it took to fill the pond and this would equal the total gallons in our pond. This figure is extremely important when stocking or treating your pond.
As the water filled we carefully smoothed and folded the liner, to create flat shelves for our plants. Finally, after 650 gallons of water poured in, it was beginning to look like a pond!!


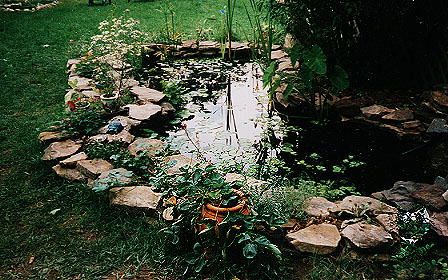
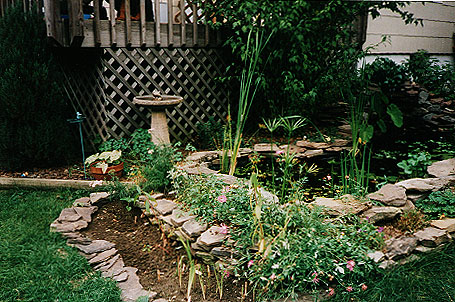
The stonework had to be completed next to anchor the liner. We had 1 pallet of fieldstone delivered and we set to work. I was in charge of fitting the rocks together thus stabilizing the liner. It was like doing a giant (and heavy) jigsaw puzzle. Just the right piece had to fit in as perfectly as possible. Adjustments had to be made for the lower side of the pond. This stonework had to go higher than the rest.
The waterfall was completed by trial and error. We were warned that we had to create channels to make sure that the water all trickled into the pond. We also had to find just the right stone to create just the right sound of running water. We didn't want the water to be too ...rushing. And we didn't want it to be.... just a trickle. After adjusting and changing rocks we finally got the sound we were looking for.
At the top of the waterfall we placed a new black plastic oil change pan, cut away the front, and would eventually fill this with water hyacinths. The water would go into the pump, through the hose, (hidden in the rocks), and empty into the pan filled with plants. When it got to the right level the water would spill out and run down the waterfall. After a few adjustments of the angle of the pan we were done.


The plant life had to get established before fish could be added. We had to add a sufficient amount of oxygenators, floating plants, and marginals in order to eventually achieve a natural balance. For more about the different aquatic plants, try this linkThe Aquatic Plant Puddle link to commercial sources for aquatic plants, in Pams Puddle. There you can find more information on how to create balance with plants and fish in your pond.


The fish were now ready to be added!! After floating the bags on top of the water to acclimate them to the water temperature(please never do this in direct sun- light),we released our new tenants into their new home. Gradually we added the fish. Finally 21 in all!! We got 6 golden orfe, 4 shubunkins, 5 fantails,4 comets, a black moor, and a beautiful black, silver and orange butterfly koi. A few months later we noticed 1 lone baby orfe, that must have been born shortly after we placed the fish in the pond. At first he was a dark color, but he slowly became the same golden color as the others!! A team of scavengers were added to help keep the pond clean. We added 12 snails, and 6 tadpoles which we watched grow into graceful frogs.


Finally it was time for the cosmetic work. We decided to build a second ring of rocks around the pond to create a raised bed for flowers. We also built rock rings around the waterfall with pockets of soil for more plants. We planted: ladys mantle,pink yarrow, cornflower,violas,lambs ear,a bed of assorted hardy sedums and cactus, hibiscus,hostas,lavender, and thyme.

As an afterthought we added a small bog area to one end of the pond. We dug down about 20 inches, lined the hole with extra liner, and refilled it with dirt. Here I planted different types of bog iris, and chameleon plants. Now it was time to sit back, listen to the waterfall,and watch our glimmering fish swim happily to and fro in their new home. We felt like we had created a little piece of "heaven" in our own backyard!!

