Datapad Instructions
1. Installation and Setup
2. Editing
2.1 File
Types
2.2 Hex Mode
2.3 Source
Mode
2.4
Clipboard
3. Other Features
3.1 Search/Replace
3.2 Jump
3.3 Printing
Datapad's installation file only contains one file -- the program itself. You can just copy the file anywhere you want and begin using it without registering the program. However, if you want to preserve your settings and associate files to the program, you can set all of that from within Datapad by enabling it to use the registry.
Select "Tools->Options" from the main menu to bring up Datapad's Option window, then select the "Setup" tab if it's not selected already (Figure 1). To register the program, check the "Enable Registry Access" box. You will now be able to install shortcuts and set file associations, but first you must install shortcuts so Datapad knows where its file is located. Click on the"Install Desktop and Start Menu Shortcuts" button and locate the correct path to the program.
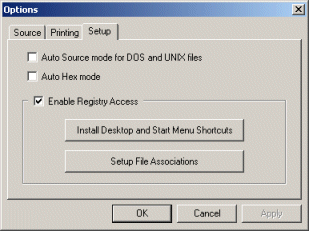
Figure 1
Once the shortcuts are installed, you can click on the "Setup File Associations" button (Figure 2). From the "File Types" window, you can associate Datapad with any of the registered file types and extensions. Note that this will not override the default command associated with the file type; it will only add a "Datapad" option on the popup menu when you select a file. For each file type, you can specify in which modes to view and edit which are described in the next section.
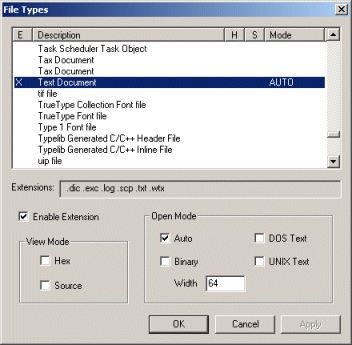
Figure 2
To remove the program from your system, uncheck the "Enable Registry Access" box from the Options window and apply the change. The program will remove all its settings from the registry and delete the shortcuts.
2.1 File Types
With Datapad, you can edit you text files like you normally do with any other text editor. You can also edit binary files such as images and executables. Datapad converts the contents of a file into records. For text files, a record is simply a line that ends with either a carriage-return/line feed (DOS) or just a line feed (UNIX). However for binary files, data is initially cut into fixed-length records, the default being 64 bytes. As you edit the file, the records will grow or shrink, but don't worry since the record information is removed when you save the file (unless you specify to save the file in DOS or UNIX format which adds CR/LF add the end of each record).
You can let Datapad determine which format to open a file; this is know as Auto mode. However, you can force Datapad to open the file in either binary, DOS, or UNIX. In DOS and UNIX formats, Datapad simply searches for CR-LF or LF characters to break the records at, even if there are non-printable characters (including null) in between. If you want to open a binary file using a different length other than 64 bytes, select the binary format and type in the new width.
Datapad displays the only the common ASCII characters: the numbers 0-9, letters A-Z and a-z, and some of the special characters like !, &, *, etc. All other characters are shown as a period (.). If you want to see their hex values, you can turn on Hex mode ("View->Hex" on the menu or Ctrl-H). In figure 3, two digit hex values are then displayed below each character they represent. For example, the character 'A' has a hex value of 41. When you type the letter 'A' in hex mode, the number '4' which represents the high-order nibble (four bits) is displayed under the character, and the number '1' which represents the low-order nibble is displayed under the high-order nibble. You can edit characters or bytes by either typing the character itself or by typing its hex value.
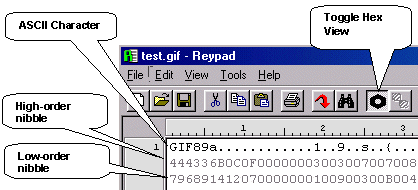
Figure 3
If you are working with a DOS or UNIX file, you can edit the file in source mode. Normally, tabs are shown as a single character. In source mode however, tabs are expanded so that the next character is positioned at a tab stop. This is useful when text alignment is important such as in source code, hence the name. Other features in source mode include:
- Smart indent - As you press Enter to go to the next line, Datapad automatically indents based on the previous line. In addition, when selecting multiple lines, you can add/remove indents by pressing the Tab/Shift-Tab key.
- Tab replacement - You can substitute tabs as you are typing or when you save the file.
You can alter the settings for these features under the Source tab of the Options window. Remember that these features are only available while you are in source mode. In addition, double-clicking with the left mouse button selects the closest word in source mode; otherwise, the whole line is selected.
You can cut, copy, and paste selected data from one Datapad program to another. You can also transfer selected data to and from other applications that accepts text data. If you have many lines to put on the clipboard, you can use the Advance Clipboard window (Figure 4) under the "Edit->Advance" menu option and enter the beginning and end records you want to select rather than trying to select them with a mouse.
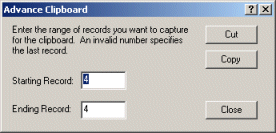
Figure 4
3.1 Search/Replace
Search for a specific phrase containing characters or hex values and replace them with another from the "Search/Replace" window (Figure 5).
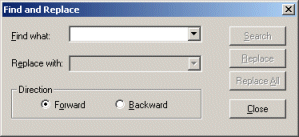
Figure 5
Specify hex values and other special characters by preceding them with the escape character. Escape sequences include:
|
\a |
Bell (alert) |
|
\b |
Backspace |
|
\f |
Formfeed |
|
\n |
New Line (may not be visible in DOS or UNIX modes) |
|
\r |
Carriage return (may not be visible in DOS mode) |
|
\t |
Horizontal tab |
|
\v |
Vertical tab |
|
\xnn |
ASCII character in hexadecimal notation |
In DOS or UNIX mode, the CR or LF characters at the end of the lines are stripped off before displaying them as records; Datapad reinserts these characters when you save the file. You can manually insert these characters in the middle of the line by going to Hex mode, but Datapad will not automatically break the record. When you try to search for these characters, only those manually inserted can be found.
To search for a non-printable other than those listed above, specify its two digit hex value with the '\x' sequence. For example, to search for a NULL character use "\x00".
This feature comes in handy when dealing with large binary/record files. Use the Jump window (Figure 6) to find a specific record based on a certain criteria such as its width or just its position. There are several criteria you can choose from:
- Select Record - Jumps to the record number specified in the value field
- Longest Record - Jumps to the next occurrence of the record with the longest length.
- Record Length - Jumps to the next occurrence of the record with the length specified in the value field.
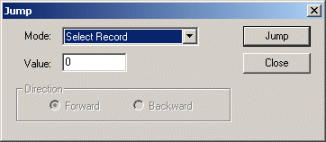
Figure 6
Datapad offers several options when printing your file. You can include line numbers and ruler bar, adjust margins, and even change font size. These options can be changed on the Printing tab of the Options window. Printing and Print Preview (Figure 7) are found under the "Tools" menu.
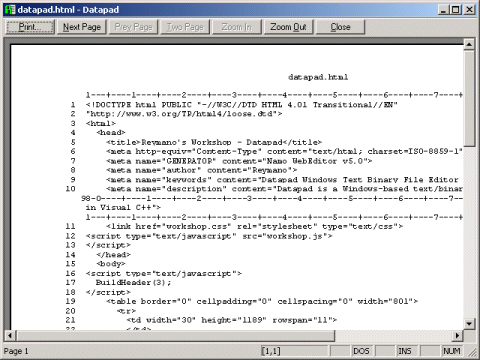
Figure 7