STRINGS - PUT 'EM ON AND KEEP 'EM IN
TUNE
By huskybones
Today's article is about putting on your strings and getting the best sound possible. A big part of this is just understanding that nothing about playing music is an exact science. I'm going to outline the system that I've used for years. I've seen similar ideas in magazines and I know that other people use it too. Bottom line - it works.
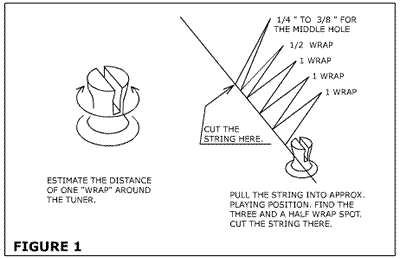
I usually replace my strings one at a time leaving the old strings in place. This seems to be a little easier on the intonation settings. First, put the string through the bridge. Stretch the string out along the neck next to the tuner. The string will be much longer than necessary, so you'll have to cut it with wire cutters. To do this, estimate the distance of one wrap around the tuner (see figure 1). Then with the string stretched out, find the spot where you could get three and a half wraps around the tuner. If there aren't enough or there are too many wraps, then the string won't stay in tune. This is just an approximate number and sometimes I use one more on the A string because it stays in the nut better that way. After I find this place on the string, then I add a little more string to go into the hole in the tuner, and that's where I cut. If you don't feel comfortable doing this by eye, you could use a ruler to find the cutting spot. For example if the distance around the tuner is 1", then you would measure out 3 1/2" plus between 1/4" to 3/8" for the middle hole and cut there.

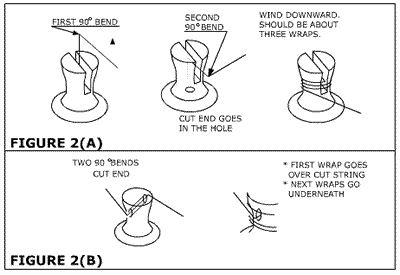
If you're tuners have slots (bass and some vintage guitars) then follow figure 2A. Once the string is cut, the next step is to make two 90 degree bends to keep it in place. Put the string in the hole and make the first bend. The second bend is to start the string in the right direction as it wraps around the tuner. Be sure to bend the string and turn the tuner so that the string makes a straight line from the bridge, through the nut, to the tuner. Wrap the string in a downward direction. All of this takes some practice so give it some time.

Figure 2B is for guitar tuners. The two bends occur on either side of the hole. Then the first wrap needs to go over the string and 2nd 3rd wraps go under. Again make sure you start your turn so that the string makes a straight line as stated above.
As you replace each string, there are a couple of final things to do. Tune the string up to it's regular pitch. Grab the string right around the 12th fret and pull it up a little bit (on the bass, about one inch) and snap it back to the fretboard. This stretches the metal. Then check the tuning on that string again. It will probably be a little bit flat, so tune it up again. Stretch again and re-tune. Don't overdue this step. Two or three times should be about enough so that it stops going flat after the stretch.
After all the strings are on, stretched, and tuned then you can check your intonation. If you didn't see my article on this topic, then go to your favorite guitar tech for help. However, if you don't change string gauge or type, then the bridge probably won't need much adjustment. I always check it anyway, but I'm funny that way. With your intonation set, it's time to set the "witness point". This point is where the string crosses the saddle on the bridge. Push down on the string on the pickup side of the saddle to make a slight bend. All of these bends are strategically placed to get your strings to stay in tune and give you a consistent tone.
And now you're done! Hope this helps. See you soon.
-hb
By huskybones
Today's article is about putting on your strings and getting the best sound possible. A big part of this is just understanding that nothing about playing music is an exact science. I'm going to outline the system that I've used for years. I've seen similar ideas in magazines and I know that other people use it too. Bottom line - it works.
I usually replace my strings one at a time leaving the old strings in place. This seems to be a little easier on the intonation settings. First, put the string through the bridge. Stretch the string out along the neck next to the tuner. The string will be much longer than necessary, so you'll have to cut it with wire cutters. To do this, estimate the distance of one wrap around the tuner (see figure 1). Then with the string stretched out, find the spot where you could get three and a half wraps around the tuner. If there aren't enough or there are too many wraps, then the string won't stay in tune. This is just an approximate number and sometimes I use one more on the A string because it stays in the nut better that way. After I find this place on the string, then I add a little more string to go into the hole in the tuner, and that's where I cut. If you don't feel comfortable doing this by eye, you could use a ruler to find the cutting spot. For example if the distance around the tuner is 1", then you would measure out 3 1/2" plus between 1/4" to 3/8" for the middle hole and cut there.

If you're tuners have slots (bass and some vintage guitars) then follow figure 2A. Once the string is cut, the next step is to make two 90 degree bends to keep it in place. Put the string in the hole and make the first bend. The second bend is to start the string in the right direction as it wraps around the tuner. Be sure to bend the string and turn the tuner so that the string makes a straight line from the bridge, through the nut, to the tuner. Wrap the string in a downward direction. All of this takes some practice so give it some time.

Figure 2B is for guitar tuners. The two bends occur on either side of the hole. Then the first wrap needs to go over the string and 2nd 3rd wraps go under. Again make sure you start your turn so that the string makes a straight line as stated above.
As you replace each string, there are a couple of final things to do. Tune the string up to it's regular pitch. Grab the string right around the 12th fret and pull it up a little bit (on the bass, about one inch) and snap it back to the fretboard. This stretches the metal. Then check the tuning on that string again. It will probably be a little bit flat, so tune it up again. Stretch again and re-tune. Don't overdue this step. Two or three times should be about enough so that it stops going flat after the stretch.
After all the strings are on, stretched, and tuned then you can check your intonation. If you didn't see my article on this topic, then go to your favorite guitar tech for help. However, if you don't change string gauge or type, then the bridge probably won't need much adjustment. I always check it anyway, but I'm funny that way. With your intonation set, it's time to set the "witness point". This point is where the string crosses the saddle on the bridge. Push down on the string on the pickup side of the saddle to make a slight bend. All of these bends are strategically placed to get your strings to stay in tune and give you a consistent tone.
And now you're done! Hope this helps. See you soon.
-hb