The two sturdy plastic tubes should be about 3/16 inches (1/2 centimeter) wide, and the length of the one tube should be about the same as the bottle hight, and the other about two inches (five centimeters). A metal tube the same thickness as the plastic tubes, and about five inches (thirteen centimeters) long will be needed. And to connect everything together, some plastic tubing the same thickness as the others, will be used. The kind used in fish tanks can be used.
The pump will have to give a continuous air flow, because pulses of air will not keep the flame going. The air pump used in fish tanks will work fine for this (actually fish air pumps are not continuos, and give really fast air pulses, but they work fine). You can also try getting a tank of oxygen and mixing it with the gas flow just before the "head" of the torch, and the flame will probably burn much hotter (use caution!!!).
A valve is suggested to regulate air flow to the bubble torch. If too much air flows the liquid might not give enough fumes off, and the flame will extinguish. Like many other things used in making the torch, you can find a valve at the pet store used in fish tanks.
The flammable liquid should be one that normally gives off a lot of fumes. The lower its boiling point, the better it will work. Acetone (or just nail polish remover) works well, but I have not been able to get isopropyl alcohol (rubbing alcohol) to work. You can also try something like gasoline, or hairspray, but I have never tried them. But lets just say if it fumes a lot its good.
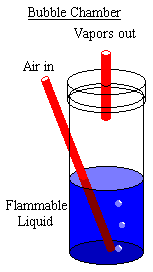
Now we move on to the actual construction. First drill a hole in the middle of the bottle
cap for the two inch plastic tube to go in. Put the tube in about 1/4 of an inch (1/2 of a
centimeter), and seal it with silicone sealant, or by "welding" the plastics together with a
soldering iron. Then drill a hole in the side of the bottle for the other sturdy plastic tube
to go in. The hole should be about a forth of the way down from the top, and will need to
be drilled at an angle so the tube can reach the bottom of the bottle. Then put the tube in,
and have it so it almost touches the bottom, then seal it in place the same way as you did
for the cap. When you are done it should look something like the one below. This is our
bubble chamber.
To finish off the torch, connect the pump to the valve with some of the flexible tubing. Then connect the other end of the valve to the tube that says "Air in" on the drawing above. Then get some more tubing and connect it to the tube that says "Vapors out" on the drawing above, and connect the other end to the metal tube. Make sure the bottle is held in place by something, because if it is knocked over while the pump is on, it will squirt the flammable liquid all over, and will probably start a pretty bad fire. Before you pour in the flammable, test it for leaks by pouring in water, to about half way up the bottle. Then turn on the pump, and open the valve. If there are any leaks, you will have to seal them up before you use the torch. If it squirts liquid out of the metal tube, you will have to use less volume of flammable liquid than you poured in water, or not turn the valve up as high when you use the torch.
Before you use the torch, it is probably a good idea to build a flashback arrestor. This
will stop the bottle full of the flammable liquid and fumes to catch fire, and possibly
explode by the fire traveling through the tube to the bubble chamber. To make a
flashback arrestor simply make another bubble chamber, then fill it about half way with
water. Then connect the "vapors out" part of the bubble chamber filled with the
flammable to the "air in" part on the bubble chamber filled with water. Then connect the
"vapors out" part of the chamber with water to the metal tube. The setup of everything is
shown below.
Once there are no leaks, and everything is working right you are ready to use the torch. Pour in the flammable liquid into the first bubble chamber to about half way up, and some water half way in the second bubble chamber, then turn on the pump and open the valve a little. Ignite the flammable gas at the end of the metal tube with another flame, flint, or a piezo ignitor. Adjust the valve to get the desired flame size. The flame is about 3,000°F (1650°C), and can melt many metals. I have been able to easily melt zinc and aluminum.