
6.1 Project Summary
A survey of construction tolerances was taken to determine the present accuracy of the post-frame industry that will be used to establish criteria for acceptable workmanship in the post-frame industry. The project timeline consists of a document research phase, a field measurement phase, and a data analysis phase.
During the document research phase, the researcher investigated existing construction standards for other types of building configurations and materials. Each standard was evaluated for applicability to post-frame structures. They were evaluated to see whether they were specific to post-frame components, if their tolerances were subject to standards that already apply to post-frame buildings, or if the subject could be considered similar or analogous to some aspect of post-frame construction.
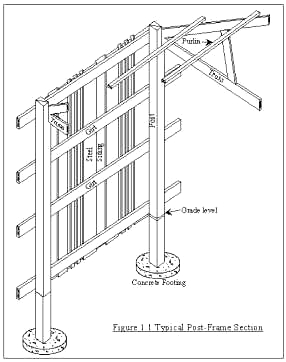
Rather than adopting the scope and numerical values of other standards that may or may not be practical for post-frame construction, field measurements were designed to assess the current state of the industry. Only those standards considered to be analogous to or applicable and specific to post-frame construction were considered in designing the field measurement phase of the project. It was decided that the following measurements would be taken:
The measurement procedures were largely designed to use a highly accurate surveying total station that could determine angles and distances of structurally significant points with respect to the station's location and orientation. Simple geometric formulas converted the raw data into the measurements described above.
During the course of the measurement phase, the researchers examined approximately 40 buildings in southern Wisconsin. Building types ranged from large free-stall barns to relatively small private storage buildings, and were largely designed and built by large post-frame building firms. At each building, representative measurements that were applicable and appropriate to the specific configuration were taken.
The data analysis phase is mostly concerned with a statistical analysis of the data to estimate the accuracy of the entire industry based on the sample measurements taken. The measurements are analyzed for deviation from average and, where applicable, deviation from plan. The tables in Section 6.2 present the research findings in dimensions useful to engineers and builders:
6.2 Results Summary
| Tolerance Value | No. of Measurements Conforming to Value | % of Measurements Conforming to Value |
|---|---|---|
| -0" | 139 | 44% |
| -6" | 237 | 75% |
| -9" | 267 | 84% |
| -12" | 283 | 90% |
| -15" | 294 | 93% |
| -18" | 305 | 97% |
| Tolerance Value | No. of Measurements Conforming to Value | % of Measurements Conforming to Value |
|---|---|---|
| 3/8" | 409 | 82% |
| 1/2" | 451 | 90% |
| 3/4" | 485 | 97% |
| 1" | 491 | 98% |
| Tolerance Value | No. of Measurements Conforming to Value | % of Measurements Conforming to Value |
|---|---|---|
| 1" | 328 | 85 |
| 1 1/4" | 343 | 88 |
| 1 1/2" | 354 | 91 |
| 1 3/4" | 362 | 93 |
| 2" | 363 | 94 |
| 2 1/4" | 370 | 95 |
| 2 1/2" | 373 | 96 |
| 2 3/4" | 377 | 97 |
| 3" | 378 | 98 |
| Tolerance Value | No. of Measurements Conforming to Value | % of Measurements Conforming to Value |
|---|---|---|
| 1 1/2" in 100' | 47 | 84% |
| 2" in 100' | 51 | 91% |
| 3" in 100' | 52 | 93% |
| 4" in 100' | 53 | 95% |
| 6 1/4" in 100' | 55 | 98% |
| Tolerance Value | No. of Measurements Conforming to Value | % of Measurements Conforming to Value |
|---|---|---|
| 15 min | 93 | 91% |
| 20 min | 97 | 95% |
| 25 min | 99 | 97% |
| 30 min | 99 | 97% |
| 35 min | 101 | 99% |
| Tolerance Value | No. of Measurements Conforming to Value | % of Measurements Conforming to Value |
|---|---|---|
| 2.5" in 100' | 25 | 78% |
| 3.0" in 100' | 28 | 88% |
| 3.5" in 100' | 29 | 91% |
| 4.0" in 100' | 30 | 94% |
| 4.5" in 100' | 31 | 97% |
| Tolerance Value | No. of Measurements Conforming to Value | % of Measurements Conforming to Value |
|---|---|---|
| 1/2" in 10' | 183 | 81% |
| 3/4" in 10' | 213 | 95% |
| 1" in 10' | 220 | 98% |
| 1 1/4" in 10' | 225 | 100% |
| Tolerance Value | No. of Measurements Conforming to Value | % of Measurements Conforming to Value |
|---|---|---|
| 1/2" in 10' | 166 | 74% |
| 3/4" in 10' | 200 | 89% |
| 1" in 10' | 215 | 96% |
| 1 1/4" in 10' | 223 | 99.6% |
| Tolerance Value | No. of Measurements Conforming to Value | % of Measurements Conforming to Value |
|---|---|---|
| 1/2" in 10' | 116 | 73% |
| 3/4" in 10' | 139 | 88% |
| 1" in 10' | 148 | 94% |
| 1 1/4" in 10' | 153 | 97% |
| 1 1/2" in 10' | 154 | 97% |
| Tolerance Value | No. of Measurements Conforming to Value | % of Measurements Conforming to Value |
|---|---|---|
| 1/2" in 10' | 114 | 72% |
| 3/4" in 10' | 133 | 84% |
| 1" in 10' | 147 | 93% |
| 1 1/4" in 10' | 155 | 98% |
| 1 1/2" in 10' | 156 | 99% |
Post Height
| Tolerance Value | No. of Measurements Conforming to Value | % of Measurements Conforming to Value |
|---|---|---|
| 1/4" | 149 | 73% |
| 3/8" | 184 | 91% |
| 1/2" | 196 | 97% |
| 5/8" | 203 | 100% |
| Tolerance Value | No. of Measurements Conforming to Value | % of Measurements Conforming to Value |
|---|---|---|
| 1/4" | 125 | 75% |
| 3/8" | 156 | 93% |
| 1/2" | 166 | 99% |
| 5/8" | 167 | 100% |
| Tolerance Value | No. of Measurements Conforming to Value | % of Measurements Conforming to Value |
|---|---|---|
| 1/2" | 120 | 74% |
| 3/4" | 146 | 90% |
| 1" | 155 | 96% |
| 1 1/4" | 159 | 98% |
Girt Spacing
| Tolerance Value | No. of Measurements Conforming to Value | % of Measurements Conforming to Value |
|---|---|---|
| 1/8" | 321 | 62% |
| 1/4" | 457 | 88% |
| 3/8" | 504 | 97% |
| 1/2" | 518 | 99.6% |
| Tolerance Value | No. of Measurements Conforming to Value | % of Measurements Conforming to Value |
|---|---|---|
| 3/4" | 34 | 85% |
| 1" | 344 | 88% |
| 1 1/4" | 350 | 89% |
| 1 1/2" | 356 | 91% |
| 1 3/4" | 358 | 91% |
| 2" | 367 | 93% |
| 2 1/4" | 371 | 94% |
6.3 Considerations
Some distinction should be made between tolerance error due to carelessness or ineptitude and variations made based on reasonable engineering judgment. For example, a post might be designed to support a truss on a notched surface on its left side. If the builders encounter obstacles while digging the hole in which the post is to be embedded, they might decide to dig a few inches to the left of the designated spot and notch the post top on its right side. Thus two measurements of post spacing will have significant error, yet the structure may not have lost any of its integrity. Occasionally, girt spacings were observed that could not possibly have been intended to comply with building plans. In these cases, specified spacings were ignored and the girts were placed in equal intervals along the height of the posts. Since the purpose of the girts is merely to transfer loads from the sheathing to the primary framing members, they can be misplaced several inches and still serve that function.
Variations to design due to on-site conditions are not uncommon to construction projects, and procedures exist in other industries to ensure that all changes are documented and approved by licensed engineers. If drawings can be modified to reflect field-condition changes, then fewer errors would be recorded. If certain types of modifications are common to post-frame structures and are always acceptable, the industry could list and justify them in a document available to their customers.
It is also important to view errors within the context of other errors and the design of the entire building. A large numbers of errors might belie the quality of a building if consistency in error is not also considered. For example, large errors in post height might merely indicate that the building is a few inches shorter or taller than designed, which may not affect the functionality or integrity of the building. Conversely, few errors in key places might have harmful effects on the building. For example, a single shallow post embedment that is subject to frost upheaval might cause a shearing failure of the building wall. Under these circumstances, one might argue that placing all of the posts at shallow depths is safer than having some meet the design depth.
The purpose of this report was to assess the current state of industry building practices for the development of a post-frame-specific standard. The adoption of such a standard is typical in the development of professional organizations, such as the NFBA, as they strive to achieve recognition for their expertise and professionalism. Histories of the American Medical Association and the American Society of Civil Engineers demonstrate how adoption of performance standards and codes of ethics (similar to that adopted by the NFBA) helped to transform doctors and engineers from skilled tradespeople to licensed professionals. Thus this standard and its enforcement is intended to increase the perceived professionalism of the post-frame industry. It may be noted, however, that many of the tolerance values presented here are significantly higher than analogous tolerances of other industries. Thus while post-frame builders attempt to standardize themselves with respect to their peers, the industry as a whole must prepare itself to be judged with respect to its peer industries.