Bob's Tailbox Construction Page
The tailbox is made from foamboard purchased at the local
Wally-World. It is inexpensive, light, easy to work, and tough
as nails. It can be painted, and bent if you bend it over a
long bend. If you need it to bend shortly, you should cut 1/2
way through and use duct tape to cover the cut. I used colored
duct tape, and it works fine. The top was made by tracing the
outline of the top of the box, and cutting the top from another
sheet of the foamboard. I also cut out the shape and made the
bottom of the box fit on top of the rack which I fit the box
around. This gave me water tight storage. and also allowed the
bottom to act as a brace against the sides. I put a blinking LED
Light on the rear just under the Lid. Another Blinky goes on the
rear of another box which fits on top of the tailbox lid. This
second box is attached using Velcro strips, and fills in the
space between the top of the box and the top of the seat. I made
an attachment to the rear of the box to make it more aero.
I am making another
box for my bike, as I am going to adapt the one I made
previously to my son's bent. I will take pictures as I
construct that box, and It should help you see.
This is the Box after I first built it on the rear of my SWB.
This is in Killeen,TX.

This is the Box after I Made a top for it. (Incidently This is in Arizona)

This is a view of the box
from the top.


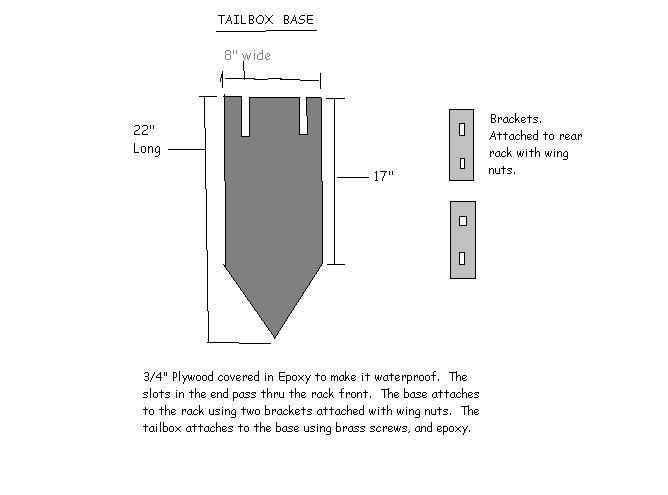
I am putting together a new tailbox for the
new bicycle, and I wanted it to be removable. I started with a
3/4" piece of plywood, and covered it in fiberglass epoxy to
weather proof it. I attach it to the rear rack using two metal
brackets and wingnuts. I will have further construction details
and pictures soon.

Some links to other tailbox construction web pages:
A Beautiful Tailbox made by Blake Olson.
Ed Gin
and His fairing Seminar.

You are visitor  to this site.
Return to Main Page


to this site.


