LinkExchange Member | Free Home Pages at GeoCities |
LinkExchange Member | Free Home Pages at GeoCities |
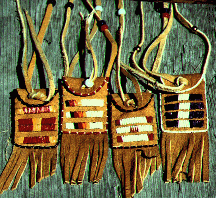
Before beads were brought over by traders, Indians used birdfeather quills and porcupine quills to decorate their items. They would dye the quills with plant dyes and natural resources. Once beads were acquired ,quillwork wasn't done as much because the beads came in more colors and were easier to use. Quillwork is a craft that I really enjoy doing because when you have the finished product you can appreciate the work that has went into it and be proud of it. I learned how to do quillwork by my father showing me a basic stitch. Then I could go to books, understand their directions and learn more complex stitches. The book that I have found the easiest to understand is "A Quillwork Companion - by Jean Heinbuch". Both the text and pictures are quite simple to understand. One of the things I've learned just through trial and error is that the best surface to quill on is a good piece of braintanned buckskin. It shouldn't be too thin or else your work won't turn out nice. Commercial buckskin is basically impossible to do nice quillwork on because your needle and thread don't "catch" the hide when you do your stitching and it is a hassle to try and make them go all the way through the hide. Stick with braintanned and you'll do fine. I use two needles on my quillwork. I find this makes my work lay flatter and not bunch up, versus using one needle. It takes a little practice to get used to, but it comes around. For dying my quills, I just use Rit dye. You can also use natural plant dyes, but I haven't tried that yet. To dye my quills, I first wash them with warm, soapy water to get off the porcupine grease and dirt. Then I heat some water and put in my dye. Trial and error will let you know how much of each to get the color you desire. Make sure that you let your water just reach the boiling point, but don't let it boil. This is important, because if you let your quills boil they will collapse and your quills won't be of any use to you anymore. Once I have heated my water, I put in my quills and frequently stir them so that they will color evenly. If you let them sit for a while and don't stir, they will come out with uneven colors. Once you've gotten the color you want, rinse the quills in water until your water is running clear. Then put them on a paper towel to dry. When you are ready to use them, you can soak them in your mouth and let the saliva soften them for you or you can put them in a little dish of water to soften. I used to soften them in my mouth, but after almost swallowing a few I decided to try the water dish. Some people say to use a warm, moist paper towel and just set the quills on them and they'll soften. I have found the water dish to work best for me. You have to be careful though that you don't let them soak too long or else they won't flatten correctly. Just about 5 minutes should do the trick. To use your quills, you first cut off the black end and the barbed tip. Some people only cut off one end or none, but I cut off both. I find it flattens better for me this way. Then you flatten the quill by pulling it through your teeth or fingernails. The flatter the quill, the nicer the work. These are just a few things to share with others who are interested in learning to quill. A good place to learn quilling and different stitches is on my Quillwork Links page - Native Tech Quillwork. These are just a few of the items that I have quilled. I realize these aren't the best pictures, but.........There are a few different pictures on the K & M Creations website of work that I've done.


 VIEW OTHER THOUGHTS
 sti4186@montana.com