MSM-Workstation Tutorial (part 2/5)
By now you should be able to follow what happened behind the scenes in the creation of our little application. We are now going to modify it a bit so as to demonstrate other properties we can assign to GUI object. In order to avoid creating our second program from scratch, we will copy the application and window we had defined earlier.
 In the System Browser
(version 2) click the right mouse button on Window. From the menu choose New…
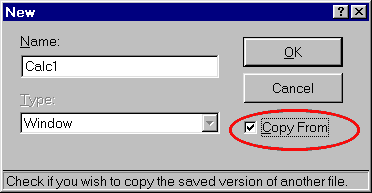
Don’t forget to check Copy From. We’ll call our new window Calc1. Once OK is
clicked, another window will appear asking the window you want to copy from. We have Calc.
Repeat the same process for application Add, creating a new application Add1.
In the System Browser, double clicking Add1 will bring it up. It only has one object assigned to it: Calc. We want it to use Calc1. Click on <Components> and choose Element -> Definition. Drop Calc and Add Calc1. Our application is now using the *1 version of everything. One final step is to change the action logic of Add1. Change %%DO(Calc) to %%DO(Calc1) in Element -> Action -> Enter.
Knowing what you want to do is very important, always.
- We want to allow the user to perform the following arithmetic operations: addition, subtraction, multiplication and division. Special attention has to be given to the situation when dividing by 0. This special condition demonstrates an example between procedural and event driven programming. In procedural programming, the programmer would normally ask for the operator before the second number (the denominator in the case of a division) and could therefore block zero entry at the input stage. In event driven programming the person could first enter the two numbers and then choose division. The check must come prior to processing the equation.
- We want to add a menu item and button called Reset. This will set num1 and num2 to zero and reset the operator to plus. A box will seek confirmation. The Reset button will carry a picture.
Window — CommonCode
;Program demonstrates program development using MSM-Workstation - Chris Bonnici - Jan
1998
;M Web Magazine @ http://geocities.datacellar.net/SiliconValley/7041/mwm.html
;You are using this program at your own risk
;
;Closes the Window
QuitWin %%Cancel
QUIT
; Accumulate the numbers and update answer
UpdAns K oper
%%Get(op.Value,oper)
SET answer=$SELECT(oper=1:num1+num2,oper=2:num1-num2, oper=3:num1*num2,1:$S(num2=0:"err",1:num1/num2))
%%SetVar(answer)
QUIT
; Zeroise num1 and num2 and update answer
Reset QUIT:'$$YN^%msgbox("Are you
Sure?","M Web Magazine")
DO Init
QUIT
Init SET (num1,num2,answer)=0
%%SetVar(num1)
%%SetVar(num2)
%%SetVar(answer)
DO ResetRdo
QUIT
ResetRdo NEW oprarr
%%GetChoice(op,oprarr)
%%ResetChoice(op,oprarr)
SET oprarr(1)="+"
%%SetSel(op,oprarr)
QUIT
Window — Create
;Initialisation Code
DO I^%msgbox("Welcome","M Web
Magazine")
DO Init
Control Button1 — Push
Do QuitWin
Control Button2 — Push
DO Reset
Control num1 — Modified
DO UpdAns
Control num2 — Modified
DO UpdAns
Control op — Push
D UpdAns
Before we start discussing the code behind this program, we would like to point out that this program is a tutorial first and foremost and that our primary intention is that of showing you the various macros and methods that are available. This should justify the some inconsistency in %%macro usage (although the end result does work equally well).

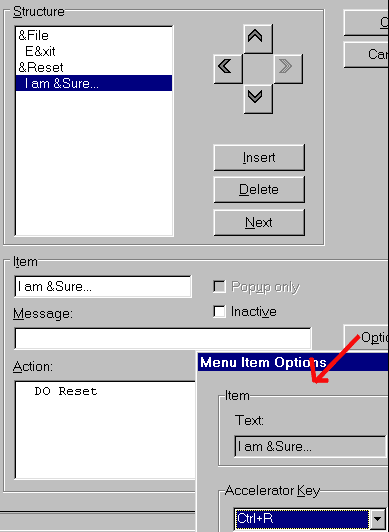
Having defined our code, we now add a menu item called Reset. It will lie next to File menu item, be accessed by ALT+R and will have an option within it call ‘I am Sure’. We will assign a shortcut key CTRL+R so that the user will be able to invoke the option directly. The screen shot above shows how to assign such keys. Not shown is the message that will appear at the bottom of the window when the user clicks on Reset.
The action associated with this command is to DO Reset.
 Our next task is to also
add a button beneath the Close button called Reset. MSM-Workstation has a tool bar with
all the tools you can use. Clicking on any one will describe what the particular tool
does.
We select the Button icon and click once on our window were we want it to appear. A default sized button will appear and this objects dialog box will appear.
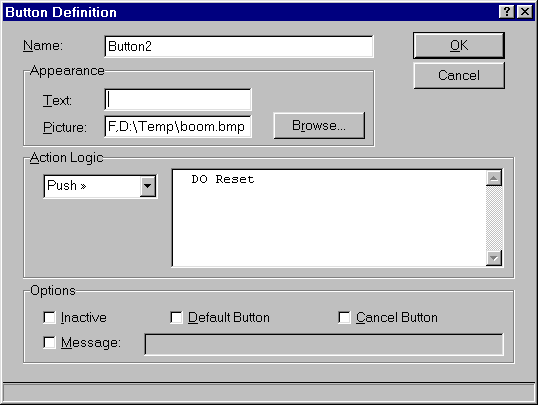
With this button we’ve cleared the text and set up an icon for the button. The icon was created using a drawing package and saved as a bitmap. It is called boom.bmp. The push action associated with this button is DO Reset.
The Button Definition dialogue box below shows how to go about setting it up.

Another esthetic change will be to Label3. Besides changing the text, we will change some of the properties of this object. When working with windows and their objects, you will notice that under the toolbar you have a property bar that allows you to view and modify all properties associated with that object.

The first drop down list shows all the objects. You can therefore either select an object by clicking on it or by choosing it from this list. The second list shows all the properties associated with the selected object. The third drop down list lets you choose (or enter) from the available options associated with that property. We removed the border from answer.
How do you follow (dry run) such programs?
There are some parts of the code that will take place when the program initialises. In our program we have the Window – Create event. (we won’t be going into M syntax here—those who are new to M should have a look at our M Tutorial). The called routines may be either within the event or they may be found in the CommonCode section. The events that remain dictate what will happen when values are modified, buttons are pushed, radio buttons are checked, etc. It might help if you associate these events with choices on a menu of a tightly integrated system. The user will select options the way he wants, although ultimately everything has to work like clockwork.

