MSM-Workstation Tutorial (part 1/5)
Micronetics have announced that MSM-Workstation version 2 will soon be available for download. If you develop applications with it you must register but there is no registration fees to pay if you want to learn and experiment with it. This approach will make MSM Workstation attractive to developers world wide. For the full article click here.This means that after downloading the free version of MSM-Workstation you can directly look at our source and experiment with it. Micronetics are listed in our thank you page. After you finish this tutorial, do go to this page and drop them a note of thanks.
I would personally like to thank the entire UK team for their support. Their technical support (too long a list to list here) is stupendous and all my questions were normally answered over the phone or I received a reply a short while after via e-mail.
You can download this issue's code by clicking here.
Today we develop our first database-based stand alone application. What we will do is perform a second level installation (more on this later) and pop a menu that allows you to maintain data within a user defined database. The database is self maintained meaning that it expands transparently when needed (no user/developer intervention necessary).
Last time I received a number of queries about problems running the executables. All of the problems stemmed from the fact that last time I failed to mention that when running MWM-Workstation developed applications you must install a number of DLL’s beforehand (as with many other development tools). These files are found in the subdirectory Redist of MSM-Workstation development environment and can be freely redistributed. You can download these files from Chris Bonnici’s Download M page.
If you are a developer and would like to redistribute your applications, note that the folder APICliRT must be renamed to Disk1 before running the setup.exe file found within it.

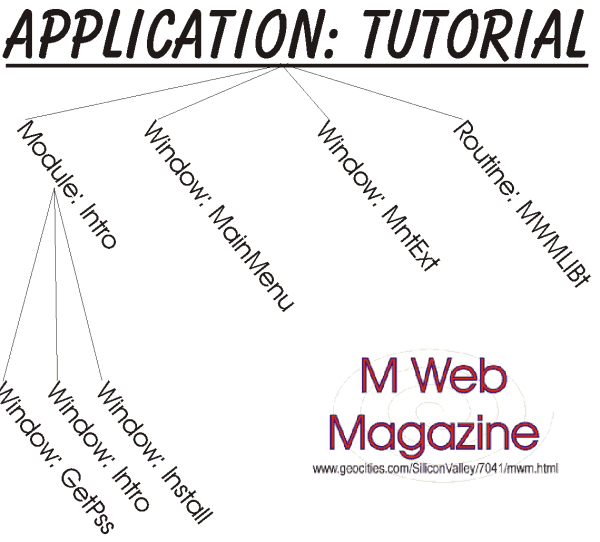
The diagram above describes the project we will discuss today. Our application Tutorial is made up of a module, two windows and a routine. We already explained the purpose of the windows in a previous issue.
The module is an unglorified application. The main difference is that you can’t compile a module into a stand alone application (unlike an application). A module can be promoted to an application (or vice versa) by checking checkbox Application in the Module Definition Box. A module serves a number of purposes:
- It allows one to group objects logically. Handling of large projects is greatly facilitated.
- It allows components to be reused. For example, assume the setup program included in this archive is to be used for many different applications. Create a module once and use it many times. When you insert a module, you are automatically inserting all the objects it requires.
- Module level development. When developing complex applications, a programmer (or teams of programmers) may be working of different facets of the final application. Each person/group works on his or her own module and fully tests that component. (Although you can’t make into an exe, you are allowed to test any object in MSM-Workstation).
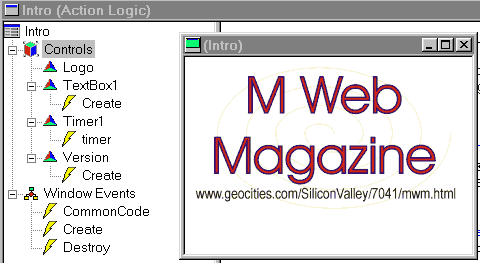
Modules may have or may lack code within them. Do not mix up code with objects. For example if you click Element – Actions for Module Intro, you will observe that it is empty.
Analyzing Application Tutorial
N DBNAME,Result

    %%DoWin(Intro)

    S DBNAME=%%RetCode

    Q:DBNAME=""

    %%DoWin(MainMenu)

    S Result=$$UNMOUNTM^%msv("MWMdb")

    I Result<0 D E^%msgbox("Unable to Close Database","MWM007")

    Q
The application calls up Window Intro. Upon termination, a value will be passed by Intro to Application. The macro %%RetCode, stores what Intro has returned in DBNAME and stops program execution if it is null. If DBNAME is not null, it means that the database has been successfully loaded and thus the Window MainMenu can be called up.
When the user exits from MainMenu, the program will unmount the database associated with the moniker MWMdb and gives an appropriate error if something goes wrong. More on monikers below.
Window Intro

Window Intro lacks a title bar. You can set these settings either through the Property bar of via Element – Definition.
 You should be very
careful about the paths to graphics. MSM-Workstation does not embed them within it the exe
and by default when you insert a graphic into a window the full path leading to the
graphic will be stored. This will cause the program to abort if you attempt to run the
application on a different computer. It is therefore advisable to remove the path, leaving
only the name. Then make sure that the exe and the graphic are installed in the same
directory.
If you place a bitmap with the same name same name as your executable file in the directory, this file will automatically be displayed for a short while when you run it. This is identical to the box displayed by many Windows 95 programs when you execute them.
Window Install: Code Analysis
Window — Create
; When display is changed after installation,
the window may not display correctly
N Size,Val
%%Get(Logo.SizeWidth,Size)
%%Set(..WinWidth,Size)
%%Set(Logo.PosTop,0)
%%Set(Logo.PosLeft,0)
%%Get(Logo.SizeHeight,Size)
%%Set(Version.PosTop,Size)
%%Set(Version.PosLeft,0)
%%Get(Version.SizeHeight,Val)
S Size=Size+Val
%%Set(TextBox1.PosTop,Size)
%%Set(TextBox1.PosLeft,0)
%%Get(TextBox1.SizeHeight,Val)
S Size=Size+Val
%%Set(..WinHeight,Size)
D JustifyW^%ViEg1(ViEWcwin,$G(ViEWsets("PosJustifyH"),"L")
,$G(ViEWsets("PosJustifyV"),"C"))
The Window – Create event adjusts the window so that all items are positioned properly. I have noticed that when changing the monitor resolution windows might not display correctly. This window has been set so that the user cannot resize it or move it and therefore the proper display becomes important. Calling upon the SizeWidth and SizeHeight of the objects, one computes the proper sizes and resets the window to the proper size. Finally JustifyW^%ViEg1 allows you to position the window. You have to specify two parameters Horizontal and Vertical Justification. The tables below list the parameters that can be passed.
PosJustifyH |
PosJustifyV |
||
| Left | L | Top | T |
| Center | C | Center | C |
| Right | R | Bottom | B |
In our tutorial program notice that the window progresses left to right at the middle of the screen.
Control Timer1 — timer
N DBNAME
%%Set(Timer1.Active,0)
S DBNAME=$$Init
%%Return(DBNAME)
A timer object will cause the event associated with it to be triggered every so often (you set this value). In our case the timer is used to call function $$Init (in Common Code) and return to the calling module the database name and path or null (as we mentioned above).
We also disable the timer here--%%Set(Timer1.Active,0). Replace 0 with 1 to enable it again. The code tide to this event could have easily been placed in Window – Create, but the problem is that the mouse pointer changes to an hourglass during this event. We wanted a normal pointer. We encourage you to think of other alternatives to problems you may encounter, but always keep in mind what would happen if, for example the Window loses focus and gains it again. For example the Window Enter even will trigger each time this happens.
| Chris Bonnici email: chribonn@softhome.net |

