
Click on the little white triangle at the upper right and select the Blend Transparancy feature.
Click in the A column to the right of the Diffuse color to bring up the Texture A box. Select a texture; the Desert Sandstone texture works well for Jupiter-like planets. Make sure the mapping mode is set to Object Space.
In order to make half the planet invisible, well need to use an alpha map in the transparancy channel. Click in the B column to the right of the Transparancy setting. In the upper right corner of the Texture B box click on the small white triangle. Select Basic:Basic Altitude. Click on the pink glass bead to get into the Deep Texture Editor. In the Component 1 box, be sure that the 'A' is selected for Alpha Map. You can deselect the C and B for Color and Bump Maps; we won't need them.
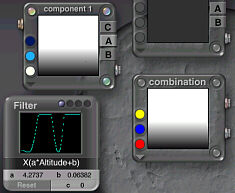
At the bottom of the screen click on "Filter" to call up the filter box. The equation should read X(a*Altitude+b). Adjust the value of 'A' to about 4.27 and adjust 'B' to about zero. The screen should look like the image below.

Leave the Deep Texture Editor. Set the gradient componant to Object Space. Make sure the Specularity and Ambience are set to zero. Keep the Diffusion low and adjust the Transparancy to about 20%. Leave the Material Lab.
The top half of the sphere should be visible and the bottom half should gradually fade to being transparant. If your planet doesn't look like this you may need to adjust the A and B values in the Filter box. Rotate the sphere so that the crescent is on the side. Enlarge the sphere and move it as far from the camera as you can. This will allow the haze to partially obscure the planet. Your planet should look like the image at the top of the page.