

Click on image below to view animation.

 Start with a new scene file in Bryce. Go to the File menu and select Animation Setup. Create an animation 8 seconds long at 15 frames per second. Create a terrain and click on the [A] icon to enter the Object Attributes box. For the Size coordinates, enter values of X=1000, Y=25, Z=1000. You can adjust the height of the terrain to range from large stormy waves to low peaceful waves. Leave the Attributes box and click on the [E] icon to enter the Terrain Editor.
 With the timeline set on the first frame, hold the Ctrl and Shift keys as you click on the Fractal button. This generates a realistic fractal terrain that will serve as our ocean. You can adjust the height of the preview terrain by holding the Ctrl key as you drag-click the mouse.
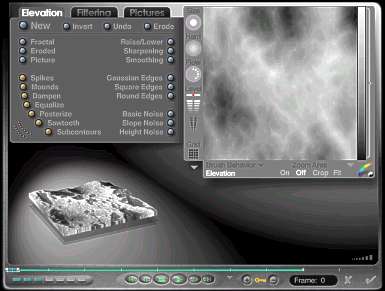
 You may need to click the Fractal button a few times to get a terrain that looks good. Look for terrains that are fairly level. Avoid ones that have extreme peaks and valleys. When you get one you like, set a keyframe by clicking the + sign next to the key.

 Advance the timeline to the 2 second mark and Ctrl-Shift click the Fractal button to generate another terrain. Set another keyframe.
 Repeat these steps at the 4 second, 6 second, and 8 second marks. You can use the
  buttons to play back the animation within the Terrain Editor. If you don't like one or more of the terrains, don't panic. Just advance the timeline to that keyframe, click the - sign to the right of the yellow key, and generate a new terrain. Don't forget to set a new keyframe. When you are happy with the results, leave the terrain editor.
 Click on the
  icon to enter the Advanced motion lab. Click on the name Terrain in order to expand the hierarchy. Click on the word Geometry. A blue, diagonal, straight line should appear in the Time Mapping Curve Editor. The horizontal dashed lines represent the keyframes that we set in the Terrain Editor.
 When you pass the cursor over the blue line it will change to a pen. Click on the blue line where it crosses the dashed lines and a yellow dot appears. You can zoom in to make it easier to see by dragging the magnifying glass around the area you want to enlarge. Zoom back out by holding the Shift key and clicking anywhere in the window.
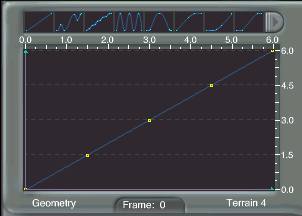
 Zoom in on the lower left corner of the window. Add a point along the line and drag it to form a curve as shown below.
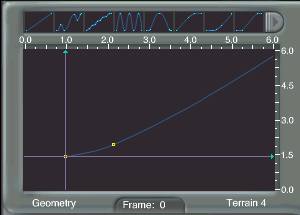
 Zoom in on one of the points where the blue line crosses the dashed lines. Add a point on either side of the original point and shape the curve as shown below. This will smooth the transition between keyframes and give the waves a more fluid and realistic look.

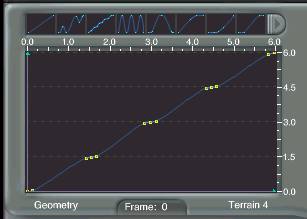
 Repeat this last step for the other 2 points. Zoom in on the upper right corner of the window and add a point. Shape it as you did the lower left corner. When you are done the blue line should look like the image below.
 Leave the Motion Lab. In the main window switch to the top view. With the timeline set on the first frame, position the terrain so that the camera is in one corner. Set a keyframe for Terrain:Position.
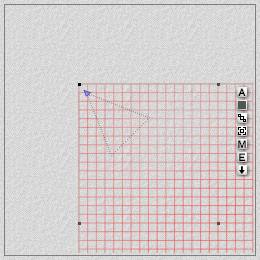
 Advance the timeline to the last frame. Move the terrain so that the camera is about 1/5 of the way into the terrain. Don't move the camera, just move the terrain. Set a keyframe for the terrain's position. As the terrain moves past the camera it will give the illusion that the large swells are rolling along.

 Click on the [M] icon to enter the Materials Lab. Choose one of the water presets from the Waters & Liquids library. In the Materials Lab, set the Transparancy to zero. Adjust the frequency of the texture until it looks right to you. Here's the most important part; be sure that the mapping mode is set to World Space. This will allow the texture to remain still as the terrain moves past the camera. Leave the Materials Editor.
 You can render a quick wireframe version of the animation to see how it looks. Go to the File menu and select Render Animation. After you have selected your settings, hold the Shift key as you click the 'check mark' in the lower right corner. In a few minutes you'll have a wireframe animation of your waves. If you don't like the way it looks, go back into the Terrain Editor and change some of the terrains.
 Adding some fog to the scene will help hide the fact that the terrain is not an infinite plane. Also, keeping the sun fairly low in the sky will exaggerate the shadows and cause the waves to stand out more. When everything is ready, render your animation and enjoy the show.