So, you removed the objects from the monolith application and put it on the DPB server. Now what? How do you expect your application to access this NVO? In fact, if you try to regenerate the w_employee window right now PowerBuilder is going to complain that nvo_employee is missing. This where 'proxy' objects come into the picture. As the name suggests, proxy objects are not the 'real thing'. They are just a place holder for the actual object that is created and run on a DPB server. Let's understand how to generate and use proxy objects.
Generating Proxy objects
Proxy objects are generated using the Project painter. Open the pbserver application in
PowerBuilder. Click on the 'Project' toolbar button ![]() and select 'New' to create a new PowerBuilder
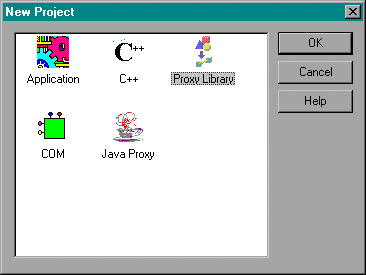
project. The following window will be presented to choose the type of objects that you
want to generate -
and select 'New' to create a new PowerBuilder
project. The following window will be presented to choose the type of objects that you
want to generate -

Select 'Proxy Library' and click on OK. The project painter will open with a new untitled project.
Next click on the 'Properties' toolbar icon ![]() to open the 'Properties for Proxy Library' dialog.
Specify 'proxies.pbl' as the Output Library and click on OK.
to open the 'Properties for Proxy Library' dialog.
Specify 'proxies.pbl' as the Output Library and click on OK.
Now, you need specify the NVOs for which proxy objects are to be generated. You do this
by clicking on the 'Select Objects' toolbar icon ![]() to open the 'Select Objects' dialog.
to open the 'Select Objects' dialog.
'Libraries' lists the PBLs defined in the applications library path which in our case is pserver.pbl and remoteobjects.pbl. Check remoteobjects.pbl to make the objects in it available for proxy generation. When you do this nvo_employee will become available in the 'Objects' list. To generate a proxy for it check the checkbox to its left. Click on OK.
Save the project in the remoteobjects.pbl. We are all set to generate the Proxy
objects, so click on the 'Build' toolbar button ![]() . PowerBuilder will create proxies.pbl and create a proxy
for nvo_employee in it. The name of the proxy is the same - nvo_employee. But it's not a
real object and hence you cannot open it in any painter.
. PowerBuilder will create proxies.pbl and create a proxy
for nvo_employee in it. The name of the proxy is the same - nvo_employee. But it's not a
real object and hence you cannot open it in any painter.
Using Proxy objects
To use the proxy we just generated, open the pbaccess application in PowerBuilder and include proxies.pbl in the library path. Now, if you try to regenerate w_employee it will generate successfully. But the application will still crash when you try to access an instance variable or call a function on nvo_employee. This is because you haven't yet told PowerBuilder that the corresponding object is to be created remotely on the DPB server. To do that we'll have to use a 'connection' object and tweak the creation code a little.
Connecting to the DPB Server
Connecting to a DPB server is similar to connecting to a database. Instead of a 'transaction' object we have use a 'connection' object. With the pbaccess application open, define a global variable 'gcon_dpb' of the type 'connection'. We'll create this object and connect to the DPB server in the open event of the application. Here's the modified code for the open event -
pbaccess::open
gcon_dpb = Create connection
gcon_dpb.driver = "WinSock"
gcon_dpb.application = "pbserver"
gcon_dpb.location = "localhost"
If gcon_dpb.ConnectToServer() <> 0 Then
MessageBox("Error when trying to connect to remote server",
gcon_dpb.ErrText)
Destroy gcon_dpb
HALT
End If
Open(w_employee)
The 'driver' property for the connection object specifies which driver should be used to connect to the DPB server. The 'Application' property specifies the name of the DPB server. We have configured our DPB server to run as a service called 'pbserver', so that is what goes here. The 'location' property specifies the IP address of machine the server is running on. Since in the development phase we'll be running both the server and client on the same machine we'll just use a IP location called 'localhost'. For most TCP/IP setups, this location maps to a special IP address - 127.0.0.1 - known as the 'loopback' address. IP addressing is an extensive topic, but for the time being it will suffice to understand that this is a special address that just points to same machine. The rest of the code uses the ConnectToServer() function to establish a connection with the DPB server and if successfully opens the w_employee window.
The close event of the application disconnects from the DPB sever and destroys the connection object.
pbaccess::close
If gcon_dpb.DisconnectServer() <> 0 Then
MessageBox("Error on disconnecting from remote server",
gcon_dpb.ErrText)
End If
Destroy gcon_dpb
Remote Instantiation
All that is left now is to change the way nvo_employee is instantiated. Here's the changed code for the open event of w_employee.
w_employee::open
gcon_dpb.CreateInstance(invo_emp, "nvo_employee")
this.event post ue_refresh()
As you can see, the only change required to instantiate nvo_employee remotely on pbserver was to replace the CREATE statement with the CreateInstance() function. The rest of the code will remain untouched.
Testing the distributed application
To test the server and client components in action do the following -
- Open the server application pbserver in PowerBuilder. Start the database and run the application.
- When the console window comes up, click on 'Start' to start the server
- Open another instance of PowerBuilder. This time open the client application pbaccess, run it and test it.
The following sections will describe what you need to do to deploy this application to a production environment.

Introduction
Strategy
Building the monolith
Building the DPB Server
Building the PB Client
Setting up the DPB Server
Deploying the PB Client