Tying a sash
David M. Delaney
ddelaney@sympatico.ca
October 27, 2006
Here is a superior way of knotting the sash of a bathrobe, house coat, or kimono.
Ashley's Book of Knots (ABOK) [1] identifies two knots for a
sash, ABOK # 1223, and ABOK # 1224 . ABOK # 1223 is tricky to tie and
untie. ABOK # 1224 is easy to tie and untie, and is a good knot
for the purpose. Both of these knots are difficult to tie snuggly
around the waist. If we base a sash knot instead on ABOK #
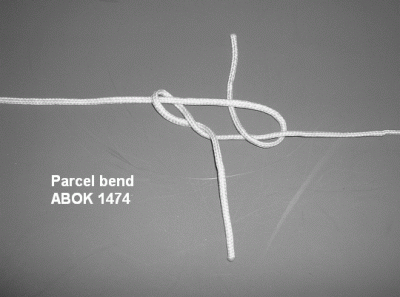
1474, a knot that Ashley does not mention as a sash knot, we get a knot
that is easy to tie to any degree of snugness around the waist, and is
easy to untie. As secondary benefit, we learn (and practice often) one
of the best knots for tying packages or joining two pieces of
twine. Here's what Ashley has to say about ABOK # 1474. [2] "The
Drawing Bend, Harness Bend, or Parcel Bend [The various names by which
Ashley had found ABOK # 1474 to be known. DMD] is about the most
practical bend for twine. There is no danger of capsizing as
there is with the Weaver's Knot, and it is very secure. It has an added
feature which makes it invaluable in parcel tying: it may be
tied tightly while under tension."
A bend is a knot that joins two ends of rope. Of the three names Ashley gives for ABOK # 1474, I prefer "parcel bend".
The parcel bend may be modified to make it into a sash knot by
slipping it -- by pulling through a bight rather than an end as the
final step, making it into a slip knot.
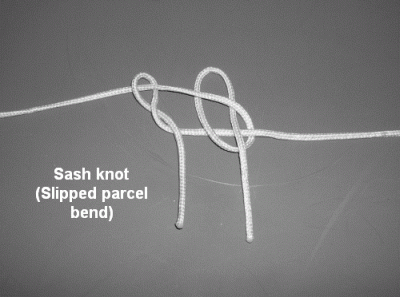
Procedure for tying the sash knot.
Start with the sash passing behind your back. Tie the sash across your
front by the following procedure. While looking at the following
pictures, imagine that you are looking
down at your front and are tying the knot around your waist by knotting
it in front of your body.
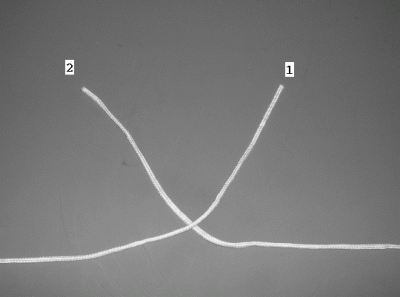 Step1 Place the end of the sash coming from the left side
of your body, 1, over the end of the sash coming from the right
side of your body, 2.
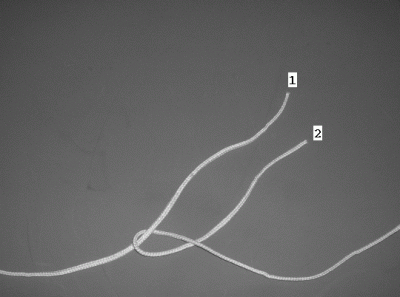 Step 2 Loop 2 up and over 1 and under itself toward the right.
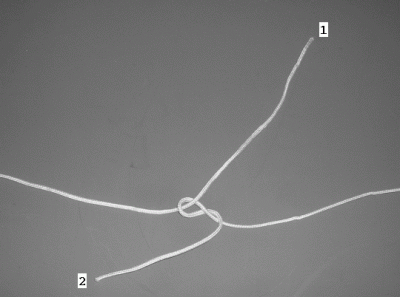 Step 3 Pull 2 back over itself to the left to form a "crossing knot" in 2.
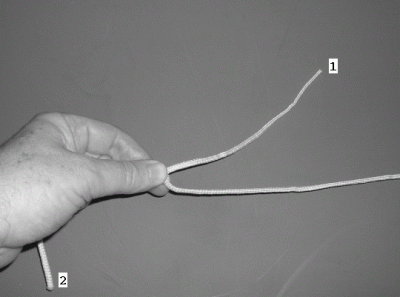 Step
4 Snug up the crossing knot formed by 2 and pinch it around the
leftward extension of 1 with the fingers of the left hand, leaving 1
straight as it passes through the crossing knot in 2. Grasp 1 in
the right hand. Pull to the right with the right hand tightening the
sash around the waist as 1 slides through the crossing knot in 2. The
grip of the left hand keeps the sash from loosening when the right hand
stops pulling on 1.
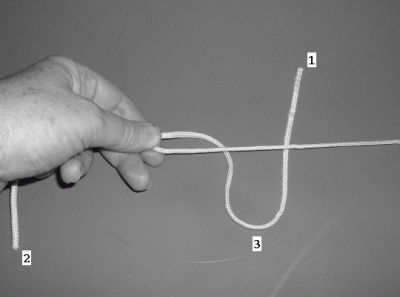 Step
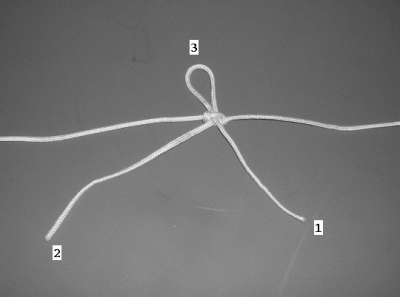
5 Keeping the sash from loosening by the grip of the left hand,
tuck a bight, 3, of 1 under the rightward extension of the tight
sash. The diraction of the tuck will be upward against your body.
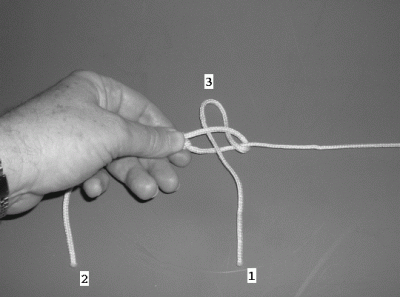 Step 6 Push the bight, 3, through as shown. Pull the bight 3 with the right hand to tighten the knot.
 Step 7 The finished sash knot. Pull on 1 to untie.
References
[1] The Ashley Book of Knots, by Clifford W. Ashley, 1944, Doubleday, New York.
[2] Ashley, op. cit. , p. 267
David Delaney home


 Step1 Place the end of the sash coming from the left side
of your body, 1, over the end of the sash coming from the right
side of your body, 2.
 Step 2 Loop 2 up and over 1 and under itself toward the right.
 Step 3 Pull 2 back over itself to the left to form a "crossing knot" in 2.
 Step
4 Snug up the crossing knot formed by 2 and pinch it around the
leftward extension of 1 with the fingers of the left hand, leaving 1
straight as it passes through the crossing knot in 2. Grasp 1 in
the right hand. Pull to the right with the right hand tightening the
sash around the waist as 1 slides through the crossing knot in 2. The
grip of the left hand keeps the sash from loosening when the right hand
stops pulling on 1.
 Step
5 Keeping the sash from loosening by the grip of the left hand,
tuck a bight, 3, of 1 under the rightward extension of the tight
sash. The diraction of the tuck will be upward against your body.
 Step 6 Push the bight, 3, through as shown. Pull the bight 3 with the right hand to tighten the knot.
 Step 7 The finished sash knot. Pull on 1 to untie.