Reviving those old good times...
| ATARI
2600 / PC Reviving those old good times... |
 |
Idea & realization: Hernan C.
This report explains how to connect an Atari 2600 joystick to the PC through a standard PC joystick (analog) as the interface.
The advantages of this system are that it works with any emulator of Atari (that accepts joystick of PC) and it doesn't require any software or extra driver, since the Atari joystick will behave as a normal PC joystick, plus, the possible delays in the response caused by the drivers for parallel port used in the typical interfaces are avoided. As disadvantage, for the implementation of this system, you need to modify the PC joystick and the Atari joystick (although these alterations don't affect the individual operation of each one).
This device works fine as much in the PC mode as in the Atari mode and it was tested in several situations and different hardware. However, no responsibility will be accepted by hardware and/or software flaws (Atari2600/PC), neither no operation guarantee will be given. The application of this technique will be at your own risk.
Required elements:
| - Atari 2600 joystick |  |
| - PC joystick , It's highly recommended a simple and cheap Pad type (15-20$) |  |
| - Multiple cable of 7 threads ~6ft (you can use also one with more threads, for example 9 leaving disconnected the surpluses) |  |
| - DB-9 plug (female) |  |
| - DB-9 plug (male) |  |
| - Switch of three pins (two positions) |  |
| - Welder, tin, screwdriver etc. |
Description:
The connection device is
divided in two parts; one is the Atari joystick with some
internal modifications and a connection plug also modified (Image) and another is the PC joystick that will accept
the connection of the Atari joytick by means of other alterations
(image).
To clarify the idea, in the following chart the possible
connection configurations can be seen after carrying out the
changes in the joysticks.
 |
Connection
scheme showing the Atari joystick onto the PC through the
PC joystick. (The switch must be in the PC position) |
 |
Connection
scheme showing the Atari joystick onto the Atari 2600 console. (The switch must be in the Atari position) |
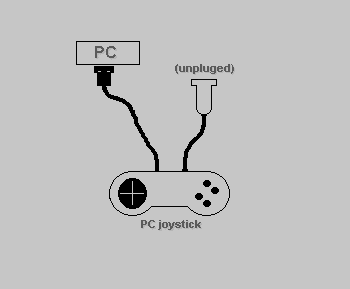 |
Connection scheme showing the PC joystick onto the PC. |
Part #1: How to modify the PC joystick:
To make the required changes, it will be necessary to add to a PC joystick an entrance (by means of a DB-9 male plug) to be able to connect the Atari joytsick there. Notice: it will be indispensable to dismantle the joystick!
The new extension will contain 7 pins connected as follow:
One pin to the
common direction point (common to all the directions of the pad,
up, right, etc.)
Four pins connected each one in a direction point of the pad (up,
down, right, left)
Another pin will be connected to one of the two points of the
main shot button.
The last pin will be connected to the other point of the main
shot button.
The circuit inside the joystick would be this way:
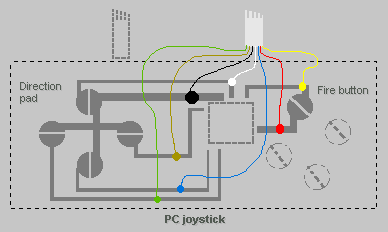 |
In dark-gray the original part of the board is represented, the other colors show the added connections.
Notice: To avoid interfering with the operation of the joystick controls, it is not advisable to make the weldings exactly in the points of contact, but in some homologous point that is communicated by the circuit (simply by following a furrow from the point of contact to find an appropriate place where to perform the welding).
In this image you can appreciate the modified interior of the joystick, the marked connections with a cross are not part of the project, but rather they are refections to amend parts of the board that were broken.
After carrying out the connections it will be necessary to perforate a hole in the joystick cover to allow to pass the cable since now the joystick will contain two cables (the original that is connected to the PC and the new one that it connects the Atari joystick).
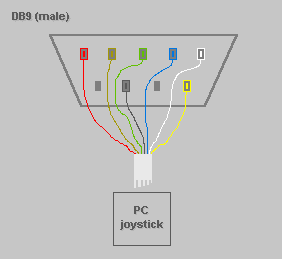
Once the cable is inserted for this hole, make a cut to about 3 or 4 inches and connect the DB-9 plug (male) in the following way:
(Side where the cables will be welded)
 |
...Assemble the joystick again and place the helmets to the DB-9 plug to concluding with the first part of the project!
Part #2: How to modify the Atari joystick:
The modification of this joystick consists on changing the cable (passing from 6 to 7 threads), replacing the plug by one that will also have a tiny switch and removing of the board the union between the button contact with the master line (connecting that free button contact to the extra thread of the new cable). Notice: it will be indispensable to dismantle the joystick!
-Joystick board modification:
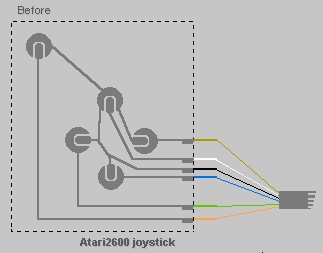
The first step to modify the board is to remove some of the connection material - striping carefully with a cutter - that unites a point of the shot button with the master branch (leaving this point disconnected of the common branch).
After this it is necessary to retire the cable (removing carefully each thread off the board).
Once retired the original cable will have to insert the new cable for the hole of the joystick and to weld the threads to the the board terminals respecting the colors (if the new cable doesn't have the ideal colors, kept in mind for that color you substitutes each one, in this example the orange thread is replaced by the yellow thread). Finally it is necessary to weld the red thread to the free point of the shot button.
Circuit:
 |
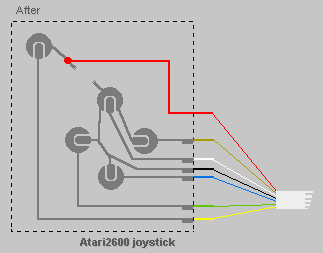 |
Observe you that in the modified circuit, part of the board connection material has been removed, the red thread has been connected to the shot button part that is free and the orange thread has been replaced by its substitute yellow.
This image shows how would be the interior of the joystick after the modification (the image here presented is of a standard joystick and it was altered to show the modifications because the joystick in which these alterations was made, it is too much repaired by other reasons without relation to this project)
-Substitution and modification of the joystick plug:
When replacing the joystick cable we will also leave aside the plug (that comes together to the original cable). The new plug will have an extra thread connected in one of its pins and it will also have a switch that, depending on the plug and switch model, won't be very complicated to adapt.
The circuit inside the plug will have the following disposition:
(Side where the cables will be welded)
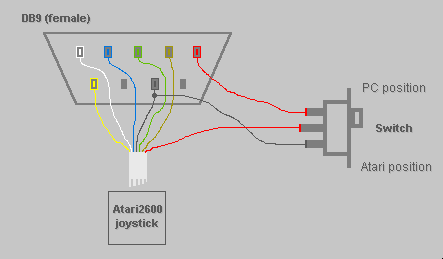 |
When the connections are done, the last step will be to adapt the switch to the case of the DB-9 plug and to arm it. The switch to use will have to be as smaller as possible to allow an easy installation inside the plug (in this example a linear switch was used, however, you can also use one of the type 'lever-stick' that requires only a small hole for its installation).
This image shows how would be the adaptation in the plug.
Note: it is possible (and easier) to adapt the switch directly in the joystick, but the original joystick aesthetics would be altered, so, place the switch there as your own choice.
To include the switch in the joystick instead of the plug, the complete circuit would be this way:
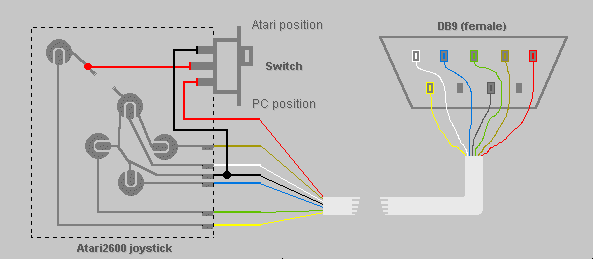 |
*This diagram shows the possible inclusion of the switch inside the joystick instead of being in the DB-9 plug, please DO NOT CARE ABOUT THIS CIRCUIT and forget it, if you place the switch inside the plug.
...If you have followed the whole procedure appropriately, arm your Atari2600 joystick, it now will work as much for this console as for the PC (connecting it to the PC joystick that you have modified) simply by changing the switch position!.
-Ending comments:
Although the switch is only required for the shot function, it is advisable to always verify that the switch is in the Atari position before connecting it to this console. If you want it, you can connect an original Atari joystick (without altering) to the modified PC joystick, but in this case you will play only to those video-games that don't require the use of the shot button (because this won't work without the necessary modifications).
IMPORTANT!: If you carry out this work, please send your comments it would be very appreciated , Good luck!
END.
*This material is exclusive property of Random'64 and cannot be used in any other publication without expressed authorization (being outside of this exclusivity the initial image "Have you played Atari today" property of Atari®).
Contact | Random'64 Home Page | More docs
Copyright ©  .HCC. ~Software~ -2000-  Bs. As. (Argentina)
www.geocities.com/hcc.soft  ,  www.emuhq.com/random64