1. Introduction
1.1 Features 1.2 Version
2. Setting the Folder
3. Folder Browser
4. Grid Editor
4.1 Editing Modes 4.2 Additional Properties
4.3 New Crossword 4.4 Saving Crossword
4.5 View Options 4.6 User Encoding
5. Text Editor
6. Print-Preview
6.1 New Locale File 6.2 Postscript File 6.3 HTML File
7. Header
8. Details
| 1. Introduction |
CPT Editor or simply Editor is a name for collection of modules maintaining Data Folders. It is not a separate application and can be started only in the programs CPT Diagrams and CPT Crosswords.
It is supposed that you have looked at "CPT - The Primer" for the basic notions and here the details of using the Editor are described.
Several modules having own windows implement the features described above. These modules are Folder Browser, Grid Editor, Text Editor, Print-Preview, Header, and Details.
The current version of CPT Editor is 1.2.
| 2. Setting the Folder |
The Editor will not start if there is no valid folder defined.
In the top window of the running program there should
be Browse tab where you can set the folders.
First, in the Folder Type you have to select the type, then press
the folder button ![]() and select the directory
location for the folder.
The name of the folder will appear in Folder field.
The names of Source
and Target files are built into CPT and can not be set here.
You can set folder filters using
the button on the right of Folder Type field.
For example, if you set in Folder Filters dialog
the dimensions "15x15",
only crossword sets of that size will be shown in Folder Browser.
and select the directory
location for the folder.
The name of the folder will appear in Folder field.
The names of Source
and Target files are built into CPT and can not be set here.
You can set folder filters using
the button on the right of Folder Type field.
For example, if you set in Folder Filters dialog
the dimensions "15x15",
only crossword sets of that size will be shown in Folder Browser.
You can have several directories of the same folder type, for example, Library type directories 'diagrams' , 'grids', and 'crosswords'. To switch between the folders, use the steps described above. All operations will be only on the selected folder - for example, when you save the Source or the Target, they will be written into the current library directory or the automated queries will be on the current folder settings. The operations available from the top window are described in the manual of the CPT program you are running.
| 3. Folder Browser |
When you define some how the folder in the top window of the running program and press the button Start, the Folder Browser will show in a form depending of the folder type. Here are the pictures for Files and Library types:
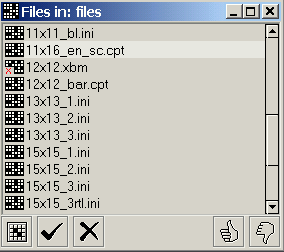

In the folder's list box, the files recognized by the program will appear.
With the 'View Options' button (first from
the button bar)
you can control which windows of the Editor to be shown.
With the 'Select' button you can mark/unmark
items from
the folder's list for selection. If the item is library file,
all crosswords from this library will
be selected.
Using the 'Delete' button, the items could be marked/unmarked to delete.
These operations will be executed
when you press the 'OK' button.
If the folder is Base Words/Clues you can select only one file,
and after pressing the OK button, the file will be copied
as your new Base Words/Clues. Instead of Grid Editor,
a window displaying the CTree header will be shown
for these two folder types.
The second form of the browser has navigation panel for the selected folder item. On the top is the size of the item (columns by rows). The Total field shows the number of crosswords in the set. In the Current field you can select manually the current crossword from the set. What follows is the navigation buttons bar. The first four buttons are obvious, we hope. With the 'Animation' button you can start an automatic browsing of this set and with the most right button you can stop this process. When the focus is on some of these buttons, the keyboard navigation keys (arrows, Page Down, Page Up) and Insert, Delete keys can be used as well. The check box Buttons wrap from Options dialog controls the behavior of these buttons (e.g. the wrapping for 'Next' button means that after the last item the first item follows). The Select and Delete check boxes play the same role as the buttons with the same names, but the operations are for individual crosswords from the set. Total Selected/Deleted fields show what you have marked to select/delete from the set till now. Since the Editor opens the whole crossword set (library file), to save your changes, two steps are required: a) save the changes in the window where you are working (e.g. Grid Editor) for the current crossword; b) click OK button in Folder Browser to save the whole library file as well.
In summary, the 'OK' button will execute all selections and or deletions, and if the current item is library file, it will be saved including the contents of library buffers and the pool, and excluding deleted/repeated crosswords.
The 'Dismiss' button will hide all windows of the Editor.
| 4. Grid Editor |
The check box Show Diagrams from Folder Browser's Options dialog controls the appearance of this window. It is the main module of the CPT Editor and most of the operations can be done here. The window shows the current crossword selected in the Folder Browser:
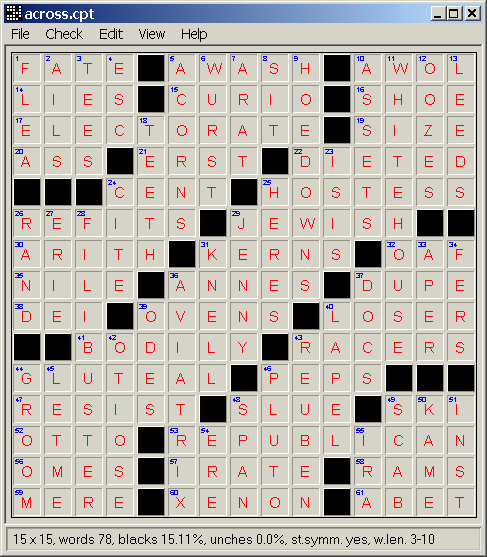
All messages are shown in the status bar. On start up the status bar contains some of the properties of the crossword. The rest of the properties can be viewed in Details window. It will be shown when the check box Show Details from the Folder Browser's Options dialog is checked.
Via the File menu you can create new crossword, save the current one, set the default user encoding, and define the options for Print-Preview module and run it.
Via the Check menu you can:
The Grid Editor starts in view mode. The editing modes can be set via the Edit menu.
In View Mode you can highlight the direction of across words with left mouse button and for down words use the right one. If the Edit Text window is showing, the words will be highlighted there as well.
In White/Black mode via mouse click the cells are toggled to white or black.
In Used/Unused mode the cells are toggled to unused or white.
In Letters ... modes you can edit the words via the keyboard. The keyboard navigation keys are working in these modes.
In Words Right/Down mode via the mouse you can set a sequence of cells forming a word. Just press the left button and drag the mouse in the desired direction and when the button is released, the selected cells will be cleared to white, and black cells (or black bars for barred type) before and after the word will be inserted.
In Words Left/Up mode via the mouse you can set a sequence of cells forming a word having reverse direction. Only in this mode you can define reversed words and you have to take care about the data format (it should be 'grids+' or 'crosswords').
Search Base Words mode will be enabled only if there are uncompleted words in the grid (if the grid is finished, you can search via the Check menu). When you click with left/right mouse button in the grid, the across/down word pattern will be searched in Base Words and you can select a word from the following dialog:

In Select Grid + Copy mode the selected part of the grid will be copied to the clipboard.
In Select Grid + Clear mode the selected part of the grid will be converted to all white cells.
In Paste Grid mode the clipboard contents will be pasted into the selected position. You can drag the paste rectangle or just click on the desired start position.
In Paste Horizontal Word mode the clipboard contents will be pasted into the selected position. You can drag the paste rectangle or just click on the desired start position.
In Paste Vertical Word mode the clipboard contents will be pasted into the selected position. You can drag the paste rectangle or just click on the desired start position.
Set All Lower Case will convert all letters in the grid to lower case.
Set All Upper Case will convert all letters in the grid to upper case.
Set Properties... will start the Additional Properties dialog.
The Undo should do what is supposed to do. Note that all global operations (changing case, encoding, and type) will not create undo record.
When you edit a crossword containing clues, all modes that can change the structure of the diagram will be disabled.
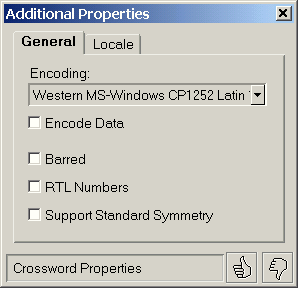
In Encoding select the encoding of the crossword. If it is just a diagram, leave the encoding to 'Default'.
Encode Data will force recoding of all data in the crossword. If it is not checked, you can change the encoding without recoding.
Barred will force conversion of the diagram to barred type. It will be disabled if there are any blacks or letters in the current diagram. Note that this is the way to create a new barred diagram, and after the conversion you should define the words using Edit | Words Right/Down or Words Left/Up.
RTL Numbers will force conversion of the diagram to RTL type (all across words will get direction RTL and their numbering will be RTL). It will be disabled if there are any letters in the current diagram.
Support Standard Symmetry will affect the modes View, White/Black, Used/Unused, Words Right/Down, Words Left/Up, and Select Grid + Clear. For example, in White/Black mode when you set a cell to black, its symmetrical cell will be set to black as well.
When you click on OK button, the selected conversions will be done without undo record.
To create new crossword select File | New | Same Size or New Size. When the current folder type is not 'Files', the New Size will not be available (the sets have a fixed size).
The Grid Editor will show new empty crossword with all cells white. You can paste any diagram or just start editing using the Edit menu.
If you want to create new special type diagrams like barred or RTL, this is the moment to start the Additional Properties dialog via Edit | Set Properties, and to set the desired features. If the diagram already contains something, the special properties will be disabled.
To save the current crossword select File and some of the available 'Save ...' menu items.
'Save' menu item is the main one used to save a changed crossword. If the folder type is 'Files', a backup file will be created and the current file will be updated. If the folder type is 'Library', the crossword will be saved in the library buffer or as new one in the pool and the current one will be marked as deleted. To save the whole library, you have to press the OK button in the Folder Browser as well. If you switch to other crossword in the library, the last changes will be lost if not saved at least in the library buffer.
'Save As New' item will be accessible only if the current folder is not of type 'Files'. CPT Editor maintains pool of new crosswords and this one will be saved there. The creation of the pool will be reflected in Folder Browser's field Total. It will be shown in blue color and the contents will look like "102+3", where the digit 3 is the number of new items in the pool. In order to save all new items, you have to press the OK button in the Folder Browser as well.
'Save As File' menu item is used to export the current crossword
in text file in several formats.
If the current crossword has words and clues, they could
be exported to file in CPT Text Dictionary format. Actually,
if there are no clues, the format will be text word list.
You can add these files directly to your Base Words/Clues.
If you select some of 'Diagram ...' data formats as output,
the diagram data only will be extracted
from the current crossword and
saved.
If you select 'GIF Image', a GIF file of the grid will be created.
Choose View | Options and the following dialog will appear:
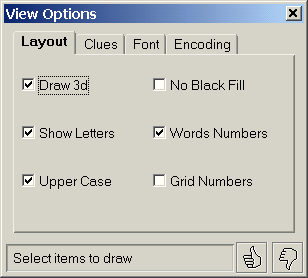
In the Layout tab you can define how the grid will be drawn. When Draw 3d is not checked the cells will be shown only in black and white color. If Show Letters is checked and the grid contains words, the letters will be shown. Upper Case controls the letter case of the words when they are drawn inside the grid. When No Black Fill is checked the black cells will be marked via single rectangle inside the cell. Word Numbers controls the showing of across/down numbers of the words. When Grid Numbers is checked the column and row numbers will appear on top and left side of the grid. The best way to understand these settings is just to play with the check boxes. Note that these options are in effect for the Print-Preview module as well.
The Clues tab contains options for the Edit Text window and for the clues.
When you check Edit Text Window the edit text window (Edit Text module) for the clues/answers and other text data will be shown. Via the Clues and Answers radio buttons you can select the mode of the window. Clues check box is equivalent to the Show Clues check box from Folder Browser's Options dialog. Position Below means that the edit text window will be shown in minimal form below the Grid Editor's window. Colors controls switching to white or color background in the window. RTL means right-to-left text. It is default for RTL scripts.
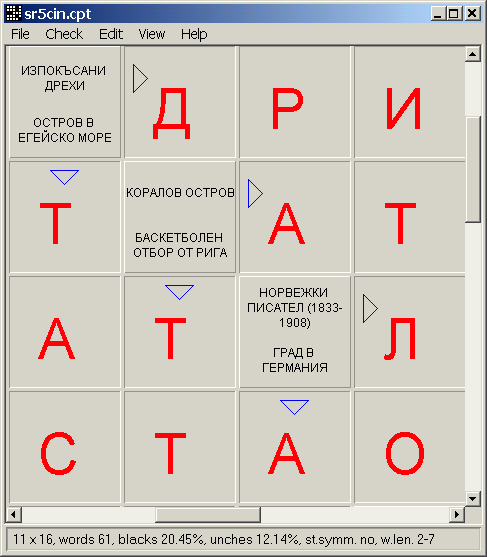
Show Clues Inside and Inside Marks check boxes will have
effect only if the diagram is of
Clues Inside or Scandy style.
Using the program menu Check | Check Clues Inside (Light)
you can invoke one of the algorithms for
analyzing these properties.
Generally, the clue positions are not saved by default and
if you don't see the clues inside, you have to run the check
(and save the crossword to save the clue positions).
Via Max Lines you can choose the number of lines used
to draw clues inside black cells. This number is used to
calculate the font size as well.
Upper Case controls the letter case of the clues when they
are drawn inside the cells.
To be able to see
the clues, you have to zoom to 3 or 4:
Via Font tab you can select the global font properties for the program. The Family combo box shows the Java supported font names. In the text field you can see a sample of the selected font. Note again, that the selected font is used by all modules in the program (except the Print-Preview).
The Encoding tab is only for Linux.
If Keyboard Converter is checked, the selected encoding will be used to convert the typed 8-bit characters to Unicode. For example, under KDE and Xkb On, if you want to use cp1251 for Cyrillic, you have to select the converter koi8-r (don't be confused that KDE3 is showing properly in all qt3 based applications the Cyrillic letters - it knows that the broken standard Xkb files by 'Cyrillic' mean only koi8-r, KDE 2 and 1 are not that smart and will show nothing..., of course, if you use a proper Xmodmap file or Xkb On with the right files, the converter encoding should be cp1251 in KDE, GNOME, etc.).
Clipboard Converter will be shown/available only if the Java VM is 1.3.1 and above. If you exchange data with applications supporting properly UTF8_STRING or COMPOUND_TEXT (all Java, KDE3 applications, Mozilla, etc.) you should switch off this flag. If switched on, the behavior is the same as for the keyboard converter.
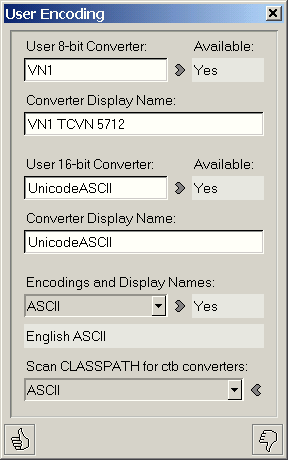
In the text fields User 8-bit Converter and Converter Display Name you have to enter the program name and the display name of the converter. The display name is free text but the program name should be known (see below). Via clicking the button on the right you can check if that converter is available. The software is testing the pair of ctb and btc converters and you can receive two error messages when the converter is not found. The same applies for the user-defined 16-bit converter.
The combo box below the label Encodings and Display Names shows the built in list of converter names and below are the display names. When the user converters are not defined, they will be shown as "User8" and "User16" as converter program names and "Reserved for User Defined ..." as display names. Again, you can check any converter from the list if it is supported by your Java RTE via clicking the button on the right.
The last combo box and the supporting 'Run Scan' button can be used to scan the Java CLASSPATH and to find all available ctb converters. The list will be sorted by the names and will include the built in converters (like VN1) in the current CPT program as well. Via the clipboard you can copy any converter name from the combo box and paste it into User ... Converter text field. This will ensure the correct name without "blind" checking. To test if the paired btc converter is available as well, you have to click on 'Check Available' button. The answers are "Yes", "btc only", "ctb only", and "No".
After checking the user-defined converter program name and entering the display name, you can click on the OK button and the setting is done.
If you want to remove the setting, delete the converter program name
from the text field and click on OK button. Note that if the removed converter
has been used as default converter for a crossword or
Base Words/Clues file encoding,
you will receive error message that User8 converter is not found.
CPT Converters
In addition to the numerous converters created by Sun, here are the converters built into this program:
Notes:
CyrBG converts the Cyrillic letters 'I' and 'i' (0xAA and 0xBA, both with grave) to \u040D and \u045D (Unicode 3.0 Cyrillic letters with grave). CyrMK converts the lower case Cyrillic letters 'i' and 'ie' (0x26 and 0x23, both with acute) to \u045D and \u0450 (Unicode 3.0 Cyrillic letters with grave). The characters mentioned are not part of any other Cyrillic 8-bit encoding and if the text includes any of them, you can not convert it to Cp1251 or ISO8859_5, the only targets are Unicode and UTF8. These letters are available in Unicode fonts e.g., in MS ttf "Palatino Linotype".
The converters defined/reported as 'btc only', can be used only for decoding of input text.
The crossword modules support just a single character (one-byte or two-byte Unicode) in a letter cell. This means that an encoding using two or more characters per letter should not be used.
| 5. Text Editor |
When the proper option is set in Folder Browser's Options dialog or in Grid Editor's View Options dialog, the following window will appear:
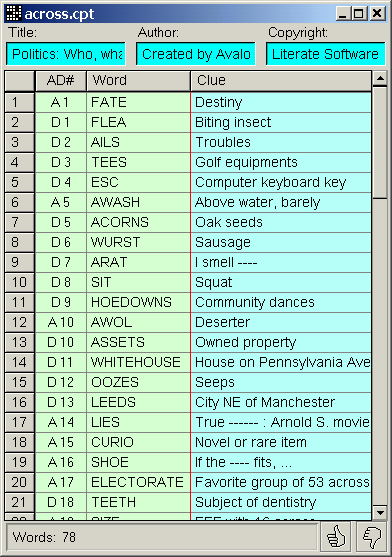
In the fields in the upper part of the window you can set the title and the other optional data identifying the crossword. A table with the words and clues/answers is shown below. The first column 'AD#' shows the number of the word prefixed with 'A' for across and with 'D' for down. The next column shows the words. You can copy a word to the clipboard via Ctrl-C. In the third column you can edit the clues/answers (when the mode is Clues the clues are shown, and when the mode is Answers the answers are shown).
To browse the table cells, use the keyboard navigation keys. To start editing a clue/answer without deleting the old contents, press the Insert key, or click with the mouse. Ctrl-C is copy, Ctrl-V is paste, and Ctrl-X is cut. To finish editing a clue/answer, press Enter or click on other cell. If you press Esc key or Ctrl-Z, you will exit the cell with undo.
A click with left mouse button over a table cell will transfer the focus to the cell and if the cell is row heading or in first column, will highlight the word in Grid Editor. Via right mouse button you can show the pop-up menu for copy, cut, and paste.
To save the new entered text, press the OK button, and when you finished with the set, press the OK button in the Folder Browser as well.
The editing of clues/answers is always allowed, even when the current data format is 'diagrams' or 'grids'. In these cases the saving of the library will not save the clues/answers. Instead, you can export the current crossword as text file and the clues/answers will be saved there.
| 6. Print-Preview |
This module is used to preview, to print, and to create Postscript or HTML file for the current crossword. To start it, select File | Document View-Print from the Grid Editor module. The options for the print layout should be set by the View Options and Document Options dialogs, started in the Grid Editor module. The first dialog is already described and here is the second:

In the Include tab you have to define all desired items from the crossword to include in the printout. Title Data will include title, author, and copyright data if available. Title Headers means that the headers of these items will be printed on the left. The Grid check box will include the diagram image and if Show Letters from View Options is set, the words will be included in the grid as well. Via the Properties you can include the crossword properties as separate section. The Clues or Words+Clues will include the clues as a separate section. Answers will include the words or printed answers (if available) as an additional section. Answers as Grid will force additional grid image with the words (valid if Answers is checked). The Page Banner when set will show on the bottom of the page the name of the crossword file and the current page number. Section Headers controls the showing of centered section headers.
The Format tab is used for additional formatting options. Compact Format means that the program will put the grid in the upper right corner and will select the number of columns of the text to minimize the used area. Some of the centered headers will be ignored or aligned on left. This flag will be ignored when the crossword has Clues In style or columns greater than 25. If Use Colors is not set, the printout will be in black and white only. The '... Columns' combo boxes define the number of columns for the corresponding sections. The number 0 is special case and it says that the section will be formatted in 'stream' layout (the items from the section are positioned on the same line, not on new line as in the case when the number is > 0). The data from the combo boxes will be ignored if Compact Format is selected. Draw White supersedes all other drawing styles - only the whites will be drawn as rounded rectangles. Again, the best way to understand the purpose of these settings is to make experiments.
In the Page tab you have to select the paper size and the margins. If you are not creating Postscript file and an analogous dialog appears from the OS print dialog, you have to select the same data.
The Font tab is similar to that of Grid Editor's View Option dialog but the parameters are for the printing. More precisely, the font encoding for Postscript file is very important when the crossword is not in English (see Postscript Files below). You should select scalable font for the proper layout.
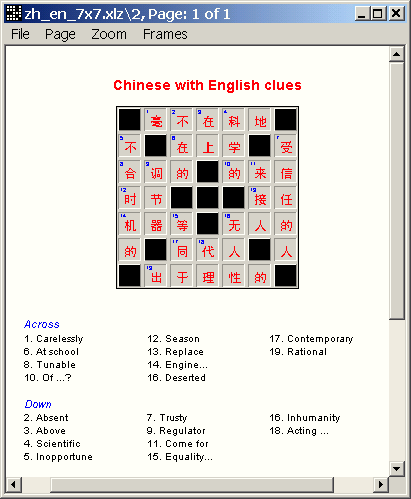
The Locale tab is the same as that of Grid Editor's Additional Properties dialog but the parameters define the printout locale. According to this setting, the program will look for a file 'doc_<locale>.properties' and all words used in the printout like 'across', 'down', 'answers', etc. are taken from this file. This way you can print e.g. Chinese crossword using English locale:
When in Grid Editor's View Option dialog Word Numbers is set off and Grid Numbers is set on, the formatting and ordering of Words/Clues sections will be by word coordinates by rows and columns (while the default ordering is by standard word numbers). This feature is used to print Arabic crosswords:
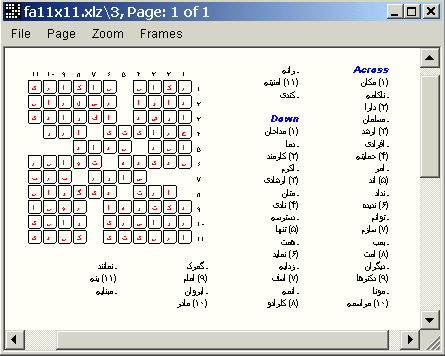
In this sample, Grid and Answers sections are included, the Compact Format and Draw White are on, and the bottom page margin is increased in order to pack the layout on top of the page. As you can see, the layout is RTL and the numbers are drawn according to the locale as well ('fa' for Farsi in this case).
Well, it is time to say few words about the Print-Preview window. Via the File menu you can print and create Postscript or HTML file. The Page menu navigates to next or to previous page in the view. The Zoom menu needs no explanation, we hope. The Frames menu allows showing in the view the frames of the page and/or the margins. The Print-Preview window reflects any change made in other modules and this way you can browse the crosswords directly in printout form.
The name of the locale-specific file for printing should be 'doc_<locale>.properties', where <locale> is ISO-639 language code [+ "_" + ISO-3166 country code]. If in the directory 'locale' the locale file for you language (e.g. Greek) is missing, do the following:
The file 'doc_el.properties' will be used when you set the Locale to 'el' or 'el_GR'.
In the File menu you can see two options: 'PostScript File...' and 'PostScript Raster File...'. The first option is intended for Ghostscript style files and you have to prepare a reference file for the fonts as described below. The second option means that the text will be sent as graphics to the Postscript file and you have not to bother about the Postscript fonts reference file. This option is available if you are using Java 1.4 or newer.
When the program is creating Postscript file, it first looks in directory 'locale' for a file 'pfonts.properties.<encoding>', where <encoding> is the code set via Encoding from Document Options | Font tab. For example, for Cyrillic printout, it is 'pfonts.properties.Cp1251'. This file contains mappings of the Java fonts to Postscript fonts, having the proper encoding. If the file is not found, the program uses standard font names and the default encoding is applied - this is usually the case when you print in English.
Before using this module, you should check/modify the template files in order to reflect you environment. In case you are using Ghostscript, you have to change its 'Fontmap' file according to the comments from our template files, and find fonts having the proper encoding.
Via the File menu you can create HTML file from the current crossword. There are several limitations however.
The layout will not be always exactly the same as in the preview. Crosswords with Clues In style are not supported. The drawing flags Draw 3D, No Black Fill, Inside Marks, and Draw White are silently ignored.
The grid is formatted as table in black and white. If you prefer the special drawing or insist on including clues inside, you can select from the File menu HTML and Grid Image Files. In this case a GIF image file containing the grid will be created as well, and it will be linked in the HTML file.
The crosswords using user defined encoding converter or Unicode will be written in UTF-8 encoding. The bidi processing for RTL scripts is left to your browser - 'direction:rtl' should be properly supported for text and tables.
| 7. Header |
When the Show Header check box from Folder Browser's Options dialog is set, the following will appear:

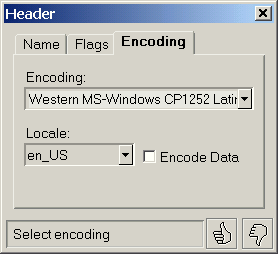
It is common dialog for all functions about the library headers. In this case in the Name tab you can change the name of the library file and when OK is clicked, it will be renamed. In the Flags tab you can change the flags for the Style, for the Stage and Marked. These flags are mainly for the user and they can be used as folder filters and for queries. In the Encoding tab you can change the settings for the Encoding and for the Locale. The Encode Data check box if set, will force converting of all text data in the library to the new encoding. For example, if you change the Encoding from "Cyrillic MS-Windows CP1251" to "Cyrillic IBM/MS-DOS CP866", set the Encode Data and click OK button, and all crosswords in the library will be converted to the new encoding. Be careful to change the encoding to new one, which can be mapped to the old, as in the example. If the Encode Data check box is not set but the Encoding is changed, this setting will be reflected in the header only.
The library conversions of Data Format, to RTL numbers, and data recoding to/from Unicode are not supported here. You have to select the library in the Source and in the main program use New Library dialog to set the conversions (and to save the new library).
| 8. Details |
This window shows the properties of the diagram,
which are not shown in the Grid Editor's status bar.
To start
it, set the check box Show Details from
the Folder Browser's Options dialog.
The properties are described in "CPT-The Primer".
There are some fields where you can enter user data.
The Marked and User Flag are single flags, the
User Data is an integer (0-255). This user information can be used for
the automated queries. To save the settings,
click the OK button and the OK button in Folder Browser as well.