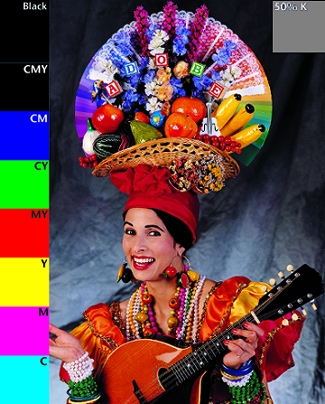
There are 2 solutions to this problem, the first and ideal solution is a is for the manufacturers of monitors to get their acts together and to properly colour and contrast test and adjust every single monitor produced. This would at least give us all a fighting chance of having decent colour for a few weeks, until degradation starts occuring in the picture tube. The manufacturer would also ideally provide a way for the end user (YOU) to adjust the colour levels externally and to provide an accurate reference card to facilitate this. Guess what? Manufacturers won't do this as it's too expensive, each monitor would need to be run up to full operating temperature (about 20-30 minutes) and then accurately calibrated, and reference cards would need to be produced, manuals written etc.
The second method is to use software correction to compensate for the differences in monitors. This compensation system is called 'gamma correction' and most of the better graphics programs allow for gamma correction to calculated and applied to the image. Gamma correction still ideally requires expensive manuals and reference cards but at least the cost is only borne by those who need accurate colour ... after all some kid surfing the web will never know the difference (oh yeah! it's this attitude that got us in this mess to start with!)
There is only one drawback to gamma correction and the software approach, and that is one that is often overlooked by hardware manufacturers I believe. What happens if the user is using a program that doesn't have gamma correction capabilities ... well considering that 99% of image viewers don't have gamma correcttion I'll let you draw your own conclusions, needless to say a cynic like myself might infer something about being back with cruddy colours but I'll not say that!
I see many monitors each year that have a 'gray' border about 15mm in from the edge of the screen. If you can see this then with your web browser minimised and no wallpaper being displayed then you should adjust the brightness until it dissapears. That gray line/region indicates over voltage is being applied to the picture tube and the results of overdriving a picture tube range from permature failure, fuzzyness and blown powersupplies!
Using the levels scale:
Scroll down this page and you will see a 'gray scale level image" adjust your background and contrast until you can see steps with the far right step being a nice white colour and the second last step just visible from the background. This may require some fiddling to achive but once done at least your monitor is in the right ball park to display decent images. (15 steps should be visible with the far right step being invisible and the second step being just visible)
When you have completed this step continue scrolling down for a colour balance test.
Unless you are an experienced electronics technician or have a monitor that has individually adjustable colours then the following image will only be able to provide you with a rough guide as to how accurate your monitors colour reproduction is.
If you have a monitor with adjustable colour for red, blue, green or are an electronics tech then follow the following instructions:
Adjust the colour levels so the centre section (the bit with the dots in it) colour shade matches exactly with the outer section of each colour block. When the Red, Blue and Green sections are properly aligned the gray section should also be aligned properly. Ideally this test should be performed with the image displayed as a standalone image and not in a web browser. Copy the file to your hard disk (right click on image and select save image as .. to save the image)
For those of you who aren't technicians or who don't have adjustable colour levels this will tell you how far off perfect your monitor actually is. Don't worry though as few monitors are perfect and most professional computer graphics programs such as Photoshop, Paintshop Pro and Corel have a system of electronic colour modification called 'gamma correction' that allows images displayed in these programs to accurately portray the real colours.
NOTE: Only suitably qualified and trained electronics technicians should ever remove the covers of a monitor and perform adjustments or repairs. If you fancy yourself as a tech because you've sucessfully built a few electronics kits heed my warning .... A monitor is no place for the inexperienced person to be playing around in. there are voltages there that WILL kill you if you happen to come in contact with them, no if's or buts about it, you will be killed outright. Monitors and TV sets contain voltages inexcess of 20,000 Volts with enough current to cause instant death. So if you aren't qualified and suitably trained DO NOT remove the case from a monitor under any circumstances, take it to a qualified service person!
Scroll down for the gamma correction image and a test image from Adobe Photoshop

